The major things to see when migrating from Exchange Server 2013 to 2019 are the requirements, limitations, and co-existence. For this free guide, we will assume that only one Exchange Server is installed.
Prerequisites for Exchange 2013 to 2019 Migration
If you are migrating from Exchange 2013 to Exchange 2019, you need to ensure the following before getting started:
- Update Exchange 2013 with the latest Cumulative Update 23 (CU23) released in July 2021 or later.
- Active Directory Servers must be hosted on Windows 2012 R2 Standard or Datacenter and higher with Windows Server 2012 R2 or higher Active Directory Forest functionality.
- If you still host Windows 2008 R2 domain controllers, you need to make sure that these are decommissioned before the installation and migration of Exchange 2013 to Exchange 2019.
- Exchange 2019 supports Outlook 2013 and higher.
Important Note: With Exchange 2019, you don’t have any Unified Messaging (UM). Thus, if you have Lync or Skype for Business Server, you will lose the ability to save voicemail messages in your mailboxes, and an alternative needs to be found, like CX-E or Azure Voicemail on Office 365.
Steps to Migrate Exchange Server 2013 to 2019
- Deploy Exchange 2019
- Install Windows Server 2019
- Install Exchange 2019 Prerequisites
- .Net 4.8 Framework
- Visual C++ Redistributable Package for Visual Studio 2012 and 2013
- Remote Tool, Administration Pack, and Windows Features
- Install Exchange Server 2019 using Setup Wizard
- Setup Outlook Anywhere
- Setup Service Connection Point
- Import Certificates from Exchange 2013 to Exchange 2019
- Export and import Certificates using PowerShell cmdlets
- Export and import Certificates using Exchange Admin Center
- Configure Exchange 2019 Virtual Directories
- Configure Virtual Directories on Exchange 2019 using EAC
- Configure Virtual Directories on Exchange 2019 using EMS
- Update DNS Records
- Move mailboxes from Exchange 2013 to Exchange Server 2019
- Move Mailboxes using EAC
- Move Mailboxes Using EMS
- Decommission Exchange 2013 server
- Conclusion
Step 1: Deploy Exchange Server 2019
Install Windows Server 2019 on a VM or Physical Machine
Start by installing Windows Server 2019 Standard or Datacenter on a Virtual or physical machine. Microsoft recommends installing Exchange 2019 on Windows Server 2019 Core, but the Desktop Experience feature is still supported. So, it’s your choice at this stage. You cannot install it on any other operating system.
If you install Management Tools on another machine, you need to install them on a Windows 10 64-bit edition. After installing and setting up Windows Server 2019, install the OS updates and following software.
Install Exchange 2019 Prerequisites
- .NET Framework 4.7.2 or later (preferably 4.8)
- Download the .NET 4.8 on your Windows Server 2019 machine and run the software package as an administrator.
- Accept the Terms and Conditions and then click ‘Install.’
- After the installation, click ‘Finish.’
- Then click ‘Restart Now.’
- Install Visual C++ Redistributable Package for Visual Studio 2012 and 2013
- Download Visual C++ Redistributable Package for Visual Studio 2012 and 2013 packages and install them as administrators.
- Install the Remote Tool Administration Pack and Windows features via PowerShell using the below command.
Install-WindowsFeature NET-Framework-45-Features, RSAT-ADDS, RPC-over-HTTP-proxy, RSAT-Clustering, RSAT-Clustering-CmdInterface, RSAT-Clustering-Mgmt, RSAT-Clustering-PowerShell, Web-Mgmt-Console, WAS-Process-Model, Web-Asp-Net45, Web-Basic-Auth, Web-Client-Auth, Web-Digest-Auth, Web-Dir-Browsing, Web-Dyn-Compression, Web-Http-Errors, Web-Http-Logging, Web-Http-Redirect, Web-Http-Tracing, Web-ISAPI-Ext, Web-ISAPI-Filter, Web-Lgcy-Mgmt-Console, Web-Metabase, Web-Mgmt-Console, Web-Mgmt-Service, Web-Net-Ext45, Web-Request-Monitor, Web-Server, Web-Stat-Compression, Web-Static-Content, Web-Windows-Auth, Web-WMI, Windows-Identity-Foundation
Step 2: Install Exchange Server 2019 using Setup Wizard
To install Exchange Server 2019, connect the Exchange Server 2019 media to the server machine and mount the ISO. Then open the Command Prompt window to navigate to the Setup.exe location using the cd (change directory) command.
Then run the below command in Command Prompt window to prepare the Schema and the AD.
Setup.exe /PrepareSchema /IAcceptExchangeServerLicenseTerms
Setup.exe /PrepareAD /OrganizationName:”Contoso” /IAcceptExchangeServerLicenseTerms
Note : If you send diagnostic data to Microsft, use /IAcceptExchangeServerLicenseTerms_DiagnosticDataON, and if you do not need to send diagnostic data to Microsft, then use /IAcceptExchangeServerLicenseTerms_DiagnosticDataOFF.
Here you have prepared the Active Directory to be Exchange 2019 friendly and now you can start the installation. Before you start, make sure that no new updates are available for the prerequisites you’ve installed.
- Now launch the Setup.exe.
- Accept the license agreement and click ‘next.’
- Select ‘Recommended settings’ and click ‘next.’
- On the Server Role Selection page, make sure to tick Mailbox Role and Management Tools and check ‘Automatically install Windows Server roles and features required to install Exchange Server.’ Click ‘next’.
- Choose the location of the installation of the Exchange Server and click ‘next’ (Make sure not to install Exchange on the system drive).
- Enter the organization’s name and click ‘next.’
- On the Malware protection setting, click No for now as this can be enabled in the future. You don’t need it for now.
- After the Readiness screen, the installation will start. After finishing, make sure again to see if any updates are available.
Step 3: Setup Outlook Anywhere
- Login to Exchange Admin Center and click ‘servers.’
- Select the Exchange 2019 Server and clickthe edit icon.
- Click ‘Outlook Anywhere’ and update the internal and external FQDN (Fully Qualified Domain Name). Click ‘Save’.
Step 4: Setup the Service Connection Point (SCP)
The next step is to set up the Service Connection Point (SCP), an attribute on Exchange Server stored in the AD schema that directs domain-joined client computers using Outlook to the server using auto-discover settings. By default, it will change to the new server. You need to stop the users from connecting to the new server for now due to issues with certificates as the default with the installation is a self-signed one. This can be changed by running the following PowerShell cmdlet:
Set-ClientAccessService –Identity ExchangeServer2019 –AutoDiscoverServiceInternalUri https://mail.mydomainname.com/Autodiscover/Autodiscover.xml
This will point the users to the current server.
Step 5: Import the Certificates into Exchange 2019
Now you need to import the certificates into the new server. Again, you can use the PowerShell commands or Exchange Admin Center to import and export certificates from Exchange 2013 to Exchange 2019.
Export and Import Certificates via EAC
To export and import certificates from Exchange 2013 to 2019, follow these steps:
- Open Exchange Admin Center and navigate to servers > certificate.
- Select the certificate, click … (three dots), and choose ‘Export Exchange Certificate.’
- Enter the UNC path where the certificate will be exported and enter a password to protect the certificate. Remember this password or note it down somewhere safe. Click ‘ok.’
Copy the exported certificate from the UNC path on Exchange 2013 Server to an external storage device and transfer it to a UNC folder path on Exchange 2019. Then open the Exchange Admin Center in Exchange 2019 and follow these steps to import the certificate:
- Go to servers > certificate. Click on three dots (…) and choose ‘Import Exchange Certificate.’
- Enter the UNC path where the certificate is stored and then enter the password. Click ‘next.’
- Select the server where you want to apply the certificate and click ‘finish.’
Now assign the POP, IMAP, IIS, and SMTP services to the imported certificates by following these steps:
- Select the imported certificate and click the ‘Edit button.
- Click ‘services’ and then check the POP, IMAP, IIS, and SMTP options.
Export and Import Certificates via PowerShell Cmdlets
First, you need to identify the certificates to move by using the below PowerShell cmdlet:
Get-ExchangeCertificate | fl Thumbprint,NotAfter,Issuer,CertificateDomains,Services
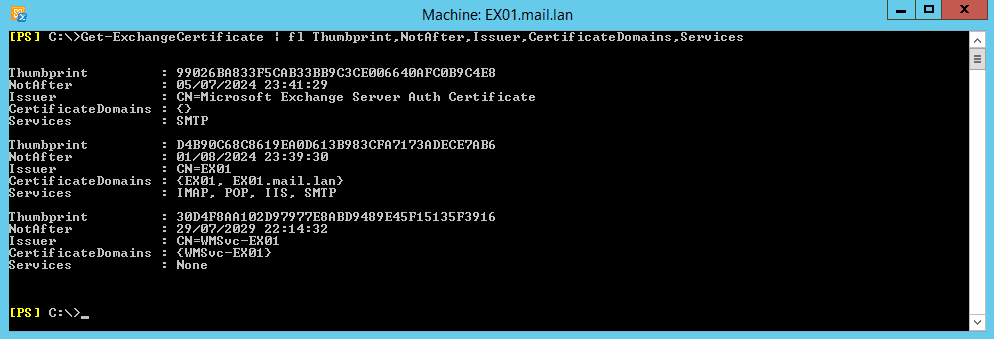
This will give you a list of certificates, along with the thumbprint and the services they are used for so you know the certificates and on what services to assign them to. On the Exchange 2013 Server, use the following PowerShell cmdlet to export the certificate for the Exchange 2019 Server.
$CertPass = ConvertTo-SecureString "LetMeIn" -AsPlainText –Force
Export-ExchangeCertificate -Thumbprint C87C1CBA43733D177B2679BC825808C7BECC659B -FileName C:\temp\Exchange2013Certificate.pfx -Password $CertPass | Out-Null
Once done, keep a note of the password. In case you forget it, you can always redo the above and use a new password. Copy the file to the Exchange Server 2019 and run the below command in PowerShell:
$CertPass = ConvertTo-SecureString "LetMeIn" -AsPlainText –Force
Import-ExchangeCertificate -FileName C:\temp\Exchange2013Certificate.pfx -PrivateKeyExportable $true –
Password $CertPass | Enable-ExchangeCertificate –Services POP,IMAP,IIS,SMTP –DoNotRequireSsl
This will import the certificate and assign it to POP, IMAP, IIS, and SMTP services.
The next step is to set the URLs for internal and external access using Outlook Anywhere. On Exchange Admin Center,
- Go to servers > virtual directories.
- From the Select type, choose OWA.
- Double-click on OWA and go to authentication.
- Select ‘Use forms-based authentication’ and choose Domain\user name. You may choose another option based on your preference.
Now set and update the internal and external URLs of virtual directories for Outlook Anywhere, OWA, ECP, Web Services, ActiveSync, Offline Address Book, and MAPI. Again, you can use the CLI interface or Exchange Admin Center to configure the virtual directories.
Set and Update Virtual Directories via EAC
The steps are as follows:
- In EAC, under server > virtual directories, double-click on OWA.
- Paste or enter the FQDN in Internal URL and External URL section.
- Repeat the steps and update the Internal URL and External URL fields for ecp, oab, activesync, webservices, mapi.
Set and Update Virtual Directories via PowerShell Cmdlets
On Exchange 2019, run the below command.
Get-OutlookAnywhere -Server srvexc2019 | Set-OutlookAnywhere -InternalHostname ex02.mydomain.com -InternalClientAuthenticationMethod Ntlm -InternalClientsRequireSsl $true -ExternalHostname ex02.mydomain.com -ExternalClientAuthenticationMethod Basic -ExternalClientsRequireSsl $true -IISAuthenticationMethods Negotiate,NTLM,Basic
Get-EcpVirtualDirectory -Server srvexc2019 | Set-EcpVirtualDirectory -InternalUrl https://ex02/mydomain.com/ecp -ExternalUrl https://ex02.mydomain.com/ecp
Get-OwaVirtualDirectory -Server srvexc2019 | Set-OwaVirtualDirectory -InternalUrl https://ex01.mydomain.com/owa -ExternalUrl https://ex02.mydomain.com/owa
Get-WebServicesVirtualDirectory -Server srvexc2019 | Set-WebServicesVirtualDirectory -InternalUrl https://ex02.mydomain.com/EWS/Exchange.asmx -ExternalUrl https://ex02.mydomain.com/EWS/Exchange.asmx
Get-ActiveSyncVirtualDirectory -Server srvexc2019 | Set-ActiveSyncVirtualDirectory -InternalUrl https://ex02.mydomain.com/Microsoft-Server-ActiveSync -ExternalUrl https://ex02.mydomain.com/Microsoft-Server-ActiveSync
Get-OabVirtualDirectory -Server srvexc2019 | Set-OabVirtualDirectory -InternalUrl https://ex01.mydomain.com/OAB -ExternalUrl https://ex02.mydomain.com/OAB
Get-MapiVirtualDirectory -Server srvexc2019 | Set-MapiVirtualDirectory -InternalUrl https://ex02.mydomain.com/mapi -ExternalUrl https://ex02.mydomain.com/mapi
Replace the URL in the command with your domain name (URL).
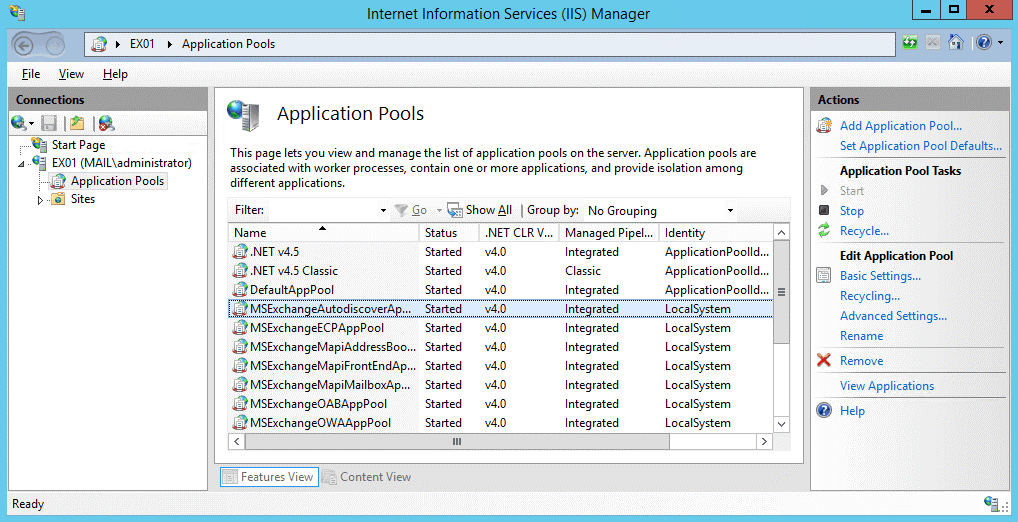
To ensure these changes are in effect, recycle the Application Pool for MSExchangeAutodiscoverAppPool. To do this,
- Open IIS, expand the server, and click on Application Pools.
- Find the Application Pool and click on Recycle.
Step 7: Update DNS Records
Now that the URLs are changed, it’s time to point the DNS records to the new Exchange 2019 Server. For this, contact your network team to see that any ports open and forwarded with NAT to the current Exchange 2013 are replicated to also point to Exchange 2019.
All open ports to Exchange 2013 should be opened for Exchange 2019. Any forwarding from the outside to the inside should be changed to point to the Exchange 2019 Server instead. It’s now the time to point the SCP record, you set before, to point to the Exchange 2019 rather than 2013.
Now the users should be able to work by accessing Exchange 2019 as their Exchange Server while being redirected to the Exchange 2013 Server as the location of their mailbox. It’s time to go round and work on the multi-function devices to point to the new Exchange 2019 Server. From the server, set up the transport rules to allow the devices to pass through it.
You need to make sure that the URL being used internally is also changed and propagated. Then connect one Outlook and check that it’s connecting to the right Exchange Server by opening the Outlook Connection status.
Step 8: Mailbox Move from Exchange 2013 to Exchange 2019
The next step is to move the mailboxes from your current Exchange Server 2013 to Exchange Server 2019. This is done by creating a migration batch job. You can create the migration batch via Exchange Admin Center or Exchange Management Shell.
Create Mailbox Move Migration Batch via EAC
The steps are as follows:
- Open the Exchange Admin Center and click on Recipients. Click on Migration, click the + sign, and select Move to a different database.
- Select the mailboxes you want to move and click Next.
- Then you can select to move everything or select specific mailbox only or the archive mailbox only.
- Select the Target database for mail and archive and click next. You can select multiple mailboxes at once in a job, depending on the volume and size.
Create Mailbox Migration Batch via Exchange Management Shell
The steps are as follows:
- Open the Exchange Management Shell and execute the following PowerShell command:
Get-Mailbox -Database MBX-DB-2013 | New-MoveRequest -TargetDatabase DB19 -BatchName “DB13toDB19”
- Also, move the Arbitration mailboxes to complete the mailbox move.
Get-Mailbox -server ExchangeServer2013 -Arbitration |New-MoveRequest
- You can check the progress using the following command:
Get-MoveRequest | Get-MoveRequestStatistics
The process is slow and requires you to export and import the mailboxes manually.
For faster mailbox migration, download and install Stellar Migrator for Exchange. With this Exchange Migrator software, you can migrate mailboxes directly from Exchange server 2013 to 2019. In addition, you may also directly export the mailboxes from Exchange server 2013 to Office 365.
Unlike EMS or EAC, the software does not impact the server resources or performance and moves the mailboxes from one Exchange Server to another at up to 4x speed. You can download it for free to evaluate yourself.
Step 9: Decommission Exchange Server 2013
Proper decommissioning of the Exchange Server is critical. Login to EAC and follow these steps:
- Go to mail flow > send connector.
- Double-click on send connector name and go to scoping.
- Remove the server’s name.
Once all mailboxes are moved, you can go ahead and remove the mailboxes from the Exchange Server 2013 using EAC or EMS command (as given below).
Get-MailboxDatabase –Server ExchangeServer2013 | Remove-MailboxDatabase
Finally, uninstall Exchange 2013 from the current server from the Control Panel. Then shut down the Exchange 2013 Server.
This completes the decommissioning of the Exchange Server. At this stage, your Exchange Server migration is complete.
Conclusion
This is a comprehensive guide on how to migrate Exchange 2013 to Exchange 2019. From deploying Exchange Server 2019 to decommissioning Exchange 2013, this guide covers every step in detail to help IT and Exchange administrators migrate Exchange 2013 to 2019 without any hiccups.
However, if you face any issue, experience errors, or need help in migrating Exchange 2013 to 2019, you can reach us via the comments section below.