Summary: Disk Utility is a macOS built-in application used to manage and repair storage devices attached to your Mac. Some of its main functions are formatting, partitioning, and managing disk volumes. In this article, we will dive into the essential elements that make Disk Utility a must-have tool for Mac users. As some of the features deal with data management, there is always an unfortunate chance to lose your important files. To retrieve missing items without the extra steps, just download and run the Stellar Data Recovery app.


Disk Utility is the Mac default app that lets you manage, format, encrypt, and repair your storage devices. If you are an experienced Mac user or just entering the Apple ecosystem, learning about what Disk Utility can do and how it can be used when things go wrong is necessary to tune up your machine. In this article, we will be taking a closer look at Disk Utility, from its basic functions to the best ways to resolve problems.
How to Access Disk Utility on MacBook
There are 4 easy methods you can use to open the Disk Utility on your MacBook. Let’s see how to do it using each of them.
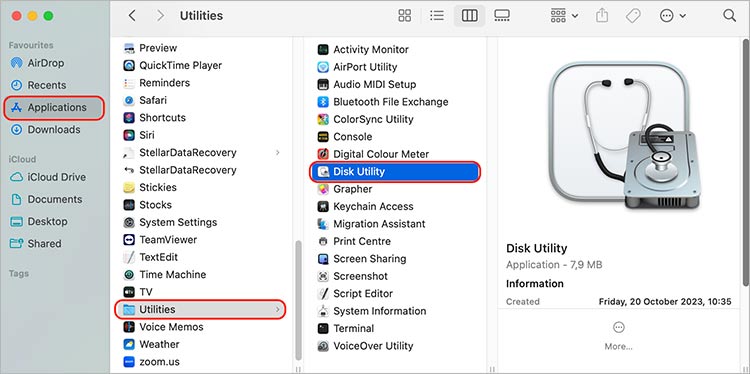
1. Via Finder
Finder provides an organized way to open applications, including Disk Utility. Here’s how:
- Click on Finder.


- Go to the Applications tab > select Utilities folder.

2. Via LaunchPad
Launchpad offers a visually intuitive way to access Disk Utility on a MacBook. Look what you need to do to open Disk Utility via Launchpad:
- Click on the Launchpad icon in your dock.

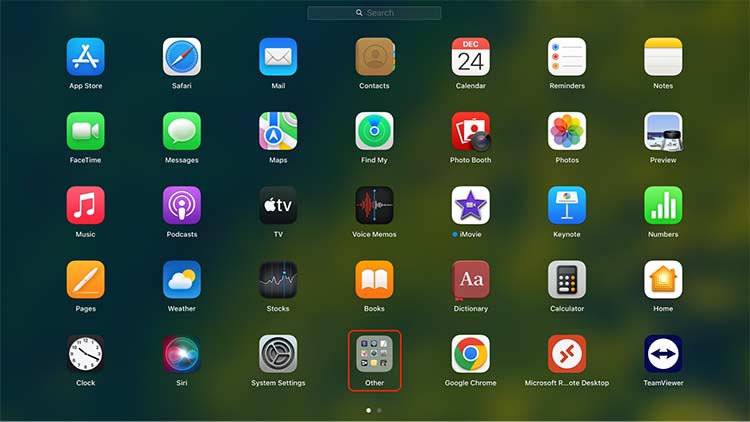
- In Launchpad, find and click on the Other folder.
- Click on Disk Utility to open it.

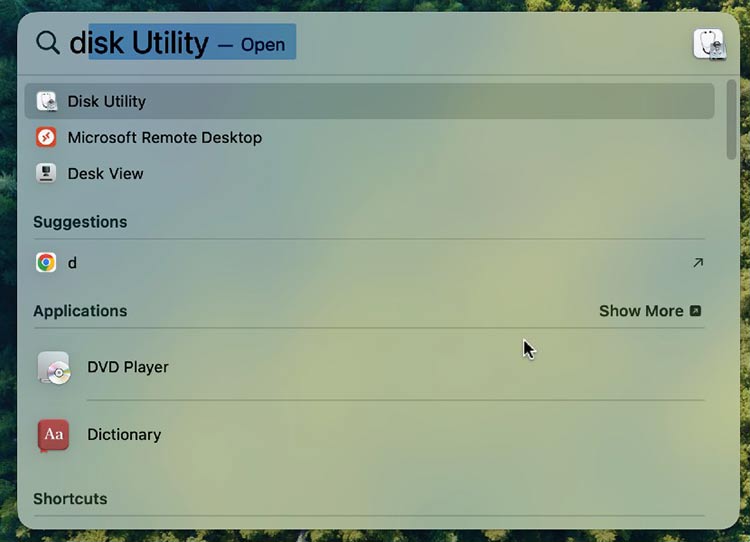
3. Via Spotlight
Spotlight is a quick and easy way to access Disk Utility. Here’s how:
- Press Command + Spacebar to open Spotlight.
- Type Disk Utility in the search bar.
- Press Enter to launch Disk Utility.
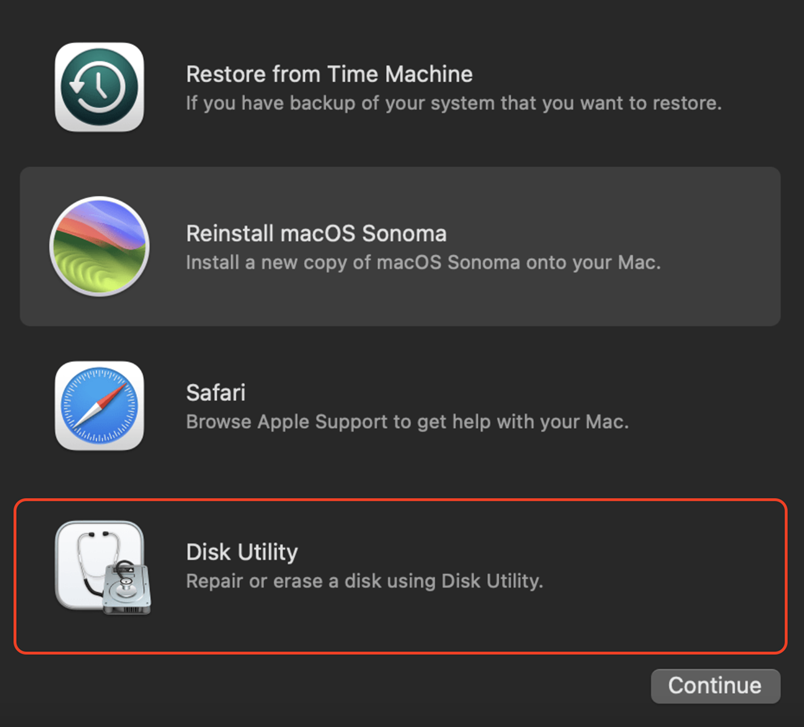
4. Via Recovery Mode
Recovery Mode is useful for accessing Disk Utility when your Mac is experiencing issues. Follow the steps below to enter Disk Utility on MacBook via Recovery Mode:
- Reboot Mac.
- Press and hold Command + R on your keyboard.
- Select Disk Utility after the macOS utility window pops up.

What Can You Do with Disk Utility on MacBook?
Let’s talk about 8 main tasks that you can do with Disk Utility on MacBook.
1. Erase Data Securely
Disk Utility offers options to securely erase data so that deleted files cannot be easily recovered. This is especially important when you want to sell your device. To erase the disk, do the following:

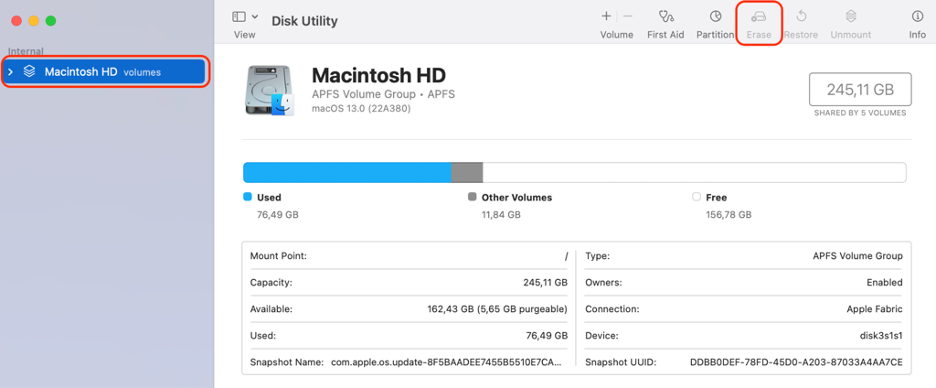
- Select the disk in Disk Utility.
- Click on the Erase tab.
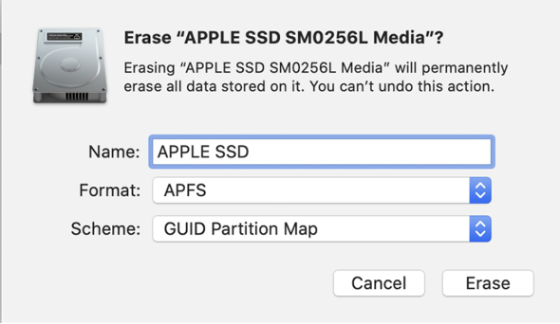
- Choose the format and new disk name.
Name: Macintosh HD
Format: APFS - Click Erase to securely erase data.

2. Check and Repair Disk Errors
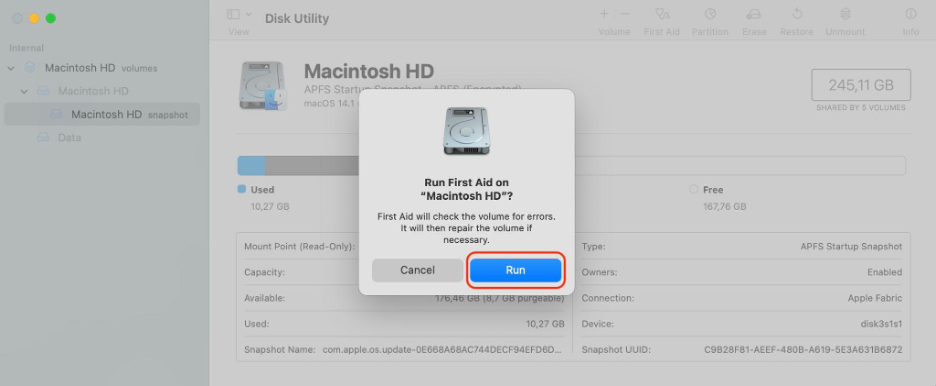
Disk Utility on MacBook includes a feature called First Aid that allows you to detect and repair disk errors and prevent data corruption of your storage. Do the following to run First Aid:
- Open Disk Utility and select the disk.
- Click on the First Aid tab.

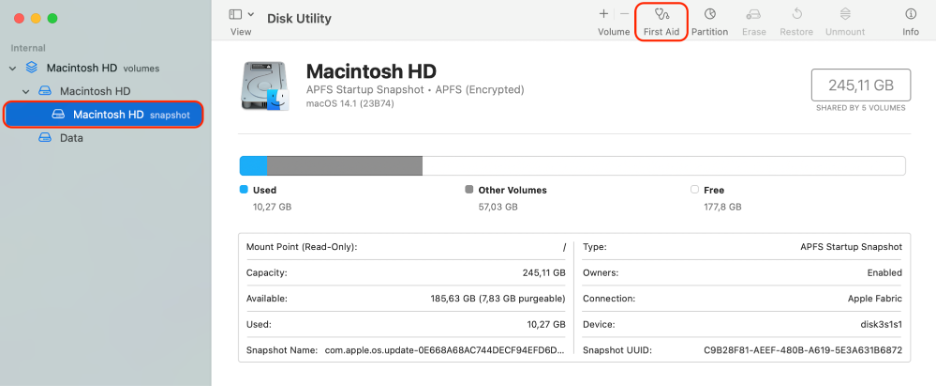
- Click Run to check and repair disk errors.
3. Partition a Disk
The Disk Utility offers the flexibility of creating multiple partitions on your disk, each with its file system and specific purpose. Follow these simple steps to create a partition:
- Open Disk Utility.
- Select the needed disk.
- Go to the Partition tab.
- Click the + button to add partitions.

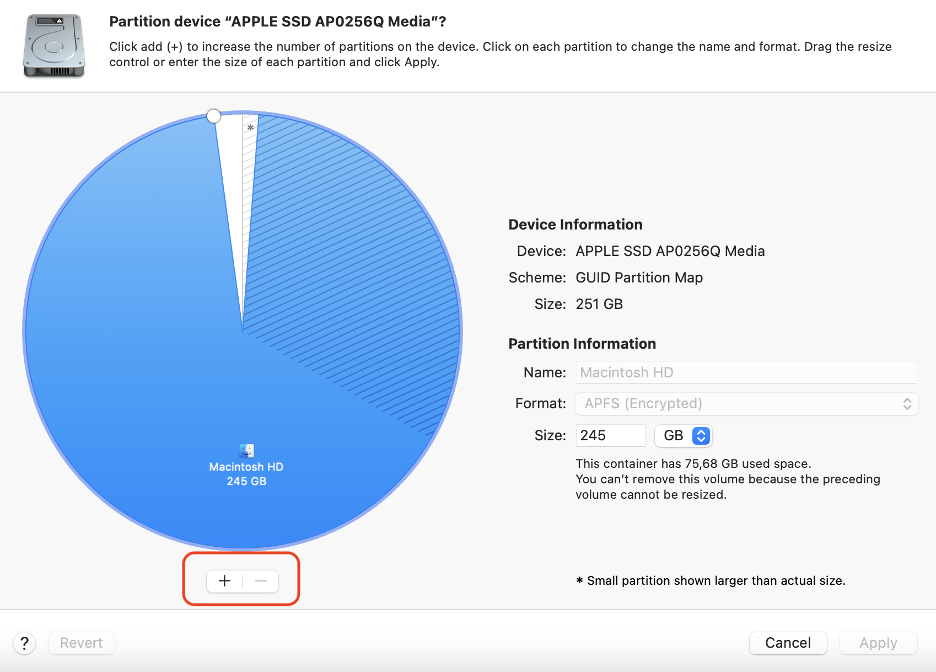
- Adjust the size and format for each partition.
- Click Apply to partition the disk.
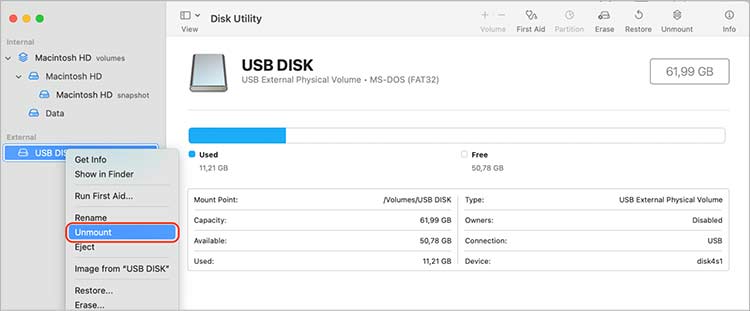
4. Mount and Unmount Volumes
Disk Utility allows you to mount and unmount disk volumes. This is particularly useful for troubleshooting or when you want to disconnect external drives safely. Follow these steps:
- In Disk Utility, select the disk or volume.
- Click Mount to run the external disk or Unmount to safely eject the device.

5. Create Disk Images
Disk Utility allows you to create disk images of the contents of a disk or a folder. Disk images can be useful for archiving, distribution, or as a substitute for a physical disk. Follow these steps to create a new disk image:
- Select the disk or folder in Disk Utility.
- Click File > New Image > Image from….

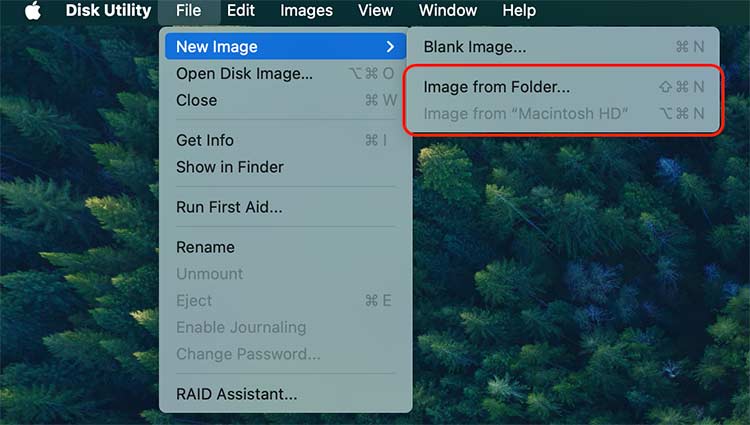
- Choose the location and format for the disk image.
- Click Save to create the disk image.
6. Restore Disk Images
Disk Utility may be useful for you when you make a system backup or recover information from a disk image that was previously created. Follow the steps below to begin the restoration process.
- Open Disk Utility.
- Click File > Open Disk Image.
- Select the disk image file.
- Choose the destination disk.
- Click Restore to transfer data from the image to the disk.
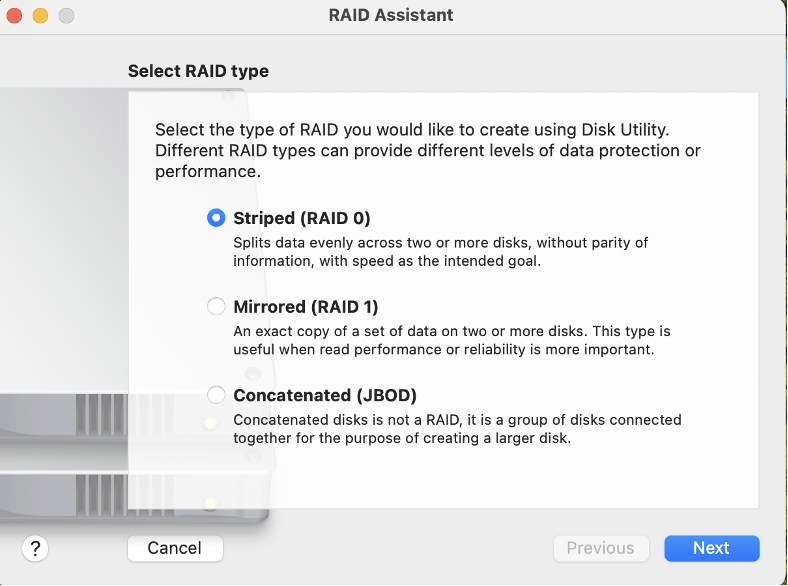
7. Manage RAID Arrays
RAID arrays can be configured and managed by Disk Utility—you can create, delete, or rebuild RAID sets to improve performance or data redundancy. Here’s how to do it:
- Open Disk Utility.
- Click File > RAID Assistant.


- Follow the assistant to create, delete, or rebuild RAID sets.

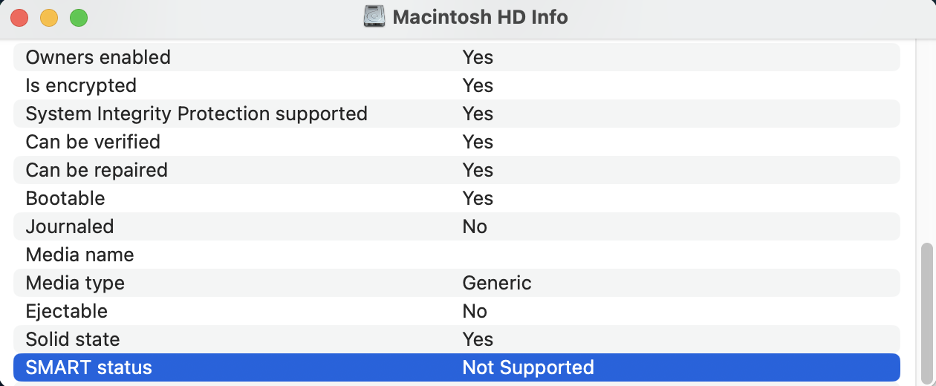
8. View S.M.A.R.T. Status
In Disk Utility, you can monitor the status of your hard drives’ Self-Monitoring, Analysis and Reporting Technology (S.M.A.R.T.). Follow these steps to do it:
- Open Disk Utility.
- Select a drive and click on the Info button.

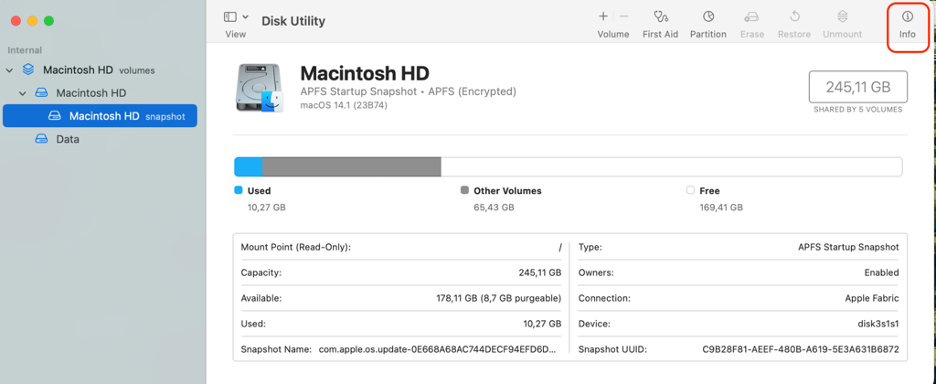
- Check the S.M.A.R.T. status in the information window.
How to Recover Lost Files with Stellar Data Recovery for Mac?
Now you know that one of the tasks Disk Utility may help you with is erasing the Mac HD, during which, it is possible to lose important data. That’s why it is recommended to install recovery software like Stellar Data Recovery. Here’s how to restore your files with the app:
- Download and launch the software on your Mac.
- Select the type of files you want to recover.


- Select the location where you lost your files > click Scan.
- After the scan is finished, preview the files and select the ones you want to recover.
- Click Recover and choose a destination to save the recovered files.
Wrapping Up
Disk Utility on MacBook is a piece of software that can help you manage, format, encrypt, and repair your Mac storage devices. It enables you to optimize disk performance, diagnose disk problems, and protect your data. By using Disk Utility to the best advantage, you can enjoy its capabilities and functions with your disks and volumes.
Read more:

