Summary: Learn how to color-correct your photos with our comprehensive guide. Enhance hues, fix the exposure, adjust white & black tones and contrast & saturation to achieve captivating results. Also, learn the art of color correction using Lightroom for flawless photos.
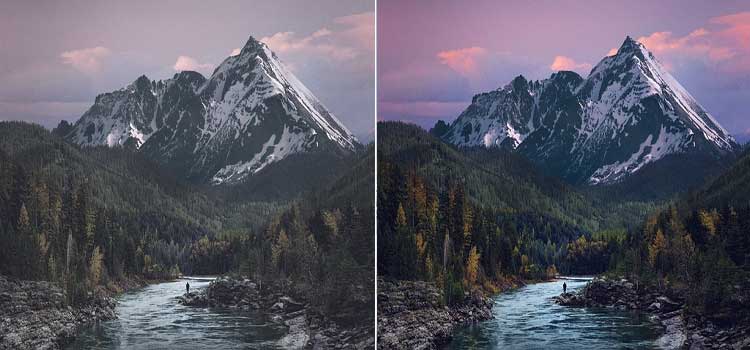
“I have a passion for landscape photography. After my recent photoshoot capturing the magnificence and sheer beauty of the Colorado Rocky Mountains, I returned to my studio to edit the images. But to my disappointment, the mountains didn’t look as beautiful as I recalled, the colors didn’t seem to pop, and the overall tone felt off.
Do I need to color correct the photos? Can someone tell me how to do it?
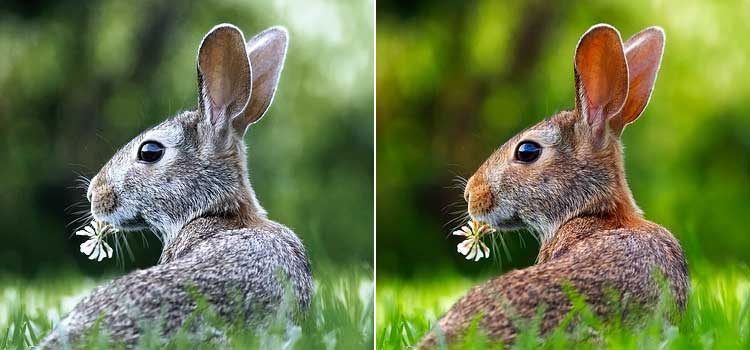
Color Correction is a fundamental technique in the photo editing world where colors come alive and images are transformed into remarkable works of art. This technique enhances the vibrancy and the emotional impact of photographs. Whether you are a professional photographer or a beginner, mastering the art of color correction will level up your photography.
In this guide, we’ll walk you through what is color correction, techniques to color correct photos, and how to use Lightroom to bring out the true beauty of your photos.
What is Color Correction in Photography?
Color correction is a post-processing technique that balances the colors of an image to make them look real, just like how the human eye perceives it. The idea is to adjust the exposure, white balance, contrast, saturation, and white & black values to make the photo appear as natural as possible.
With color correction, you can make aesthetically consistent photos and videos . You can color correct your photos using photo editing software, such as Adobe Photoshop, Lightroom, or other online tools like Fotor, LightX, Color.io, etc.
How to Color Correct Your Photos?
Let’s delve deeper to learn more about common color correction techniques and unlock your creativity!
1. Adjust the saturation to intensify colors
Color saturation is the intensity of the colors displayed in your photos. The higher the saturation of a color, the more intense and vivid the image will appear. While with low saturation, the colors appear pale or washed out.
Some photographers like to desaturate their pictures by using a more muted color palette or even black and white to add more depth to the scene. On the contrary, some photographers prefer to add intensity to all colors in their images to make them look more lively and vibrant.

So, while adjusting the saturation in photos, make small adjustments to make them look more realistic and natural.
2. Change the temperature to adapt to the mood
Temperature refers to the coolness and warmth of light in the image. Your photos can come out cooler or warmer based on the camera’s light intake. By adjusting the temperature of your photos, you can achieve accurate colors in your image and give life to dull photos.
However, when adjusting the temperature to make a photo look cooler, more green and blue tones need to be added to the final image; likewise, to make a photo look warmer, more yellow and brown need to be added.
3. Use hue to achieve tonal balance
Hue is the origin of the colors we can see. It refers to the pure color or visible spectrum of the basic color seen in the color wheel. Hues are made of three primary colors, i.e., red, blue, and yellow, and three secondary colors, i.e., orange, green, and violet. All other colors are formed by mixing them are called tertiary colors.

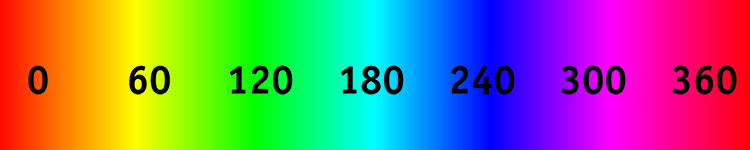
Adjusting the hue will remove unintentional color casts and correct the white balance in the photographs. However, be careful while changing the hue scale; adjusting the hue too much might make your photos look unrealistic.
4. Adjust Exposure to Color Correct Photos
Exposure is the amount of light that reaches the camera’s sensor when a photograph is taken. It defines how dark or bright the final image will be. Sometimes, an image may be underexposed (too dark) or overexposed (too bright), resulting in the loss of details and inaccurate colors in the final output.

To fix overexposed or underexposed photos, you need to adjust the overall brightness and contrast of the image. You can use your photo editing software’s tools like exposure sliders, curves, levels, etc., to adjust exposure in your photos.
Related Reads:
How to color correct photos in Lightroom?
Lightroom has several tools for photo color correction in its Basic panel under the Develop module. Here’s how to color-correct photos in Lightroom:
- Open Lightroom and import the image you want to color correct. Go to Library module > Import and click the Import button to select the image that needs to be color-corrected.
- Next, click on the Develop module.
- To correct the white balance in your image, manually move the Temp and Tint slider or use the Dropper tool for automatic adjustment.
- Next, move the Exposure slider left or right to get the right brightness for your photo.
- After that, move the Highlights and Shadows sliders to the left to darken highlights and brighten shadows in your image or to the right to do the opposite.
- Try adjusting the Contrast and Clarity sliders to change the image’s tonal range.
- Next, move the Saturation and Vibrance sliders to adjust the intensity of colors in the image.

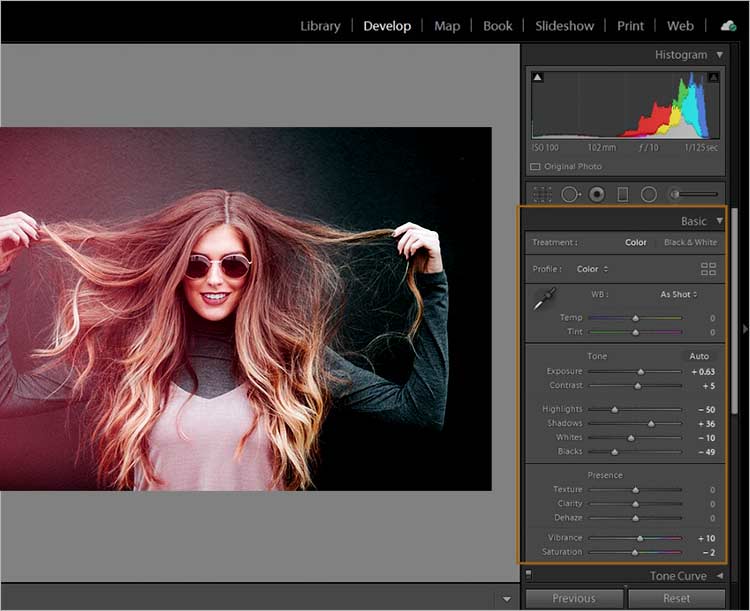
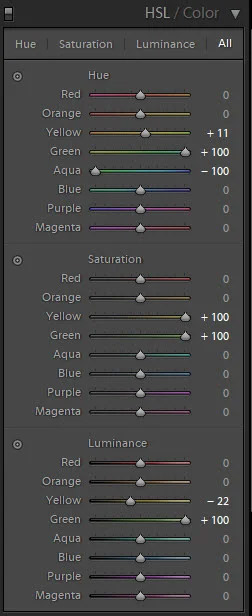
- Likewise, the Hue, saturation, and luminance (HSL) panel will help fine-tune specific colors in your image.

- Once satisfied with the color corrections, click Export to save the edited photo.
Note – In case a photo becomes corrupted during or after going through the color-correction process, or while importing or saving them on the hard drive, use Stellar Repair for Photo to fix it. This advanced photo repair tool can quickly repair photos that were corrupted due to improper color correction, damaged file headers, invalid structures, or other reasons.
Conclusion
There’s a thin line between doing everything just right and overdoing it when it comes to color correction. Moreover, everyone has their preferences on how to edit and which photo editing tool to use to color-correct different photos.
But whether you are using Lightroom or any other photo editing software, always work on a copy of the original unedited image file. This way, you can retain your original image file if you are unsatisfied with the edits.
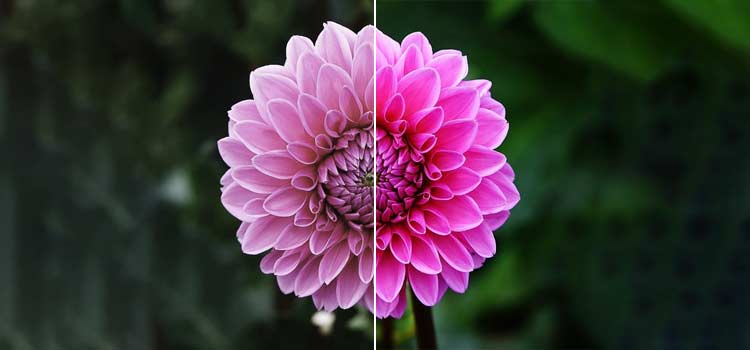
Following our guide will give you a vibrant image bursting with colors.
Happy Editing!
FAQ
1. What’s the difference between color correction and color grading?
Simply put, making a blue sky brighter with higher contrast is color correction, whereas turning a blue sky purple is color grading.
2. What can the online color correction software offer?
The online color correction software can automatically fix color balance, exposure, and contrast problems in just one click.
3. What does Color correction include?
Color correction includes adjusting white and black balances, contrast, and exposure in an image.
4. How do I auto-color correct in Photoshop?
Use the Auto Color Correction option to color-correct photos in Photoshop.


