Summary: If you are unsure which formatting system to select on your Mac, don’t worry! We're here to help you understand the difference between APFS and Mac OS Extended. To ensure added security and peace of mind when formatting, install reliable file recovery software like Stellar Data Recovery Professional for Mac.


When it comes to formatting hard drives on a Mac, it is worth mentioning two major file system formats: APFS, which stands for Apple File System, and Mac OS Extended, alternatively referred to as HFS+. Both formats possess unique strengths and features.
In this article, we will compare APFS and Mac OS Extended, explaining their fundamental characteristics, primary functionalities, and the technical guidelines for formatting drives using these formats.
Further, we will delve into the data restoration process utilizing Stellar Data Recovery after formatting storage devices in both APFS and Mac OS Extended file systems.
APFS vs. Mac OS Extended
Before we jump into discussing the details, here are the main differences:
- The APFS, or Apple File System, was implemented as the primary file system in macOS High Sierra, released by Apple in 2017. This software aims to enhance system performance, improve security measures, and optimize storage utilization specifically for Solid-State Drives (SSDs) and flash storage devices.
- However, it is worth mentioning that Mac OS Extended has served as the longstanding file system utilized by Mac computers for many years. This particular file system is compatible with the previous versions of the macOS operating system.
APFS vs. Mac OS Extended: Main Features
Let’s discuss the key features of APFS and Mac OS Extended.
APFS:
- Enhanced performance: Advanced technologies like copy-on-write, space sharing, and improved data integrity checks, resulting in faster file operations.
- Efficient storage management: Storage space optimization by allowing multiple files or directories to share the same space.
- Snapshot support: Option of taking instant snapshots of users’ file systems, allowing for easy recovery in case of data loss or corruption.
- Encryption: Support native file-level encryption, providing enhanced security for your data.
Mac OS Extended:
- Compatibility: Can be used with older versions of macOS and can be read by other operating systems with appropriate software.
- Journaling: This feature ensures that the file system can recover quickly in case of an unexpected system shutdown or power failure.
- Time Machine support: Compatibility with Time Machine, making it ideal for backing up your Mac and restoring files easily.
- Case-sensitive and case-insensitive options: Choice between case-sensitive and case-insensitive file naming conventions.
APFS vs. Mac OS Extended: Comparison Table
For your convenience, here’s a side-by-side comparison of the key features, restrictions, advantages, and drawbacks of APFS and Mac OS Extended:
| APFS | Mac OS Extended | |
| Storage optimization | Yes | No |
| Snapshot support | Yes | No |
| Compatibility | macOS Sierra and higher | All macOS versions |
| Encryption support | Yes | No |
| Time Machine support | Yes | Yes |
| Storage restrictions | Optimized for SSDs and flash storage | Suitable for traditional hard drives |
| Pros | Enhanced performance | Compatibility with older macOS versions |
| Efficient storage management | Journaling for quick recovery | |
| Snapshot support for data protection | Time Machine support for easy backups | |
| Supports file-level encryption | Supports file-level encryption | |
| Cons | Limited compatibility with older macOS versions | Lack of storage optimization features |
APFS vs. Mac OS Extended: How to Format?
When it comes to using and formatting storage drives on a Mac, it is crucial to have a comprehensive understanding of the suitable file system format.
This section will look into the practical aspects of utilizing APFS and Mac OS Extended. It includes the prevalent areas where these formats are used, along with precise guidelines on how to format your drives according to these formats.
Let’s proceed.
APFS:
On macOS High Sierra and all later versions, the APFS file system is used as the default option. Because of its advanced features and performance benefits, it is recommended for Solid-State Drives (SSDs) and flash storage.
To format a drive using APFS:
- Connect the drive to your Mac.
- Launch Disk Utility from the Applications > Utilities folder.
- Select the drive you want to format.
- Click the Erase tab and choose APFS from the Format drop-down.

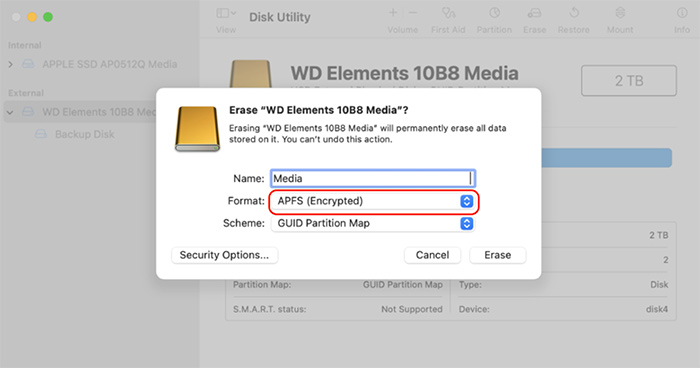
- Provide a name for the drive.
- Click Erase to start the formatting process.
Mac OS Extended:
To format a drive using the Mac OS Extended file system, do the following:
- Plug in the drive to your Mac.
- Open Disk Utility.
- Select the drive you want to format.
- Click the Erase tab and choose Mac OS Extended (Journaled) from the Format drop-down menu.


- Give a name for the drive.
- Click Erase to begin the formatting process.
Restoring Data with Stellar Data Recovery
If a drive formatting leads to critical data loss, use Stellar Data Recovery Professional – a robust solution capable of helping file recovery.
Follow these steps to use Stellar Data Recovery Professional:
1. Download and install Stellar Data Recovery Professional on your Mac.


2. Launch the app > select the file types you need to recover or just select the Recover Everything option > click Next.


3. Choose the drive or location from where you want to recover the lost files and click the Scan button to start the scanning process.


4. After scanning, Stellar Data Recovery will display a list of recoverable files. You can use the built-in Preview feature to preview the files and select the ones you want to recover.


5. Once you’ve selected the files you want to recover, click the Recover button.
6. Choose a location or an external storage device to save the recovered files. Avoid saving the files to the same drive from which you recovered the data to prevent overwriting.
7. After recovery, navigate to the destination folder and verify that your files have been successfully restored.
Wrapping Up
In conclusion, it is important to note that both APFS and Mac OS Extended possess distinct advantages and are well-suited for variable scenarios. When starting the formatting process for a drive, consider the type of storage and your specific requirements.
The APFS file system offers benefits, including heightened performance, optimized storage capabilities, and advanced features. These attributes render it particularly well-suited for Solid-State Drives (SSDs) and flash storage devices.
Mac OS Extended, also known as HFS Plus, offers enhanced compatibility with previous iterations of macOS and incorporates essential functionalities, such as journaling and Time Machine support.
In case of data loss, Stellar Data Recovery is a dependable solution for restoring files from drives formatted with both APFS and Mac OS Extended file systems.
Read more:

