Photos are precious memories. Old or new, you want to keep them for lifetime, and even beyond for your future generations to see and cherish. However, it’s not easy to protect the old photo prints. With passing years, the colors fade, pictures become dull, brownish, and are damaged by moisture, sunlight, etc. So can a faded photo be restored? If yes, then how? Let’s deep dive into the problem, causes, and learn the best solutions to fix faded photos.
What are the causes of faded photos?
Today cameras are incredibly advanced. They can deliver perfect, high-quality pictures. However, photos captured with any classic retro camera, may not be as clear and sharp. The colors may appear faded with improper brightness and contrast issues.
Further, over a passage of time, the prints of old photographs fade, decolorize, or get washed out due to moisture, humidity, dust, or sunlight. You may find a brown/ grey/ yellow tint on them.
Sometimes a colored shot captured with a smart DSLR or a latest digital camera too appears faded, if the light and camera settings are not correct.
5 Steps that Professionals Follow to Restore Faded Photos
Restoring old, damaged, and faded photos may initially seem daunting, especially if you are new to photography. Luckily, there are image editors like Photoshop known to do a great job of fixing photos. However, there’s always confusion about where to begin.
So here, I have simplified the process into 5 broad steps that usually professionals in the industry follow. Your prints may be 30, 40, 50, and more years old or you may have a new photo captured with a latest camera that has faded over time. Just remember these 5 basic steps before you begin. And, based on your situation, you can restore the photos as new and pristine.
Step 1: Scan the old faded photos
If you have to fix old faded photo prints, first, scan them to convert into digital pictures. Alternatively, you may also capture the printed photos in high quality by using a digital camera. This often gives better results compared to a scanned image. Now, load this digital image to editing software such as Photoshop or Gimp, etc., for editing.
Step 2: Crop the digital photo, if required
The old, damaged photo might have torn or ripped edges. You can fix the frayed edges by replacing them with the good edges of your photo with the help of an editing software. In case, the corners are not important, simply crop the damaged edges.
Step 3: Repair the old faded photos
Your next step is to repair the damaged sections in the old faded photo. Photoshop, Lightroom, Gimp, and other software have smart brushes, which can fix dampness, cracks, or spots in the same color tone. This will eliminate the shabbiness of the old faded picture and make it appear new. Make sure to create seamless transition between the retouched and the untouched portions of the photo.
Step 4: Adjust white balance
After repairing the damaged photo, set the correct white balance. Your old vintage or even new faded photos may not be true to their actual color. They may have a grey, yellow, off-white, orange, or brown tint. By correctly adjusting white balance, the picture would look realistic.
Step 5: Fix the details of the faded picture
In this last step, do color correction, fix photo blurriness, and reduce noise. Adjust the brightness, contrast, sharpness, hue/saturation, and fix color cast to make the old faded picture vivid.
Methods to Restore Old Faded Photos by Using Photo Editors
You are now clear on the steps to follow while restoring faded images. Use this approach to make photos vivid and clear with any photo editing software, be it sophisticated Adobe Photoshop or a free tool like GIMP.
Below we have shared how you can fix faded photos in various photo editing software. There are many ways to do it. You can pick any tool as per your convenience.
Fix colored faded photos in Adobe Photoshop
There are various techniques to fix the colored faded images in Photoshop. You may use Spot Healing Brush, Clone Stamp Tools, Neutral Filters, or Auto Color Correction options to restore faded color photos. However, it’s not possible to share all methods in one blog.
Below is a quick technique to fix washed out photos in Adobe Photoshop:
- Launch Adobe Photoshop and load the faded photo.
- Go to New Adjustment Layer > Levels.
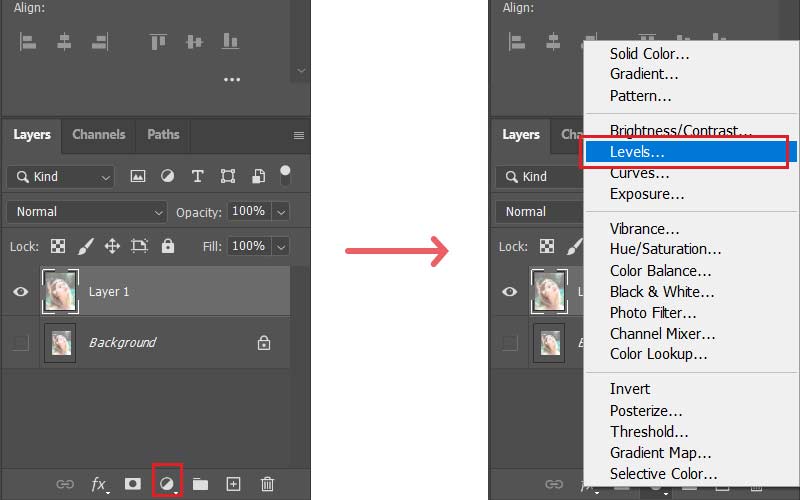 Navigate to Levels in Photoshop
- The Level panel shows Histogram that has 3 sliders – black, mid tone, and white. You would see the Histogram of a faded photo doesn’t have information in the black or white portions. Hence, you need to move the black slider towards the mid tone or towards the start of the Histogram. To do this first, click on Channels tab. You can also asses the faded photo in each channel (Red, Green, and Blue) one by one.
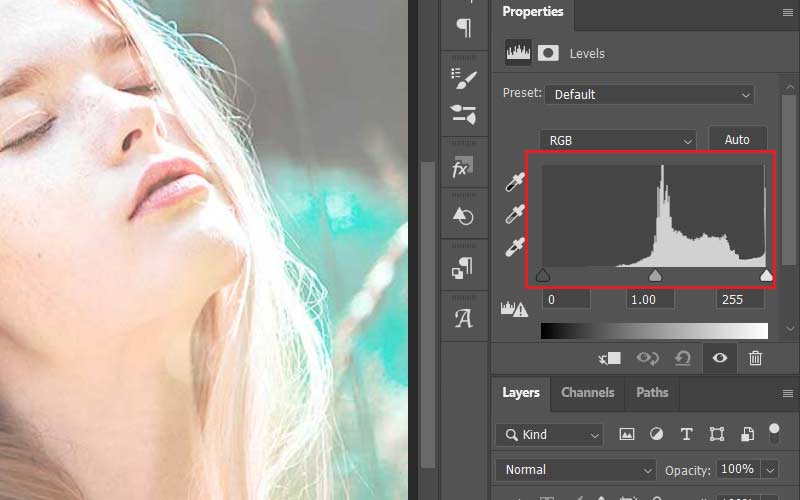 Histogram in Levels panel in Photoshop
- Now go to the Histogram panel on the left and select the All Channels View from options to see the composite RGB channel.
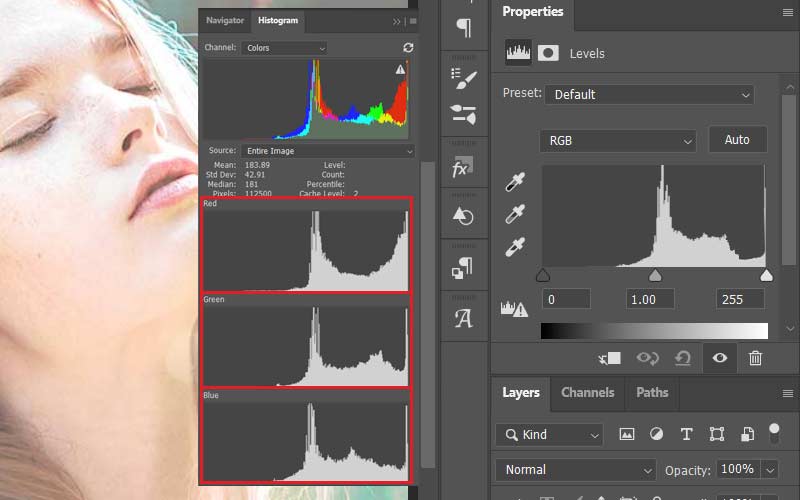 All Channels View in Histogram in Photoshop
- One by one go to each RGB channel Histogram and move the black slider towards the start of Histogram. Adjust the brightness and contrast.
- Further, you can try the ‘filters’ and change the ‘blend mode’ to enhance the photo. This would fix the faded picture making it clearer and brighter.
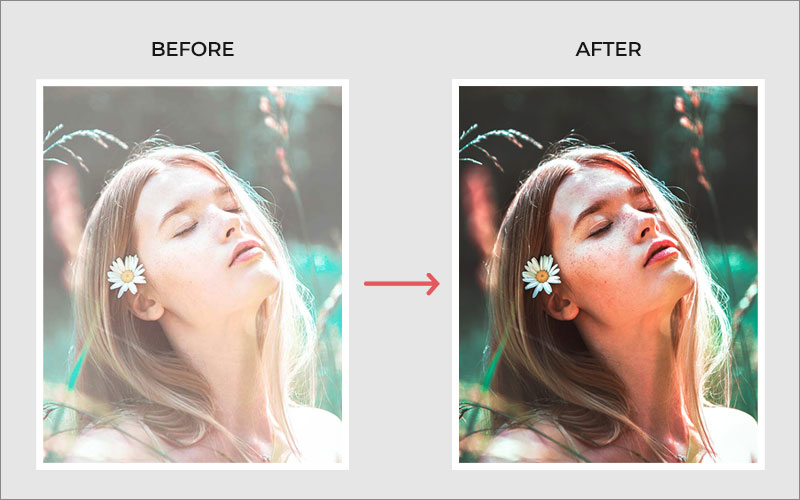 Fixed faded photo in Photoshop
- At last, save the restored photo as JPG, PNG, or other desired format.
Restore black and white faded pictures in Photoshop
Old faded black & white images may be washed out or appear greyish. You can try the below steps to fix old damaged black & white photos in Adobe Photoshop:
- Open your scanned black & white faded image in Photoshop.
- You may need to use the crop tool to cut the unwanted or damaged corners and set the image to a required size.
- Navigate to Layer > New Adjustment Layer > Curves.
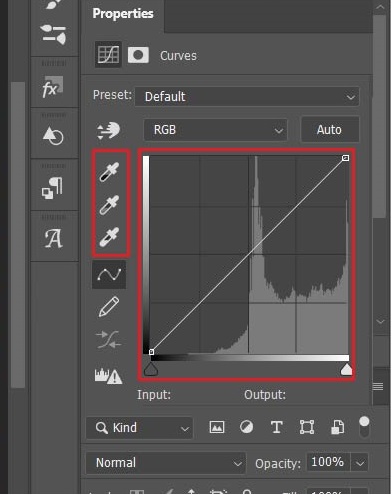 Eyedropper options in Curves
- On the left panel, click on Black Point eyedropper in the Properties box. Use it on the sections that should be black in color to fix the fade.
- Now select the White Point eyedropper. Use it on the sections, which should be of white color.
- Navigate to Layers > Curve. Increase its opacity level of the image to about 80-90%.
- Go to Layer > New Adjustment Layer. Adjust the Hue/Saturation level to brighten or darken old photo to a perfect level.
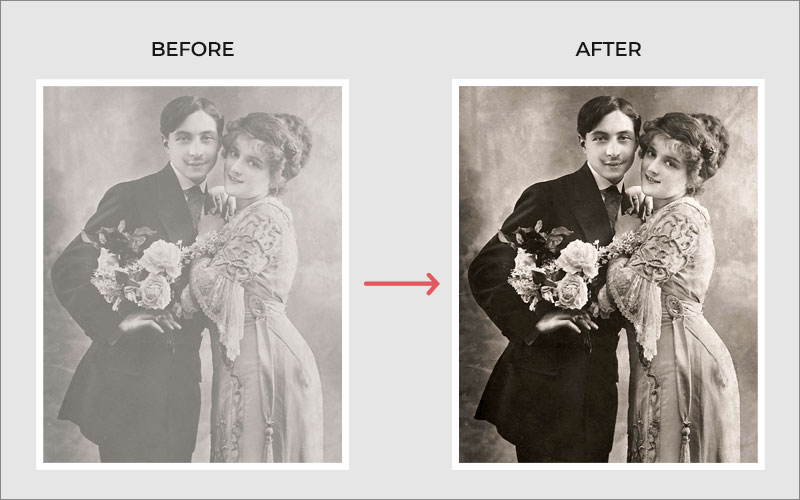 A black & white picture fixed in Photoshop
Restore faded photo with Unsharp Mask in Gimp
Gimp is an open-source image editor. You can fix faded photos free in Gimp unlike the professional Adobe Photoshop. Here are the steps:
- Open your faded photo in Gimp tool.
- Navigate to Colors > Color Balance.
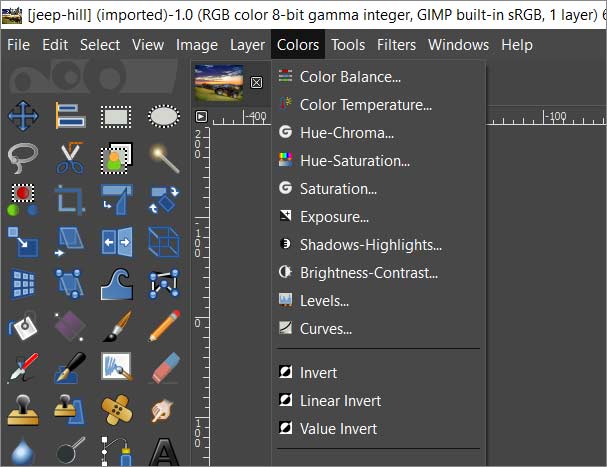 Colors menu in Gimp
- In Color Balance box, under Adjust Color Balance, one by one select Shadows, Midtones, and Highlights. Adjust the Red, Green, and Blue color levels.
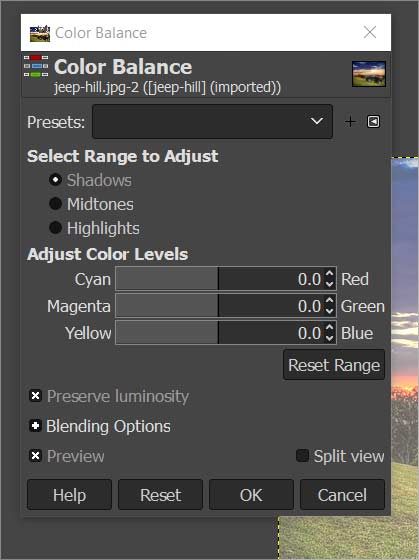 Color Balance box in Gimp
- Click OK when you obtain the desired result.
- Now, from the top menu, go to Colors > Brightness/Contrast.
- Check the Preview option and adjust the sliders until you get the best output. It is recommended to keep the values low to fix faded image.
- Further, you can use Enhance filters in Gimp. The Enhance filters can reduce noise and fix the photo blur by sharpening it. From the top menu, go to Filters > Enhance > Unsharp Mask.
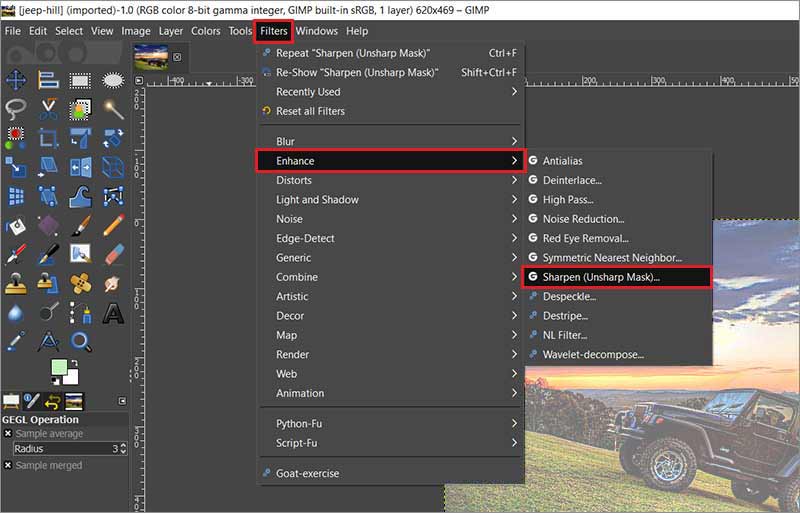 Filters menu options in Gimp
- In the Unsharp Mask dialog box check in preview option. Set the values of the Radius, Amount, and Threshold settings. Here ‘Radius’ is the number of pixels at the photo edges affected by sharpening. ‘Amount’ indicates the extent of sharpening while ‘Threshold’ is the minimum pixel value difference between the edge and rest of the picture.
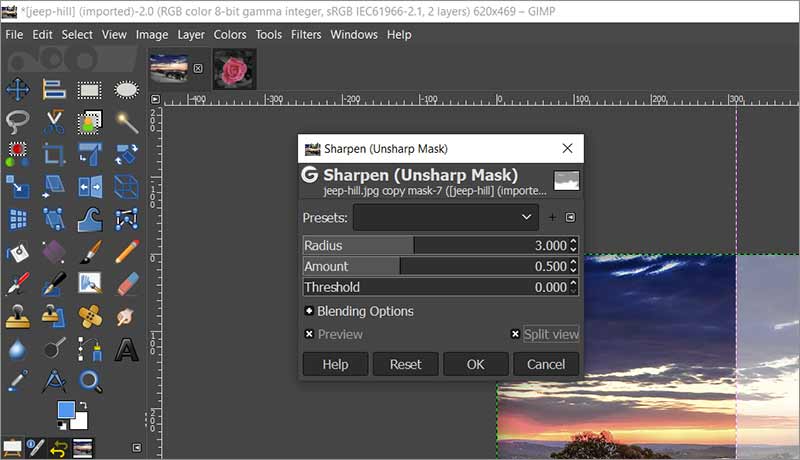 Unsharp Mask box with split screen in background Gimp
- While trying different settings, you can compare the sharpened and unsharpened picture by using the Split View tool preview in GIMP.
- Once you are satisfied with the result, click OK.
Fix faded color photos with Auto White Balance in Gimp
Another way to restore faded color pictures in Gimp is by using the Auto White Balance feature of the software. This technique is not recommended to repair old faded photos that have scratches, marks, spots, tears, etc.
Here’s how you can do it:
- Open the faded photo in Gimp.
- Navigate to Colors > Auto > White Balance. This will automatically fix White Balance in the faded image.
- Next, go to Colors > Hue-Saturation.
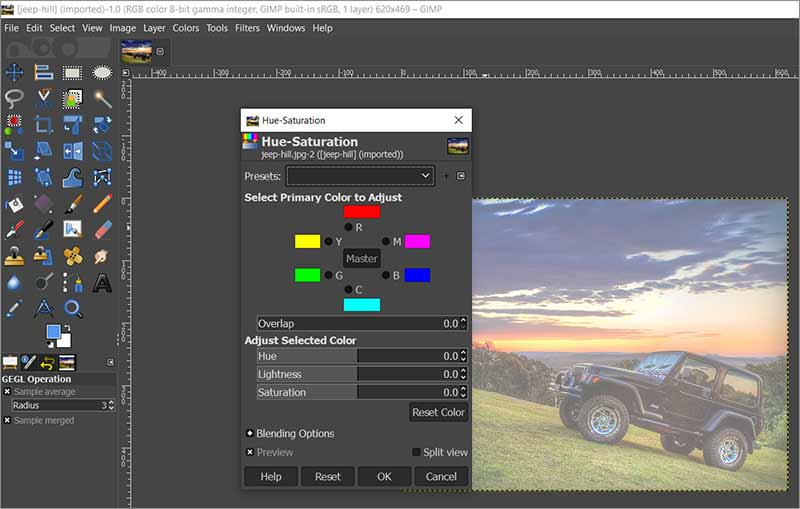 Hue – Saturation box in Gimp
- Adjust the Hue, Lightness, and Saturation values to make the faded photo clear and bright. And that’s it, your faded photo is fixed.
Restore old damaged photos in PaintShop Pro
Corel PaintShop Pro is an affordable alternative to Adobe Photoshop. Although the software doesn’t have extensive advanced tools, it can effectively fix faded and dull old pictures. It has a Fade Correction tool that can quickly restore faded or discolored photographs.
Here’s a fast way to fix faded photos in PaintShop Pro:
- Open the faded picture in PaintShop Pro on your computer.
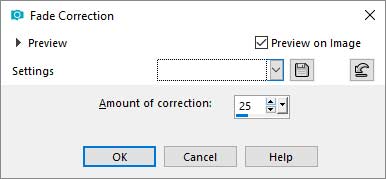
- From the top menu, navigate to Adjust > Color > Fade Correction.
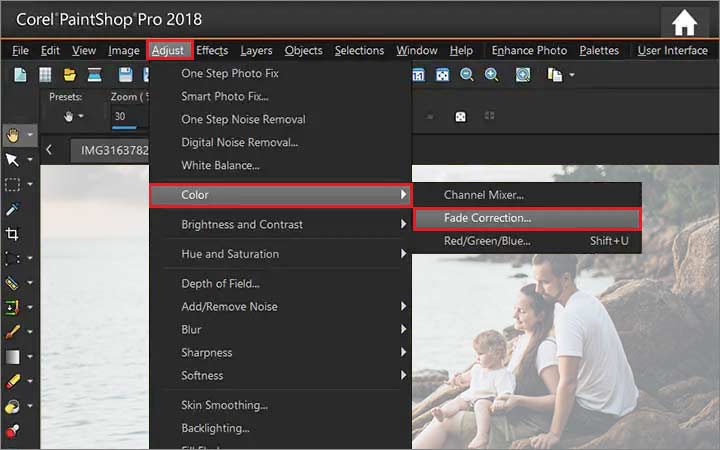 Fade Correction in PaintShop Pro
- PaintShop Pro automatically does color correction. However, you can also change the Settings as per your requirement. For instance, for an extremely faded photo, set a higher amount of correction. Check the results in the image Preview and click OK.
 Fade Correction Settings box
- Next, go to Adjust > Smart Photo Fix. Adjust brightness and saturation sliders to brighten the photo near to original.
Restore faded photos online
Today numerous online photo editing programs are available that can refurbish your dull, old, and faded photos to new. They are quiet easy to use and have almost all the features of a desktop photo editor.
You can enjoy Color Correction, White Balance, Brightness, Hue & Saturation, Filters, and other features, that help to make a faded photo perfect.
The online image editors can eliminate spots, blemishes, scratches, torn edges, and even recolor old damaged photographs.
You may try your hands on Pixlr, Adobe Photoshop Express Editor, PixCut, PicMonkey, or others.
What if Old Digital Photos get corrupted or inaccessible?
Virus attack or bad sectors in the storage drive can corrupt the image files stored as backups or archives. File corruption can damage your photos and even make them inaccessible. You cannot open a corrupt image file due to different errors. Even if it opens, the photo may appear greyed-out, show discoloration, black screen, etc. The only solution for such corrupt pictures is a photo repair tool — Stellar Repair for Photo. The advance photo repair software can automatically fix damaged file header, structure, and data.
Be it RAW or JPEG, you can repair all with the help the software. Free trials are available that let you repair the corrupt image file and see its preview.
3 Tips to Protect Old Photos from Fading
- Create digital copies of your old photo prints and save them in hard drive, cloud storage, etc.
- Use acid and lignin-free photo albums or boxes to store the prints.
- Keep the pictures away from sunlight, air, moisture, and humidity.
Wrapping Up
Restoring color or black and white faded photos to perfection comes with a lot of experiment and practice. There can be multiple ways to tackle this problem. However, this detailed guide simplifies the process for you. It brings the clear 5-step approach to fix and restore faded photos, both old and new ones. Professional photographers, photo editors, and designers follow similar techniques to breathe new life to old faded photos. Further, you may try the methods using popular Photoshop, Gimp, PaintShop Pro, and other editing tools shared in this post to fix faded photo problems.
You can share in the comment box, which method to fix the faded photos you followed. Or if there’s a valuable tip that is missed by us, we would love to hear from you.
Finally, Happy Editing!
Was this article helpful?