Summary: This post will guide you on ‘how to export contacts from Lotus Notes to Outlook’ manually. It will also outline the problems you may experience when using the manual process, and how you can overcome them by using an automated tool.
Powerful Solution: Try Lotus Notes to Outlook Converter to migrate unlimited Lotus Notes mailboxes to Microsoft Outlook easily.
IBM Lotus Notes (or IBM/HCL Notes) and Microsoft Outlook are leading email platforms with a wide user base across the globe. However, situations may arise when you need to access your Notes mailbox data through MS Outlook. But, you cannot directly access Notes contacts or other mailbox items in Outlook. You will need to export Notes contacts to Outlook. There are primarily two ways to achieve this – manually and automatically.

Export Lotus Notes Contacts to Outlook Manually
The manual procedure to export Lotus Notes contacts to an Outlook account comprises two steps:
- Export contacts from IBM Notes account to a comma-separated value (CSV) file.
- Import CSV file into your Microsoft Outlook account.
Now let’s discuss these steps in detail.
Step 1: Export Lotus Notes Contacts to a CSV File
- Launch Lotus Notes.
- Open Notes Contacts by clicking Contacts.
- In the menu bar, click File > Export Contacts.
In the Export Contacts dialog box, do the following
- Select the All Contacts in this View checkbox for ‘Which contacts do you want to export’
- To export all the contacts information, select the All fields
- In the Save to field under Save As section, browse to the directory in which you want to save the contacts.
- Specify a name for the target file in the text box next to File name.
- Next, select the Comma Separated Value (.csv) option from the Save as type drop-down list.
- Click Export.
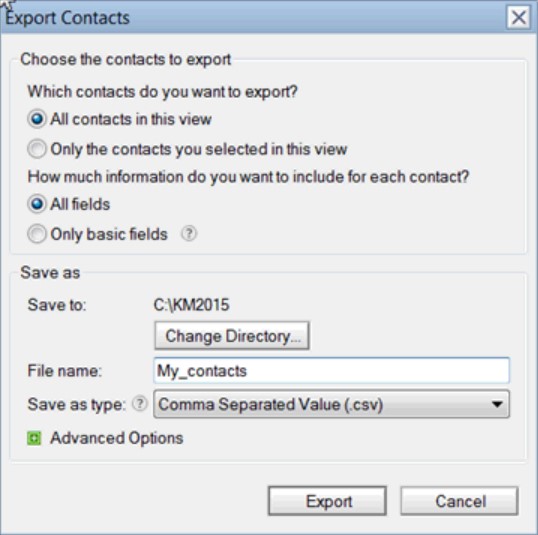 Figure 1 – Export Contacts Dialog Box
 The selected contacts from Lotus Notes client will get saved in a CSV file.
- Launch Microsoft Outlook, and click File > Open & Export > Import/Export.
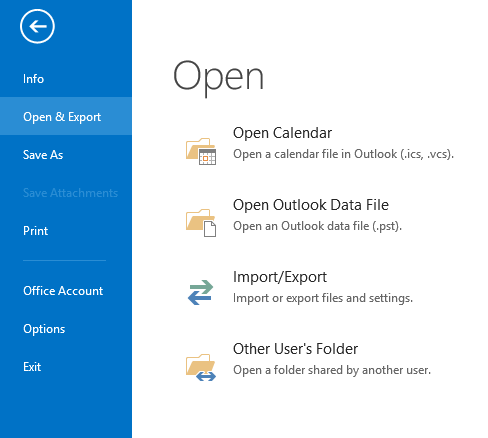 Figure 2 – Select Open & Export
In the Import and Export Wizard, select Import from another program or file from the ‘Choose an action to perform’ drop-down menu. Click Next.
 Figure 3 – Outlook Import and Export Wizard
- In the ‘Select file type to import from’ section, select the Comma Separated Values option, and then choose Next.
 Figure 4 – Outlook Import CSV File
- In the ‘File to import’ field, perform the following:
Click Browse and navigate to the directory in which the CSV file is saved. Select the file.
Choose Do not import duplicate items under the Options section, and then click Next.
Note: You can choose to move duplicate contacts to Outlook, by clicking the ‘Allow duplicates to be created’ option from the Options field.
- From the ‘Select destination folder’ dialog box, select a folder under Contacts and then select Next.
 Figure 5 – Outlook Import a File Options
- In the window that appears, select Map Custom Fields.
Note: You will need to map contact fields to match the source file (.csv) columns with target (Outlook) fields. This is because Notes and Outlook have different field names.
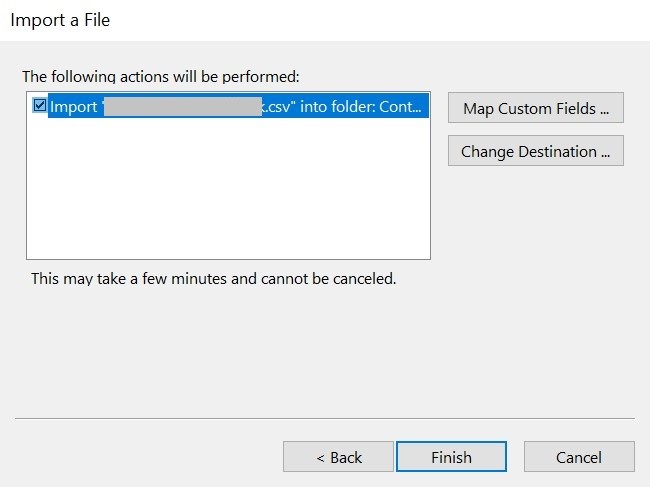 Figure 7 – Map Contact Fields
All the selected contacts will be imported into your Microsoft Outlook account. To view the contacts, open your Outlook account and click Contacts.
Drawbacks of Manual Method
While manual methods are free of cost and do import all contacts from Notes to Outlook, they have certain limitations:
- It is lengthy and time-consuming.
- No option to search for an NSF file.
- It does not support multiple file formats.
- It cannot import all the information saved for each contact in Lotus Notes. For instance, the image and logo information from Lotus Notes cannot be viewed in Microsoft Outlook.
- Novices may require technical assistance to perform all the steps listed in the above manual process.
- Mapping CSV file fields to Outlook fields can be confusing.
- Chances of human error (like accidental deletion of data) are high.
A Better Alternative to Export Lotus Notes Contacts to Outlook
To overcome the shortcomings of the above mentioned manual process, use Stellar Converter for NSF software. This NSF to PST Converter tool:
- Allows appending the converted NSF file (including contacts and other items) to an existing Outlook profile in a few clicks.
- Option to find NSF files within a specific folder/hard drive.
- Option to save converted data in multiple other formats.
- Convert NSF file items with complete information to the Outlook PST file.
- The software’s interactive GUI makes working with it extremely simple, without requiring technical intervention.
- It does not require mapping of contact fields.
- It safely and accurately exports all items of the NSF file to Outlook.
Steps to Export Notes Contacts to Outlook profile with the help of Stellar Converter for NSF are as follows:
Step 1: Download, install, and launch Stellar Converter for NSF software.
Step 2: In the Select NSF File dialog box, click Browse to select the file you want to convert.
Note: If you are not aware of the NSF file location, choose ‘Find’ to search for the file you wish to convert.
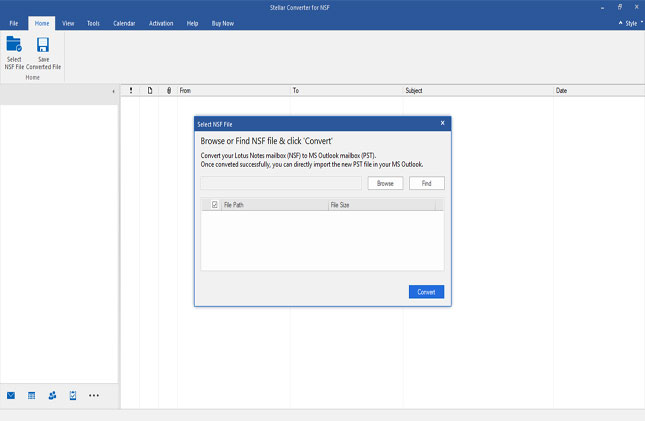 Figure 8 – Select NSF File
Step 3: Once the file is selected, choose Convert to initiate the NSF to PST conversion process.
Step 4: The software provides a preview of Lotus Notes mailbox folders on the left side. Search for the ‘Contacts’ folder that you want to export to the Outlook profile.
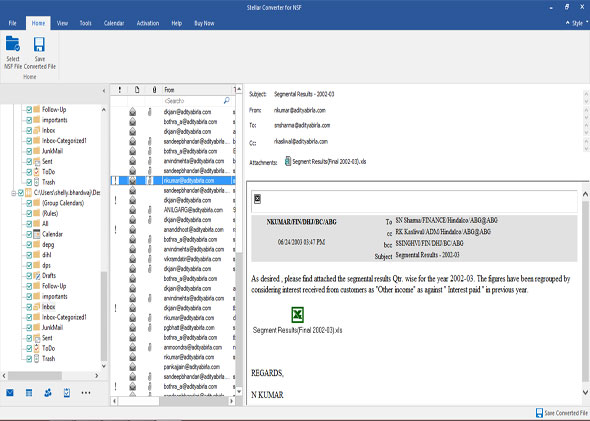 Figure 9 – Preview of NSF File Contents
Step 5: To export the converted file to your Outlook profile, click the ‘Save Converted File’ option from the Home menu.
 Figure 10 – Select Save Converted File
Step 6: From the Save As window, select Outlook Profile, and then choose Next.
Note: For saving the converted file directly to the Outlook profile, you will need to activate the Technician Edition of Stellar Converter for NSF software.
Step 7: In the Select Outlook Profile box, choose the profile to which you want to append the converted (NSF) files, and then click OK.
Step 8: Specify the password of your Outlook Profile or leave the field blank (if the Profile is not password protected), and then click OK.
The contacts from NSF file will get saved to your selected Outlook profile.
You might also be interested in How to export complete NSF file directly to Outlook profile?

Final Words
Manual methods can suffice when the data to be exported isn’t critical or is minimal. However, if you need to keep your data safe from accidental loss or damage and want to simplify the process to export Lotus Notes contacts to Outlook, opting for an automated tool is a better choice.
Was this article helpful?