PSHED.Dll (Dynamic Link Library) is one of the most common BSOD (Blue Screen of Death) errors. It can occur right after turning on your system or while you’re in the middle of an important task. A few users also encountered this problem while watching YouTube videos on Chrome.
The PSHED.Dll Windows 10 error may appear with different stop codes and error messages, such as:
What Causes PSHED.Dll Error?
This blue screen error may occur for multiple reasons, including an incompatible or faulty device driver, missing or corrupted system files, outdated BIOS, defective hard drive, memory issues, etc. Read on to find some effective DIY troubleshooting methods to fix the PSHED. Dll BSOD Windows 10 error.
As some Windows users reported that they tried factory resetting their PC, but the BSOD error kept coming up , we’d suggest you boot your system in safe mode to prevent interruptions while fixing the error.
To boot into Safe Mode, follow the given steps:
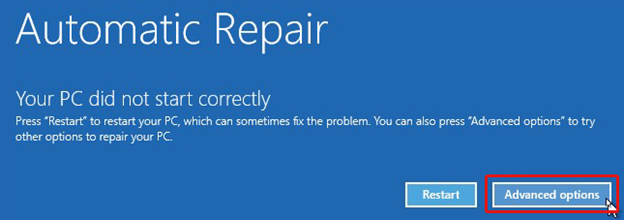
- Reboot your Windows 10 system. The moment you start to see the Windows logo on screen, turn off your system again.
- Repeat this step thrice. After that, you should reach the Automatic Repair environment.
- There, click ‘Advanced options’ to proceed.
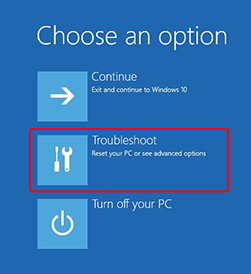
- Next, click Troubleshoot on the ‘Choose an option’ screen.
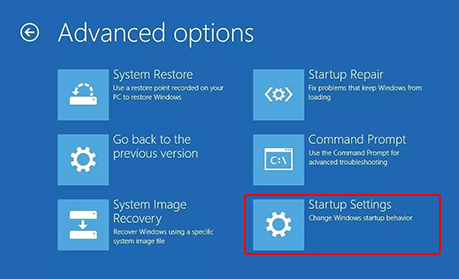
- On the next screen, click ‘Advanced options’ on Troubleshoot screen.

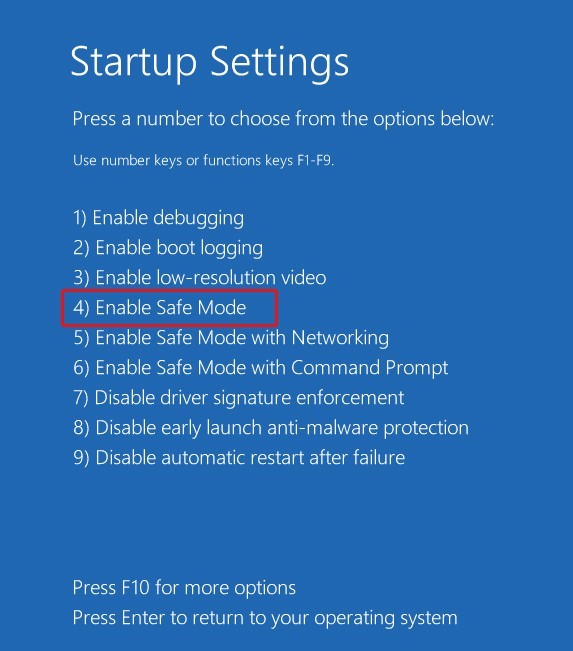
- Afterward, you need to select Startup Settings from the available options.
- On the next prompt, click Restart. The system will reboot and give you multiple options. Press F4 to enable Safe Boot.
How to fix the PSHED.Dll BSOD Error on Windows 10?
Now that you’ve booted successfully into safe mode, you can start performing the troubleshooting methods given below.
- Update device driver
- Run an SFC Scan
- Run CHKDSK Command
- Run Windows Memory Diagnostic Tool
- Update BIOS
- Perform System Restore
- Reset Windows 10 PC
Method 1: Update Device Drivers
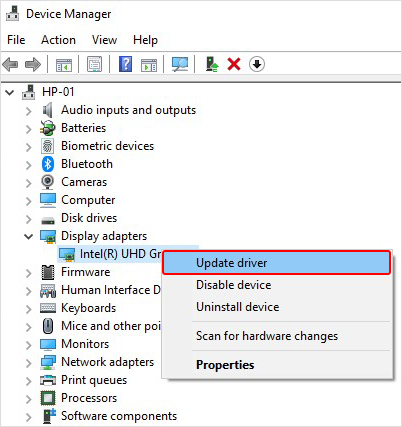
- Open Device Manager and then go to the Device category for which you want to update the driver.
- Expand the device category, right-click on the driver, and click Update driver.
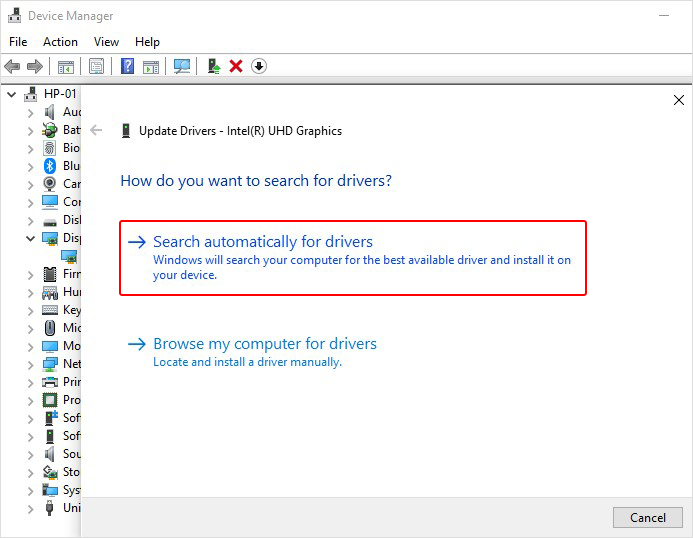
- Click Search automatically for drivers, and Windows 10 will start looking for the latest driver software available.
- Suppose you don’t find any latest driver. In that case, you can uninstall the buggy one and reinstall the compatible one either by visiting the device manufacturer’s website or by installing Windows Update. To do so, follow System Settings > Update & Security > Windows Update > Check for updates.
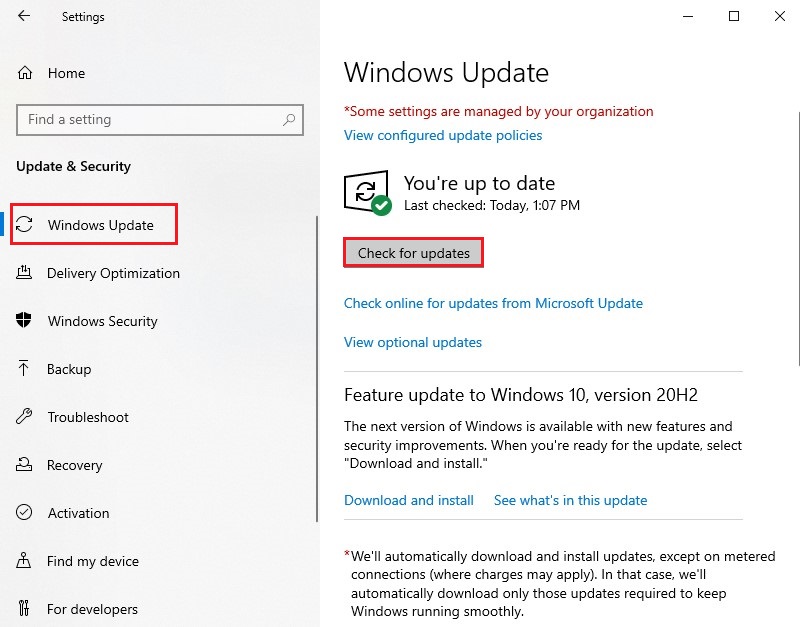
- After installing the Windows update, the latest and compatible device drivers will be downloaded automatically.
Method 2: Run an SFC Scan
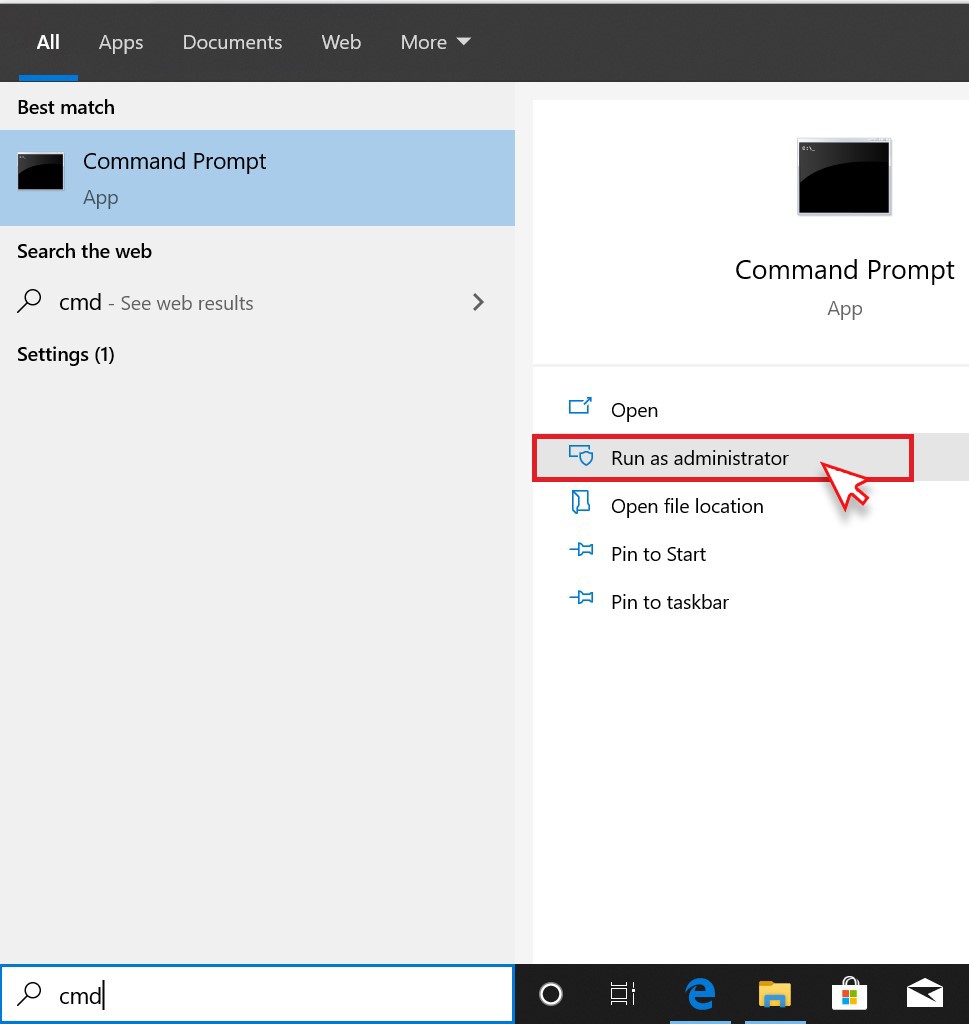
- Open Command Prompt and click ‘Run as administrator.’
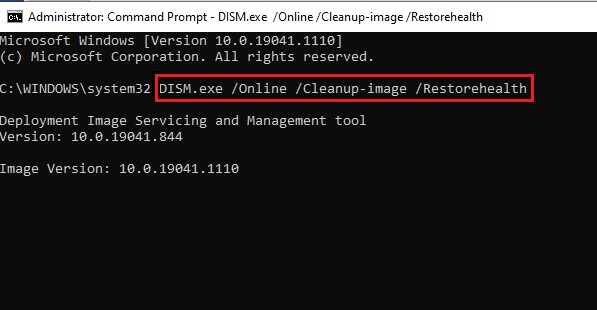
- In the command prompt window, type DISM.exe /Online /Cleanup-image /Restorehealthand hit Enter.
- Wait for a while till the system shows files that need to be fixed.
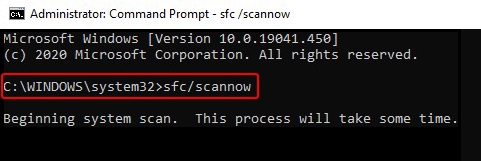
- Next, type SFC/Scannow and press Enter.
- Let the process end, and once done, close the window and reboot your system to check if the error is gone.
Method 3: Run CHKDSK Command
When you run the CHKDSK command, it scans and marks the bad sectors on the hard drive. But it prevents Windows from reading and store data from these bad sectors, which may cause you to lose your essential data. So, before performing this method, take a backup of your system (if possible).
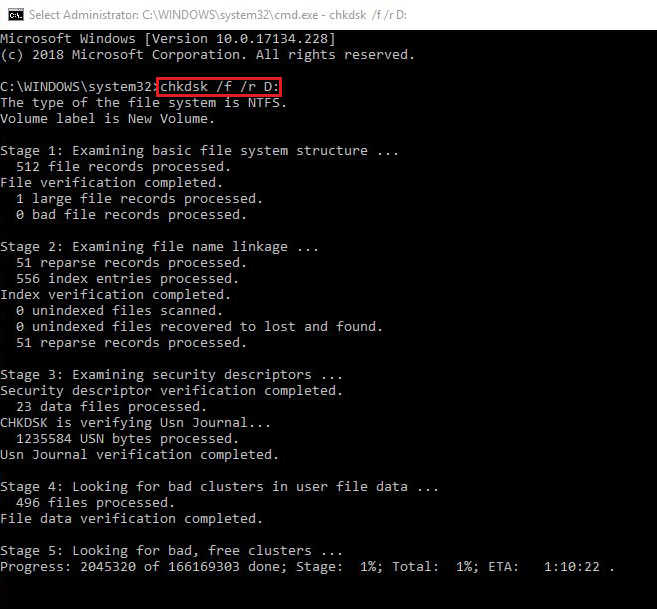
- Run Command Prompt as an administrator and type CHKDSK /f/r/d: and press Enter.
- It will take some time. Once done, close the window and restart your system to check if the PSHED.DLL is gone now.
If you don’t have any backup, you can restore data using powerful data recovery software, such as Stellar Data Recovery Professional. It is a robust and efficient DIY data retrieval software, which can retrieve all types of data, including files, folders, audio files, videos, photos, and more. It supports recovery from Windows systems and storage media drives, such as HDDs, SSDs, USB drives, etc.
- Type memory diagnostic in Windows Search Box to open Windows Memory Diagnostic tool.
- In the next window, select Restart now and check for problems (recommended).
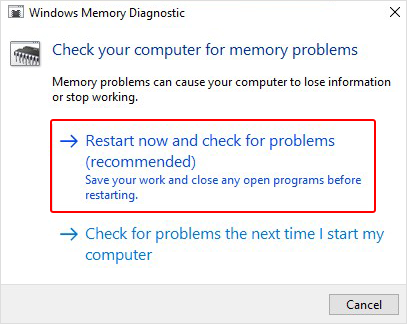
- The system will restart. The moment system will reboot, and a test will start checking up any problems with your RAM.
- Once the test is done, you’ll see the test results. If there is any further instruction given on the screen, follow them and fix the problem.
Method 5: Update from BIOS
- Restart your Windows 10 and enter the Automatic Repair environment using the steps to boot into safe mode.
- Once you reach the Automatic Repair environment, follow Advanced options > Troubleshoot.
- Next, click Advanced options > UEFI Firmware Settings

- Next, click Restart. The system will reboot and should now boot to BIOS.
- Now, note down the make and model of your motherboard. (You can find it in the motherboard’ user manual.)
- Open the System Information app to identify the BIOS current version. For this, type System Information in the search box, and after that, click System Summary. You’ll be able to see the BIOS version on display.
- Next, visit the motherboard’s manufacturer’s site, search for your system model, and then look for BIOS updates from the list of available downloads.
- Now, run the BIOS update. Once done, reboot your PC; the error should be solved.
System Restore brings the system to default configuration or chosen restore point, due to which you may lose some of your programs, apps, system files, etc. So, either take a backup of your system data or use robust data recovery software.
After recovering the data, you can start performing system restore. Follow the given steps:
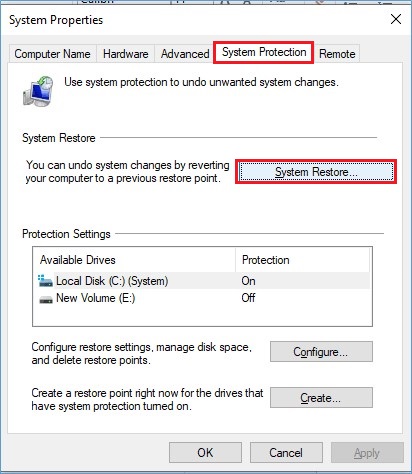
- Go to the Windows Search box and type Create a restore point.
- Afterward, navigate to the System Protection tab, and click System Restore.
- Click Next > Next to proceed. Now, select a restore point from the available ones and click Scan for affected programs.
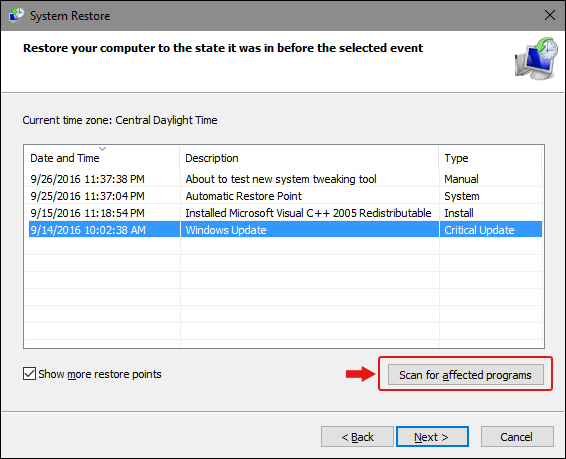
- The process will start looking for the programs and applications, etc., that will be affected.
- After this, click Finish and close the window.
- Now, reboot your Windows 10 and check if the PSHED.Dll BSOD error is fixed.
Method 7: Reset your Windows 10
If none of the above-discussed methods work for you, you’re left with nothing else but resetting your PC. Here, we’re not talking about factory reset, but resetting the system by removing all those programs, apps, files, or anything that may cause problems with your system.
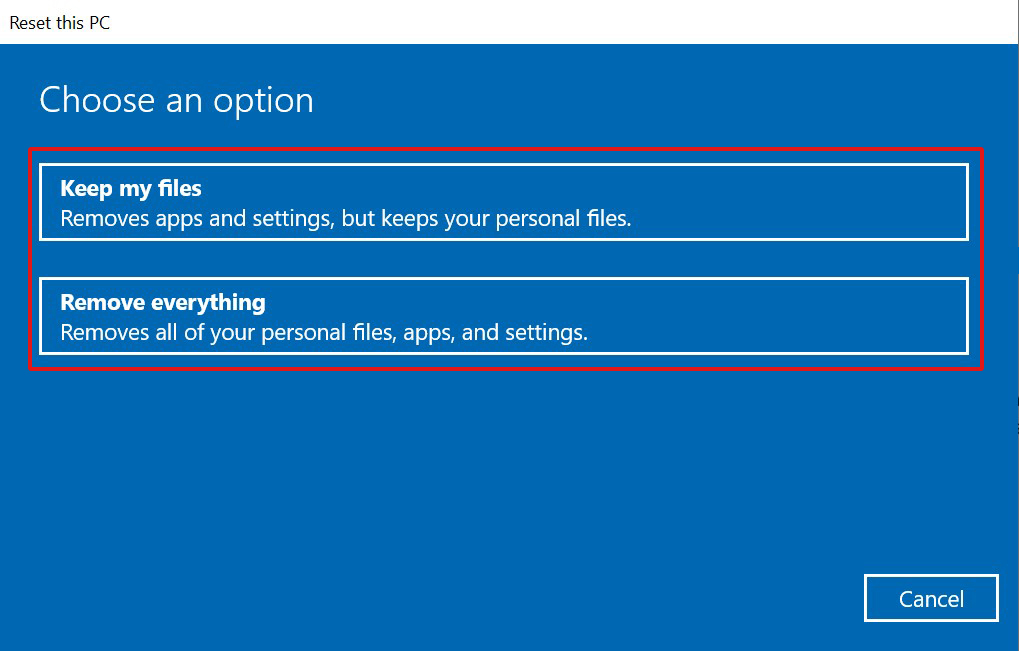
- Open System Settings and follow Update & Security > Recovery > Reset this PC > Get started.
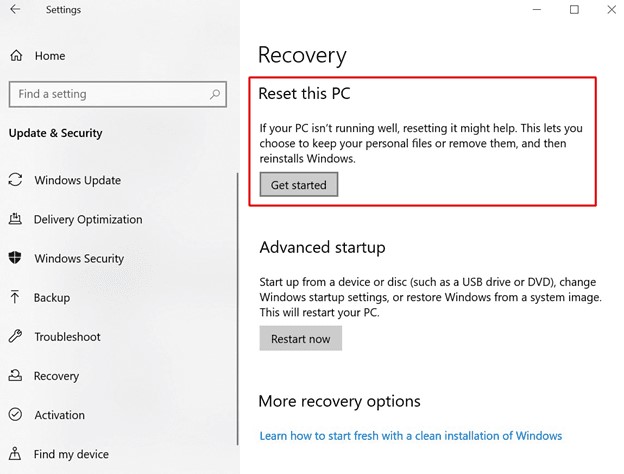
- Next, you’ll get to see two options – Keep my files and Remove everything.
- If you want to save your data, choose ‘Keep my files’ and proceed with the instructions given on screen.
- If the data is unimportant or you’ve already backed up your data, choose ‘Remove everything’. (It is recommended for the process to work).
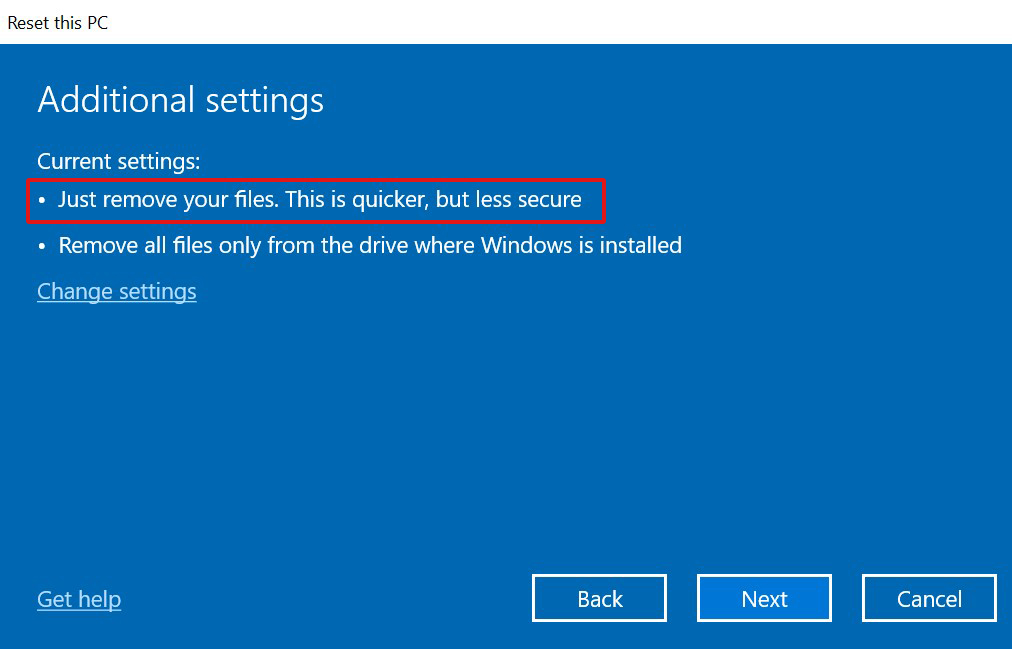
- Afterward, click ‘Just remove your files’ and click Next.
- Next, a warning message will appear on the screen. Click Next > Reset.
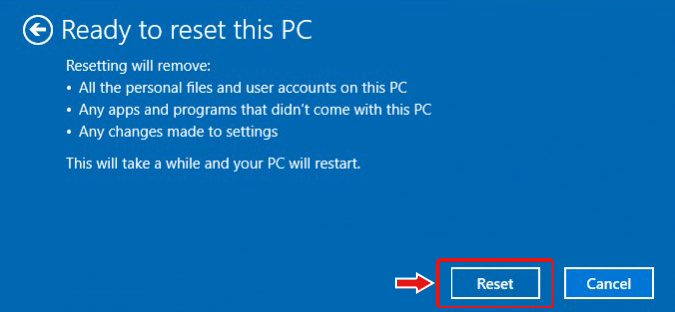
- If prompted with a confirming message, click Continue to initiate the process.
- After this, your Windows 10 will be as fresh as new, and hopefully, the error will be gone forever.
PSHED.DLL error on Windows 10 can occur due to multiple reasons, as discussed in this blog. However, the methods shared above may feasibly help you troubleshoot this blue screen error. Remember, some of these methods, such as running the CHKDSK command, performing a system restore, or resetting your system, may cause data loss. Hence, take back up of your system data before attempting them (if possible). Else, restore your essential data using professional data recovery software, such as Stellar Data Recovery Professional. It supports data recovery from unbootable, crashed, or even BSOD-affected Windows systems.
Was this article helpful?