Although Database Availability Groups (DAG) provide a safe world for the admins and the business, they can have issues. Like other machines, they can also fail. The common reasons behind a failed Exchange 2016 DAG member are:
- Hardware failure, a faulty motherboard, or other components in the server host or physical.
- Software issues, caused by a conflicting or bad Windows update.
- Third-party applications, which are not Exchange Server friendly, may lock important Exchange Server files.
- Sudden loss of power and servers are rebooted without being properly shutdown. This could cause corruption in the databases or logs.
- The server is infected with virus, malware, or ransomware.
Steps to Recover Failed Exchange 2016 DAG Member
Recovering failed Exchange DAG member isn’t just a re-install and re-join procedure. It involves a complex process of cleaning up the Active Directory/Exchange Server schema before installing a new member as a replacement. This is because most of the Exchange Server configuration is stored in the Active Directory Schema.
The steps are as follows:
Step 1: First, remove the failed member from the Database Availability Group (DAG).
Use the following command to remove the database copies.
Get-MailboxDatabaseCopyStatus -Server <failedservername> | Remove-MailboxDatabaseCopy -Confirm:$False

Step 2: Remove the server from the group by using the following command.
Remove-DatabaseAvailabilityGroupServer -Identity DAG01 -MailboxServer EX02 -ConfigurationOnly

Step 3: Evict the failed server from the cluster. For this, use the command below.
Get-ClusterNode <failedservername> | Remove-ClusterNode

Step 4: Once this is done, you can go ahead and install the new server operating system or deploy the virtual machine. After installation is complete, join the domain.
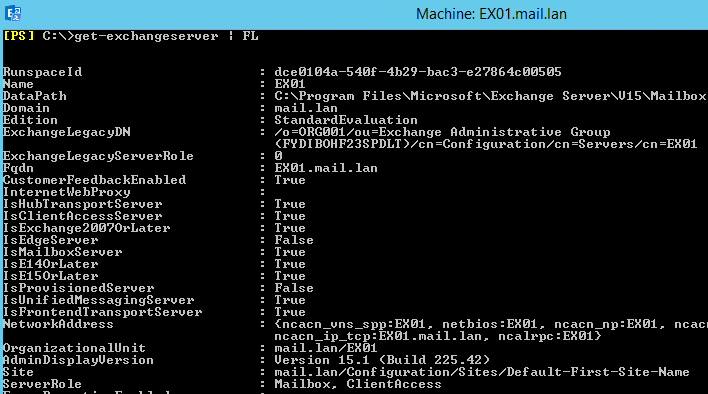
Step 5: Install all updates as the server should be running the same version and built as other member servers in DAG. You can check the required information by running the Get-Exchangeserver command and checking the AdminDisplayVersion parameter.
Step 6: After you have joined the server to the domain, installed all updates, and confirmed the version and build of the current Exchange Server installation, go ahead and install the Exchange Server in the recovery mode.
This will install Exchange and recover all the configuration from the Active Directory Schema. Run the installation of Exchange in unattended mode with the setup /m:recoverserver command.
setup /m:recoverserver /IAcceptExchangeServerLicenseTerms
Exchange Server 2016 and 2019 users with September 2021 or later CU need to run the following cmdlet.
setup /m:recoverserver /IAcceptExchangeServerLicenseTerms_DiagnosticDataON

Step 7: After the installation of the Exchange Server is complete, you need to add the server back to the Database Availability Group (DAG) by using the below command.
Add-DatabaseAvailabilityGroupServer -Identity DAG01 -MailboxServer EX02
Step 8: Now the server has re-joined the cluster and DAG. However, there is no replication of the databases. If a failover occurs, Exchange Server will work but users will not be able to access their mailboxes as their mailboxes reside only on the database in other server.
Add-MailboxDatabaseCopy -Identity DBX01 -MailboxServer EX02
You need to add database copies to the newly restored server by using the following command:
Step 9: When this is done, it would be best to restart the Microsoft Exchange Information Store service for changes to take effect.
At this stage, the database(s) added will start seeding to the newly restored server. Depending on the size and performance of the server and connectivity speed, it will take some time for the mailbox databases to be fully seeded.
The changes will be replicated after the first seeding is complete. You can check the replication status by using the Get-MailboxDatabaseCopyStatus command. This will give you all the information about the data which is being synchronized between the servers.
At this stage, you should have successfully recovered a failed Exchange 2016 DAG member.
Conclusion
The above steps will help you to recover failed Exchange 2016 DAG member. However, if there was any damage to the primary server mailbox databases or corruption, then this could halt the replication of data. In such situations, you can use a third-party application, such as Stellar Repair for Exchange, to recover your mailboxes and restore them to a healthy database copy in the minimum downtime possible. Stellar Repair for Exchange can open any version of the Exchange Server database (.edb) and export the mailboxes and mail items to PST and other file formats. You can also export mailboxes from a repaired EDB file directly to a live Exchange Server database or Office 365 tenant.
Was this article helpful?