Why even Reinstall Mojave?
The macOS requires reinstallation in several situations.
- Mac not behaving properly with the newly installed macOS Mojave
- Mac incompatible with the new macOS
- There’s a bug in your Mac
- Or, when Disk Utility fails to repair the drive and you need to rectify the storage drive partition table
Whatever be the reason, we’ll help you reinstall macOS safely.
Before you begin the reinstallation, back up your Mac using Time Machine. You can also do it manually using an external storage medium. This is the most crucial step to avoid any data loss.
Reinstall macOS Mojave
Once you’ve backed up your Mac storage drive, proceed further. Connect your MacBook Air or Pro to the power source to avoid incomplete installation of macOS due to power failure. Also, make sure you have an active Internet connection to startup Mac through Internet recovery if macOS Recovery fails. Now, boot your Mac into macOS Recovery mode to erase the startup drive and reinstall macOS Mojave. The steps are as follows:
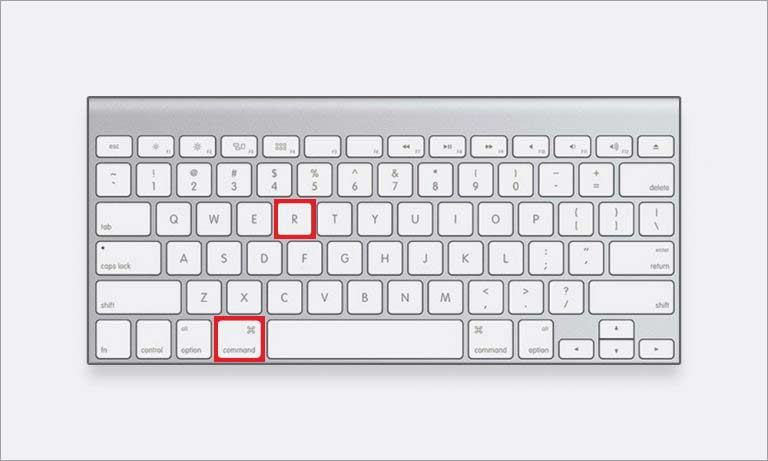
a) Start or restart your Mac, then immediately press and hold the Command + R hotkey. Release the key when the Apple logo or Globe icon appears. Mac boots into macOS Recovery mode.
b) In the macOS Utilities window, select Disk Utility, then click Continue.
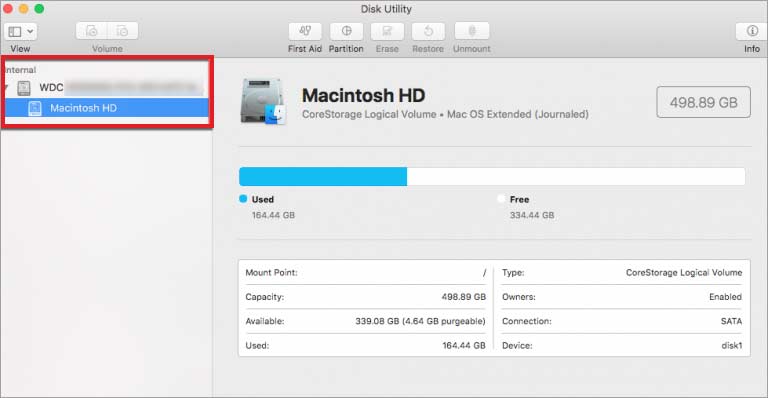
c) In the Disk Utility window, click View > Show All Devices. Select Macintosh HD the startup disk from the sidebar.
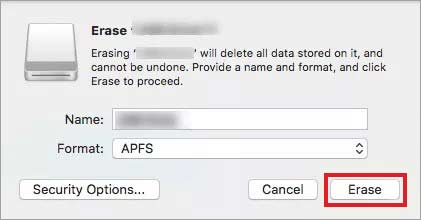
d) Click the Erase tab to erase the startup disk. Specify Name, Format, and Scheme in the respective boxes, then click the Erase button.
e) Once the drive is erased with the right file system format, quit Disk Utility.
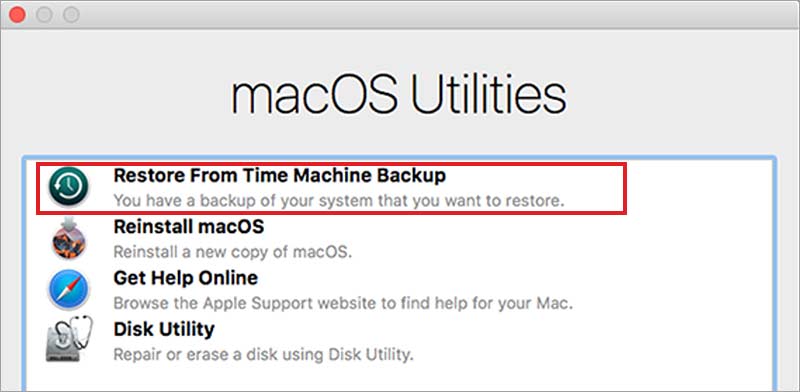
f) In the macOS Utilities window, select the Reinstall macOS option, then click Continue. Follow the on-screen instructions to install a fresh copy of macOS Mojave from the recovery drive or cloud.
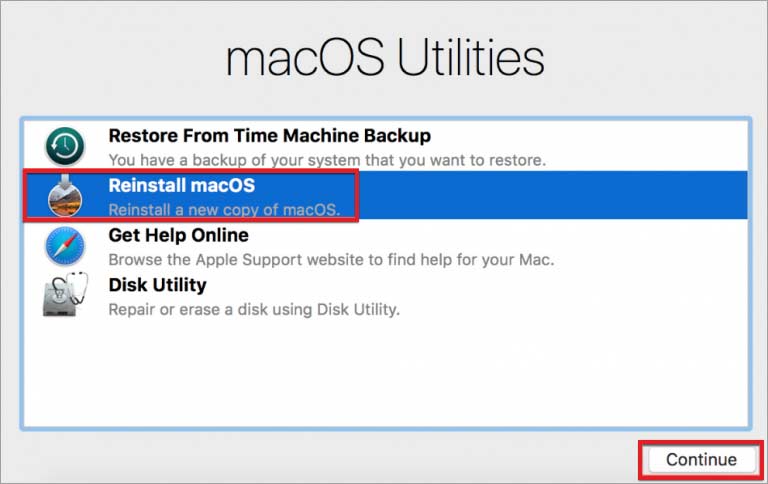
g) Alternatively, you can connect Time Machine backup drive to your Mac. In the macOS Utilities window, select Restore from Time Machine Backup and click Continue. Perform the on-screen instructions to reinstall macOS Mojave and stored data.
If macOS Mojave is unavailable through recovery mode, you can use App Store or Web Browser to download and install macOS Mojave. You can also create a USB flash drive to create a bootable installer to install macOS Mojave on multiple Macs.
Use the ‘createinstallmedia’ command in Terminal
a) Connect the USB flash drive for the bootable installer.
b) Go to Applications > Utilities > Terminal.
c) Type the following command and press Return.
sudo /Applications/Install\ macOS\ Mojave.app/Contents/Resources/createinstallmedia –volume /Volumes/MyVolume
Here, MyVolume is the name of your USB installer. If not, then change it accordingly. Type admin password when prompted, then press Return. Type Y to confirm, then press Return. Click OK to allow the copy to proceed. When it’s done, the USB drive will have the same name as the installer. For instance, Install macOS Mojave. Quit Terminal and eject the USB flash drive.
Recover Data from Botched up Reinstallation of Mojave
If you’ve accidentally erased the drive and reinstalled macOS Mojave without taking backup, proceed to the data recovery steps and tutorial video:
- Launch *the trial copy of Stellar Data Recovery Professional for Mac on your MacBook Air, MacBook Pro, or other Macs.
- From the Select What To Recover screen, go with Everything or customize your scan by toggling between the respective file types, then click Next.
- From the Select Location screen, toggle on Deep Scan switch or go with Quick Scan, then click Scan. Deep Scan will take time but the scan result from the reinstalled macOS will be comprehensive.
- Once the scan is over, preview your files, and then select whatever files are required. Click the Recover button. Click Browse to specify a distinct save location, preferably an external one, then click Save.
- Wait till the recovery is over. Navigate to the save location to check the recovered files. Finally, restore the recovered files to the reinstalled macOS Mojave.
Watch this video to recover data after macOS Mojave Reinstallation
Also, if you need free software that allows 1 GB data recovery capability, then use Stellar Data Recovery Free Edition for Mac. The software is sure to help recover data without paying any buck.
Conclusion
This blog focused on how to safely reinstall macOS Mojave. First off, back up your Mac using Time Machine. Once the backup is taken, restart your Mac and immediately press and hold Command + R hotkey. Release the key when the Apple logo appears. Your Mac will boot into macOS Recovery mode. Now, from the macOS Utilities window, use Disk Utility to erase the startup disk, then use Reinstall macOS to reinstall the operating system to macOS Mojave.
In case, you’ve accidentally reinstalled macOS without taking backup, don’t worry! We’ve got you covered. Leverage professional data recovery software for Mac to scan and retrieve files from the reinstalled macOS. The tool is compatible with macOS Mojave and other latest as well as legacy macOS.
FAQ
1. How can I upgrade my Mac running on macOS Mojave to macOS Big Sur?
You can easily upgrade your existing macOS to the macOS Big Sur by following the steps below:
- Backup your data using Time Machine.
- Open the App Store and find macOS Big Sur Installer Page (Or click the link).
- Click on the Get tab to download the installer file.
- Once the download is complete, installer file launches automatically.
- Follow the on-screen instructions to upgrade.
However, if you want to keep your existing data untouched, you must upgrade to macOS Big Sur without data loss.
2. What are the best software to recover data from a non-booting Mac?
There are a number of options to choose from, but here’s a list of 5 best data recovery software for a non-booting Mac.
3. Is it safe to use data recovery software on Mac?
Yes. However, not all data recovery software are safe. Some software available as freeware from unknown sources might contain bugs that may affect your OS. You must choose from trusted recovery software that guarantee secure recovery of data on Mac. Some of the trusted data recovery software for Mac are:
- Stellar Data Recovery Professional for Mac.
- Tenorshare 4DDiG Mac Data Recovery
- Wondershare Recoverit 10 Standard for Mac
- EaseUS Data Recovery Wizard Pro for Mac
Was this article helpful?