When running the MySQL database on a Linux machine, the database can become corrupt due to several reasons, such as virus attack on the machine, hardware failure, etc. You can try restoring the database from an updated backup. However, if the backup isn’t available, you can try repairing the MySQL database.
Methods to Repair MySQL Database in Linux
Method 1 – Repairing MySQL Database Manually
Note: The manual step-wise approach to repair MySQL database may differ depending on the storage engine you’re using: InnoDB or MyISAM. Thus, troubleshooting database corruption by executing different manual steps requires time, increasing the database downtime. Use a MySQL database repair tool to quickly repair corrupt database and restore it to the original form.
Here, we will discuss step-wise process to repair a corrupt MySQL database on a Linux-based system:
Step 1: Back up your Database
Make sure to back up your database before attempting to repair it. Doing so will prevent your database from further loss. To back up your MySQL database files, follow these steps:
1. Log in to your server via SSH
2. Stop your MySQL server by using any of the following commands based on your Linux distribution:
For CentOS and Fedora, enter:
For Ubuntu and Debian, enter:
3. To back up your database file, type:
| cp -r /var/lib/mysql /var/lib/mysql_backup |
4. Restart the MySQL server by running the following command in your Linux system:
Step 2: Run “mysqlcheck” to Check and Repair MySQL Databases
Note: The mysqlcheck command is useful for users who want to repair MySQL database and tables without stopping MySQL service.
Once you’ve backed up your databases, run the mysqlcheck command to check and repair database and tables for MyISAM or InnoDB database engines. Follow these steps to use mysqlcheck for repairing the database:
1. As the root user, enter the below command:
2. Check the database and all its tables for corruption by typing the command:
To check a specific database table for errors, type the command:
| mysqlcheck database_name table_name |
3. If the table is not corrupted, an OK message is displayed. However, if the database table displays any errors, you need to repair it by using the following command:
| mysqlcheck –r database_name table_name |
If running the mysqlcheck command does not fix the issue, proceed to the next step.
Run diagnostics specific to the storage engine (InnoDB or MyISAM) used by the database and tables. Follow the appropriate procedure below for your table’s database storage engine.
Repairing MyISAM tables with myisamchk
When your database runs on MyISAM storage engine, run the myisamchk command to repair it. To do this, follow these steps:
Note: The myisamchk command works for the MyISAM storage engine only.
1. Stop your server using any of the below commands for your Linux distribution:
For CentOS and Fedora, use:
For Debian and Ubuntu, use:
2. Type the following:
Change the above directory with the directory where your corrupt database is located. For instance, if the database is named db1, type cd db1.
3. Check corrupt tables in the database, by using the following command:
To check all of the database tables, type the following command:
4. Once you have identified the corrupted tables in the database, use the mysqlchk command to repair the tables by following this command:
5. Restart the server:
For CentOS and Fedora, type:
For Debian and Ubuntu, type:
Running the InnoDB Recovery Process
To repair db running on InnoDB storage engine, follow these steps:
- Open MySQL configuration file “my.cnf”. The location of the my.cnf file will vary depending on your Linux OS. On CentOS and Fedora, you can find the file in the ‘/etc’ directory. And on Debian and Ubuntu, the configuration file is located in the ‘/etc/mysql’ directory.
- Once you’ve located my.cnf file, find the [mysqld] section.
- In the [mysqld] section, add the following line:
4. Save the changes to the MySQL configuration file, and then restart the MySQL server:
For CentOS and Fedora:
For Debian and Ubuntu:
5. Run the below command to export all of the databases to the databasesbkp.sql file:
| mysqldump –all-databases > databasesbkp.sql |
6. Start the mysql service, then use the DROP DATABASE command to try to drop the affected database.
Note: If you’re unable to drop a database, delete it manually after stopping the MySQL server.
7. Stop MySQL Server.
8. Type the following command to delete the database manually:
| cd /var/lib/mysql rm -rf database |
Replace ‘database’ with the name of your database that you want to repair.
9. Open my.cnf file again, and comment out the following line:
This will disable the InnoDB recovery mode.
10. Save the changes you’ve made to my.cnf file, and then start your MySQL Server.
11. Try restoring the database from the backup created in Step 5:
Now check the restored database. If the problem persists, use a specialized MySQL database repair software to restore the database.
Method 2 – Repairing MySQL Database with Stellar Repair for MySQL
Stellar Repair for MySQL is a powerful MySQL database repair software recommended by DBAs to repair severely corrupted databases and restore all its objects. The software allows repairing MySQL database on Linux as well as Windows system.
To repair a corrupted MySQL database created on a Linux system, follow these steps:
Step 1: Download and install the software. For software installation, open the Linux Terminal, and then enter the following command:
| $ sudo yum install app_name |
Note: Here “app_name” is the path of Stellar Repair for MySQL software package that you need to install.
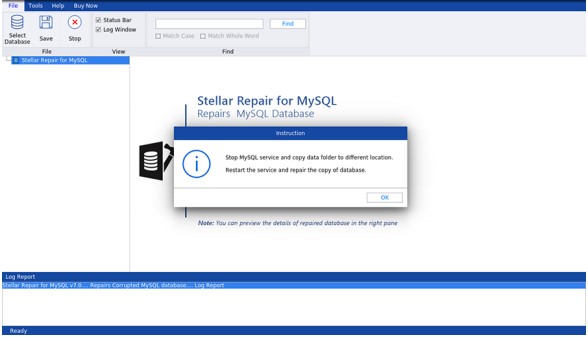
Step 2: Launch the software. The software main interface opens with an Instruction window. Click OK to proceed.
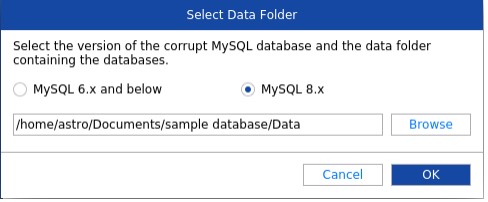
Step 3: In Select Data Folder window, select the version of your MySQL installation, then browse and select the data folder containing the corrupt database.
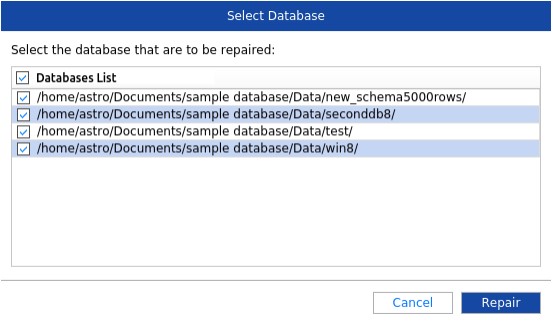
Step 4: The list of the databases stored in the selected data folder is displayed. Select all or specific database that you want to repair, and then click Repair.
Step 5: Click OK when the ‘Repair Complete’ dialog box appears.

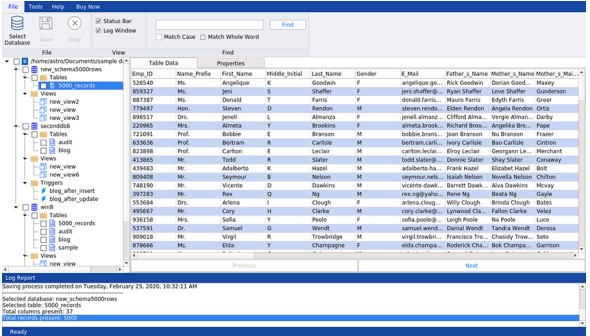
Step 6: The software displays preview of the recoverable MySQL database components.
Step 7: Click Save on File menu for saving the repaired MySQL database file.
Step 8: In the ‘Save Database’ dialog box, choose MySQL under Save As, and then enter the required details to connect to your MySQL server. Click Save for saving the repaired database file in MySQL Server.

Step 9: A ‘Save Complete’ message box is displayed when the repaired file saving process is complete.
After executing these steps, the MySQL database will be repaired.
Conclusion
Repairing MySQL database in Linux-based system using the manual method does not guarantee to restore all the database components. It might work to fix minor database issues but fail to fix a heavily damaged MySQL database. Using Stellar Repair for MySQL software can help you repair a severely corrupt database and recover all its components, preserving the original file structure and contents.
Was this article helpful?