The VLC Media Player is an outstanding tool. It can play almost any type of video and has several other useful features. But even the best tools have their flaws. One such glitch witnessed by VLC users is videos playing out of sync in the player.
Although various VLC updates fix bugs from time to time, this problem is consistent and can appear without a specific reason. Sometimes, audio or video lag goes away on its own, but there are times when it can continue to bother me for a long time.
If you’re also experiencing such issues, see the methods shared below to fix audio-video sync issues in VLC Media Player on Windows, Mac, and Android devices.
VLC Media Player has built-in features that allow you to fix the audio lag or sync issues in video playback. Below are four ways you can try to fix the audio sync issue in VLC:
- Fix VLC audio delay using Keyboard shortcut keys (temporary fix)
- Set Track synchronization value (apply separately for every video)
- Set Audio desynchronization compensation (permanent fix for all VLC videos)
- Adjust audio delay in VLC on Android phones (apply separately for every video)
Method 1. Fix VLC audio delay using Keyboard shortcut keys
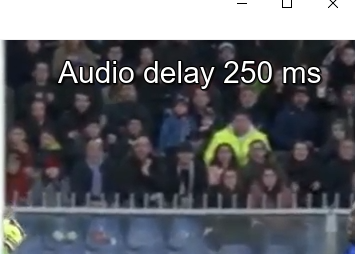 Figure: Audio delay message in VLC
 You can fix VLC audio delay on Windows or Mac using Keyboard shortcut keys. You can shift the audio up and down in increments of 50ms. However, fixing out-of-sync audio in VLC Player using the shortcut keys is a temporary quick fix. This method will only fix the audio problem of the current video playback in VLC.
Open the video in VLC Media Player on your computer. If the audio plays before the visual, then slow down the audio by hitting the ‘K’ key on the Windows PC keyboard. If the audio plays after the visual, then fasten its speed. For this, press the ‘J’ key on your PC keyboard.
If you are a Mac user, press the ‘G’ key to slow down the audio and the ‘F’ key to increase the audio speed.
Listen to the audio carefully. Make sure it matches with the video. The player will show the increase/ decrease in audio delay by 50 milliseconds (ms) each time you press the keys. You will see the message of audio delay with time in milliseconds on the top-right of the VLC Player’s screen. Though this message goes away very quickly.
Method 2: Set Track Synchronization Value to fix the VLC Player sync problem
The answer is ‘Yes’. You can apply the settings for once for all the videos you play in VLC. For this, use the ‘Audio desynchronization compensation’ feature. It would permanently fix the audio-video sync in VLC Player. Unlike the Audio track synchronization value, which you must reset every time, you must set the ‘Audio desynchronization compensation’ value just once. The settings get saved for all the videos until you change it again.
Steps to set Audio track synchronization in VLC:
- Open the video in VLC Player.
- In the menu bar, click Tools> Effect and Filters.
- Click on the Synchronization tab.
- Under Audio/ Video, enter Track Synchronization Value. A positive value will delay the audio while a negative entry will hasten the audio in the video.
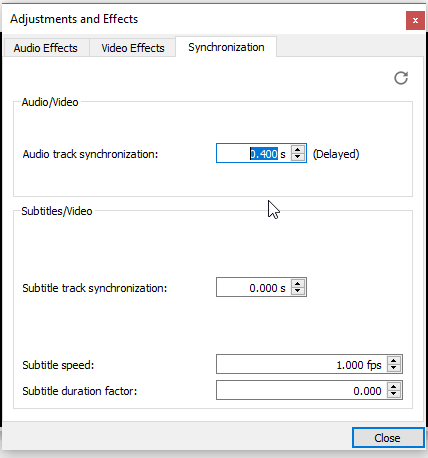 Figure: Audio track synchronization in VLC
 Method 3: Set the VLC audio desynchronization permanently
Often, users ask if every time they play a video in VLC, they have to manually adjust Audio track synchronization to get the audio in sync with the video. So, is it possible for this setting to be saved permanently?
The answer is ‘Yes’. You can apply the settings for once for all the videos you play in VLC. For this, use the ‘Audio desynchronization compensation’ feature. It would permanently fix the audio-video sync in VLC Player. Unlike the Audio track synchronization value, which you must reset every time, you must set the ‘Audio desynchronization compensation’ value just once. The settings get saved for all the videos until you change it again.
Steps to set ‘Audio desynchronization compensation’ in VLC:
- Open VLC Player.
- In the menu bar, click to follow Tools > Preferences.
- Click the Audio tab.
- Check in the All option under Show settings at the bottom-left corner.
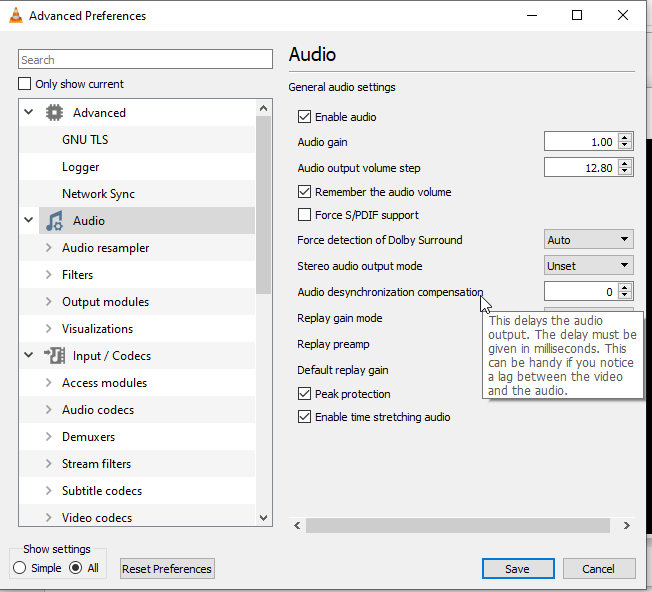 Figure: Set Audio desynchronization compensation value in VLC
- On the right pane, under Audio, set Audio desynchronization compensation. Set the value to positive, if the audio lags behind the video. If the audio is playing ahead of the video, set it to a negative value.
E.g. If audio lag is 2 seconds, you can set Audio desynchronization compensation to +2000 milliseconds. When the audio is 2 seconds ahead of the video, set it to -2000 milliseconds.
- Click Save.
The video or movie should now play without any audio sync issue in the VLC Player.
Method 4: Adjust audio-video delay in VLC on an Android device
‘Until now I was using VLC as the default media player on my Android phone without any issues. But recently, the videos have started playing out of sync. I tried to fix it by using the audio delay option but couldn’t. How to adjust audio delay in VLC Android?
The Android version of VLC has an audio delay feature, wherein you can adjust the audio speed as per the requirement and fix video audio sync.
Steps to sync audio in VLC on Android:
- Open a video in VLC Media Player.
- From the interface controls, click on the second icon at the bottom.
 Figure: Select the second icon on the VLC video on Android
- From the options, click Audio delay.
- Click on the + or – button to increase or decrease the audio speed in your video. The + button will delay the sound by 50 milliseconds, whereas the – button will hasten the sound. Press the + and – buttons until the audio gets synced with the video.
However, the settings that you make in the video will be temporary and will be removed when you close the video. Next time when you have to play the same video, reset the audio delay.
VLC fix for out-of-sync videos didn’t work? Here’s what you can do…
When the above methods don’t fix the audio sync issue in VLC videos, it indicates video corruption.
So check if you are facing an audio sync problem in VLC Player for a particular or a few video files.
Also try to play your videos on different players like MX Player, Kodi, Winamp, etc. If the audio-video sync issue persists in other players, then the problem is with your video files. They might be damaged or corrupt. This calls for video repair software that can fix corrupt sound sections in a video file.
Note: Not all video repair software is advanced enough to fix audio problems in videos. So, before choosing one, make sure it is capable of fixing sound issues in a video file.
Here we recommend one such tool— Stellar Repair for Video that can repair corrupt sound sections, file header, frame movement, etc., which usually result in out-of-sync, audio lag, missing sound, or stuttering issues.
How to fix audio sync issue with repair software
Simply download it on your Mac or Windows PC and follow the onscreen instructions. The video repair process is completed in 3 steps –
Step 1: Click Add File to insert the corrupt video file/s.
Step 2: Click Repair.
Step 3: Preview and click Save Repaired Files.
You don’t need to do any resetting or learn to use the software. It’s easy to use and has advanced algorithms that work without you making any effort.
Conclusion
It’s annoying when your favourite VLC Player suddenly starts playing videos out of sync. But the best thing about VLC is that it can fix its glitches. You can use various features in VLC to fix video-audio sync problems.
However, if you are not able to fix audio sync with VLC, videos may be corrupted. You can use Stellar Repair for Video to fix the audio sync problem in the VLC media player. But before using the software, try the methods given above to rule out or ascertain video corruption.
I hope the post was helpful. Please share how you could fix out-of-sync videos in VLC Media Player on your system.
Was this article helpful?