There are many situations where you may want to move Outlook data, such as emails, contacts, attachments, notes, calendar items, tasks, etc., to another computer. For instance,
-
You have received or bought a new computer and want to move your Outlook data from your current system to this new computer running Microsoft Outlook.
- You are using Outlook to access your Hosted Server account or Gmail or Exchange account and want to move the mailbox data from Gmail or Exchange mailbox to another Outlook, Exchange, or Office 365 account.
-
You want to move Outlook data from Outlook for Windows to Outlook for Mac.
- To create Outlook data backups as there is no option to create automatic backups in Outlook.
You can export the mailbox items from Outlook using the Outlook Import Export wizard. All the mailbox data, such as emails, contacts, attachments, etc., are exported and saved on your computer in a .pst file format, which you can move or transfer to other computer and Import via Outlook Import Export wizard. PST files can also be imported into Office 365 and Microsoft Exchange Server.
However, if you can?t access the Outlook account or Outlook Import Export wizard due to a problem with Outlook profile or Outlook data file (OST or PST), you can?t export the mailbox items.
To transfer Outlook 2007, 2010, 2013, 2016, or 2019 data or emails from an inaccessible or orphaned Outlook OST file to a new computer, you need to convert the inaccessible offline Outlook data file to accessible PST file format.
 Case Study

"OST file inaccessible? Coldwell Banker Sea Coast Advantage resolved OST File Access Challenges with Stellar Converter for OST"
"See How Coldwell Banker Sea Coast Advantage used Stellar Converter for OST"
Read Case Study
Steps to Transfer Outlook Data to a New Computer
Let us understand the systematic approach to migrate and Import Offline OST file (OST/ PST) from one computer to another. For convenience and to make the process easier, we have divided the entire process to transfer Outlook data to another computer into four steps:
Step 1: Convert and export mailbox items from Outlook or Offline data file (OST)
Step 2: Transfer PST file to the new computer
Step 3: Create a new Outlook profile on a new computer
Step 4: Import the converted PST into the Outlook profile on the new computer
By following these steps, you can
- Transfer Outlook 2007, 2010, 2013, 2016, or 2019 data to a new computer.
- Transfer Outlook data and settings to your new computer.
- Transfer Outlook calendar items, attachments, contacts, etc., to another computer.
- Move mail items from Outlook 365 to a new computer.
- Move personal folders from one Outlook to another.
NOTE1: Folder properties, Outlook settings, etc., are not preserved while exporting the data. Only the mailbox content is saved to the exported PST file.
NOTE2: You can?t access or use Outlook?s Import and Export Wizard if the Outlook profile is disconnected from the server, damaged, or belongs to a disabled/deleted mailbox. In such cases, the Outlook data file becomes inaccessible. However, you can use an OST to PST converter software, such as Stellar Converter for OST, to convert inaccessible and orphaned Outlook OST and PST files to a new PST file. You may also export the converted mailbox items from inaccessible Outlook data files directly to an existing Outlook profile, Office 365, or live Exchange account. The software also helps convert encrypted Outlook offline data files (.ost) into PST.
To know the step-by-step process for converting OST file to PST using the software, read How to Convert OST File into Outlook PST file?

Step 1: Export Outlook Mailbox Mails and Other Items to PST
Considering your Outlook account is active and in sync with the mailbox server and local Outlook data file (OST and PST), you can export the mailbox items and take a backup of Outlook emails, contacts, calendar, notes, tasks, settings, etc., to PST file using Outlook?s in-built Import and Export wizard.
The steps to export mail items to PST via Outlook Import Export Wizard are as follows:
Export Outlook Items to PST in Outlook 2013, 2016 and 2019
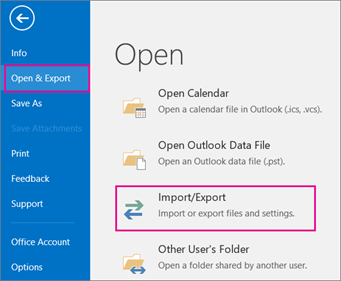
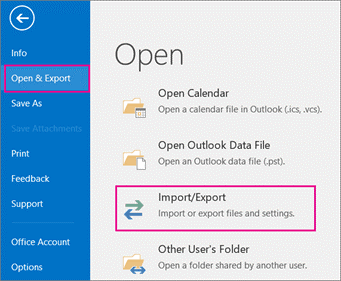
- To open the Outlook Import Export wizard in Outlook 2013, 2016, and 2019, go to File > Open & Export > Import/Export.
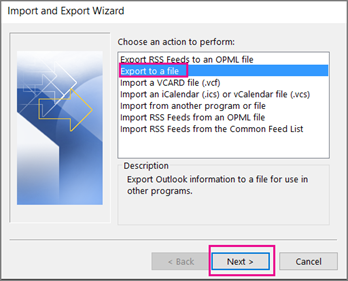
- From the Import and Export Wizard window, select Export to a file and then click Next.
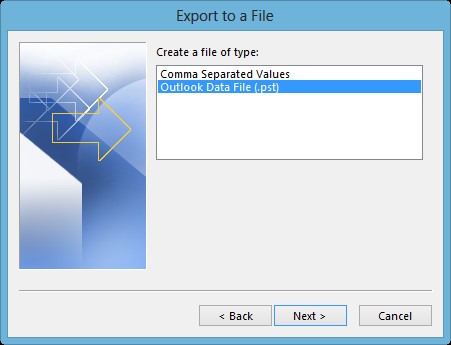
- When Export to a file window opens, select Outlook Data File (.pst) and click Next.
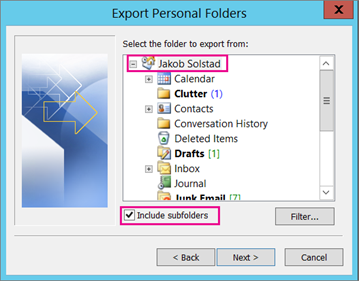
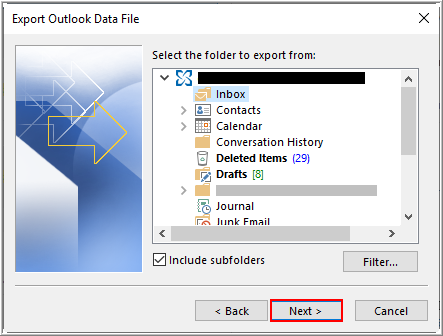
- Select the mailbox folders and mailbox items that you want to export. Also, check the ?Include subfolders? checkbox and then click Next.
- Click on the ?Browse? button to select a location to save the PST file. You can also select an existing PST file to export the mailbox data.
Note: You can also connect a USB media or external hard drive to the computer and select it as a save location for the PST file. This helps move the file to a new computer.
- Once the process is completed, click ?Finish. Then, click ?OK? with or without entering the password.
Export Outlook Data to PST in Outlook 2010
-
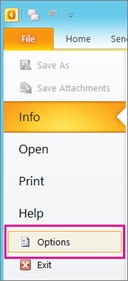
In Outlook 2010, click on the File > Info and then select Options.
- Click ?Advanced? and then click on the ?Export? button to open the Import Export wizard.

- Select ?Export to a file? and click ?Next.?

- Select?Outlook Data File (.pst)? from the options and click ?Next.?
- Select the email address and check the ?Include subfolders? checkbox to export all mail items. Click ?Next.?
- Click ?Browse? to choose save location, enter a file name, and click ?OK.? You may export a new PST file or append the data to an existing PST file.
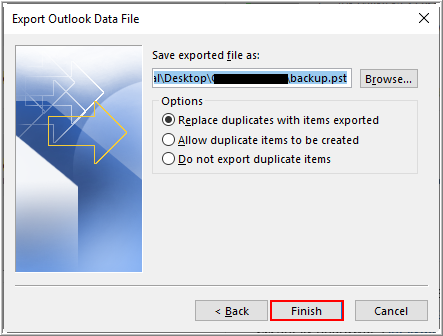
- Click ?Finish.? You will be prompted to enter a password to protect the exported PST file. You may enter a password or click ?OK? without entering the password to export the Outlook data to the .pst file.
Export Outlook Items to PST in Outlook 2007
- In Outlook 2007, click ?File? and choose ?Import and Export?.?
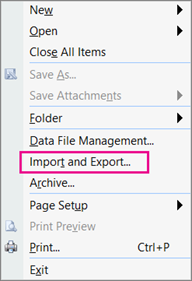
- Select the ?Export to a file? option and click ?Next.?

- Choose ?Personal File Folder (.pst)? from the options and click ?Next.?
- Select the email account and tick the ?Include subfolders? option. Click ?Next.?
- Click ?Browse? to choose a save location, enter a file name, and click ?OK.? You may get a prompt to enter the password if you are exporting to a password-protected PST or a new PST.
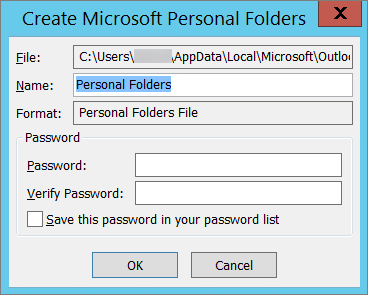
This will export and save all the emails and other mailbox data, including attachments, from the Outlook data file to a portable PST file.
Important Note: The Import Export wizard exports the Outlook data from the local cache (OST or PST). Thus, it exports the mail items stored in the local Outlook data file, which contains data from the past 12 months. To export all data, disable Cached Exchange Mode in Outlook.
Step 2: Copy Outlook Data File to New Computer
After converting the Outlook mailbox data from the OST file to the PST file, transfer the converted Outlook PST data file to a new computer. To do so, copy the converted PST file to any external storage media, connect this storage media to a new computer, and then copy the PST file on the computer?s hard drive.
However, if you could not export Outlook data via Import Export wizard, follow these steps to locate and convert the original Outlook data file using Stellar Converter for OST software.
- Download, install, and launch Stellar Converter for OST on your Windows PC.

- The software automatically displays all Outlook data files from the default location. Select the Outlook data file you want to convert.
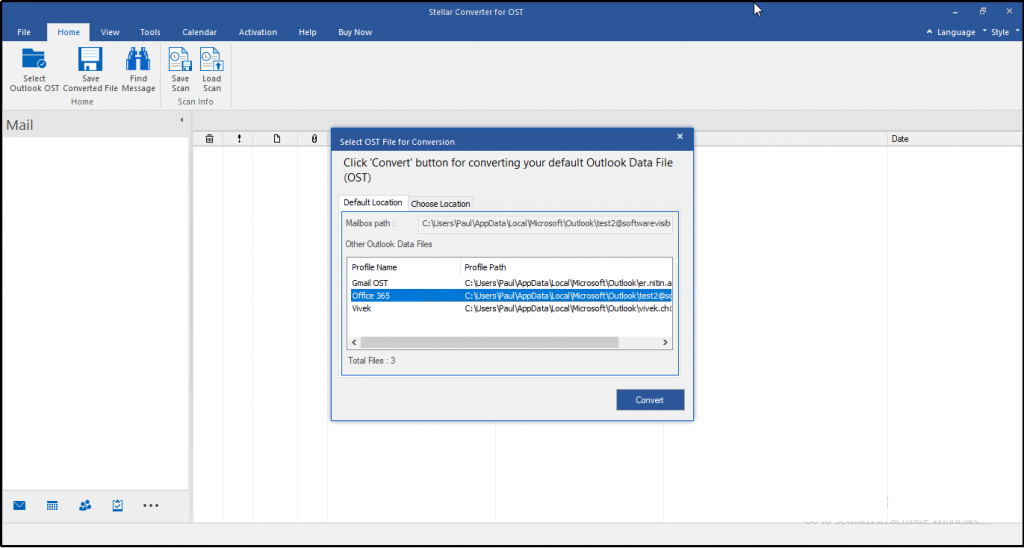
- You may also click ?Choose Location? to browse and select Outlook data file stored in a different location.
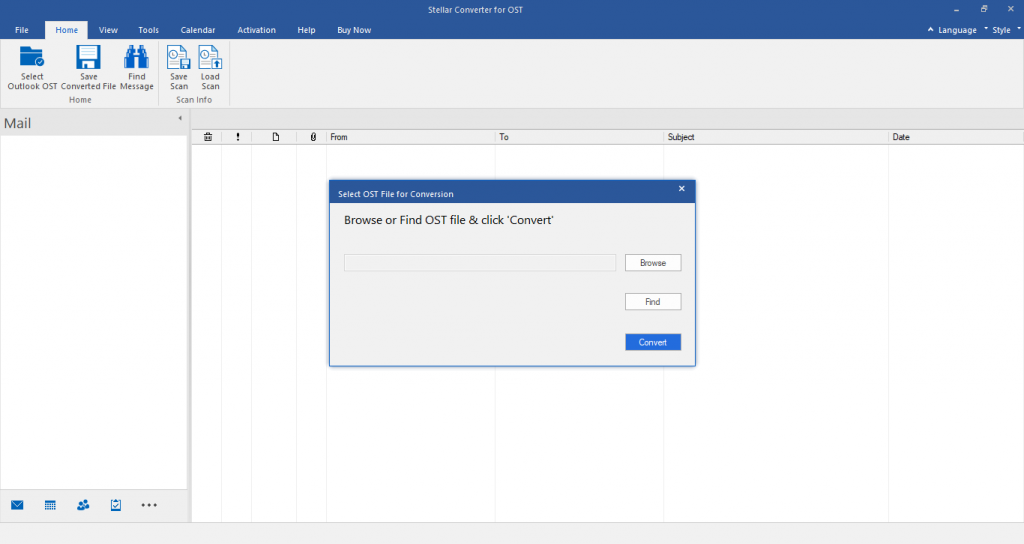
Note: By default, the Outlook data file is stored in C:\Users\YourUserName\AppData\Local\Microsoft\Outlook\ folder. However, the location may vary based on the Outlook and Windows version and edition. For more details, refer to our guide to Locate the OST file .
- After selecting the Outlook data file, click ?Convert.?
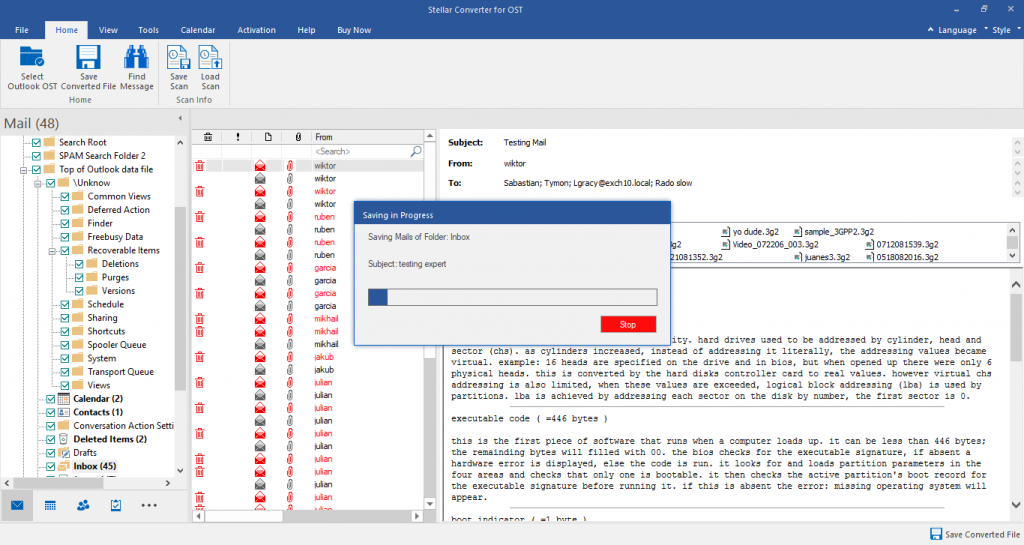
- After the conversion, the software displays all mail items from inaccessible Outlook data files. You can click on a mail item to see its detailed preview.
- Select the mail items from the converted Outlook data file and click ?Save Converted File.?
Note: The free demo version allows you to preview unlimited mail items and save up to 20 items per folder. To save all mail items, activate the software using a valid activation key.
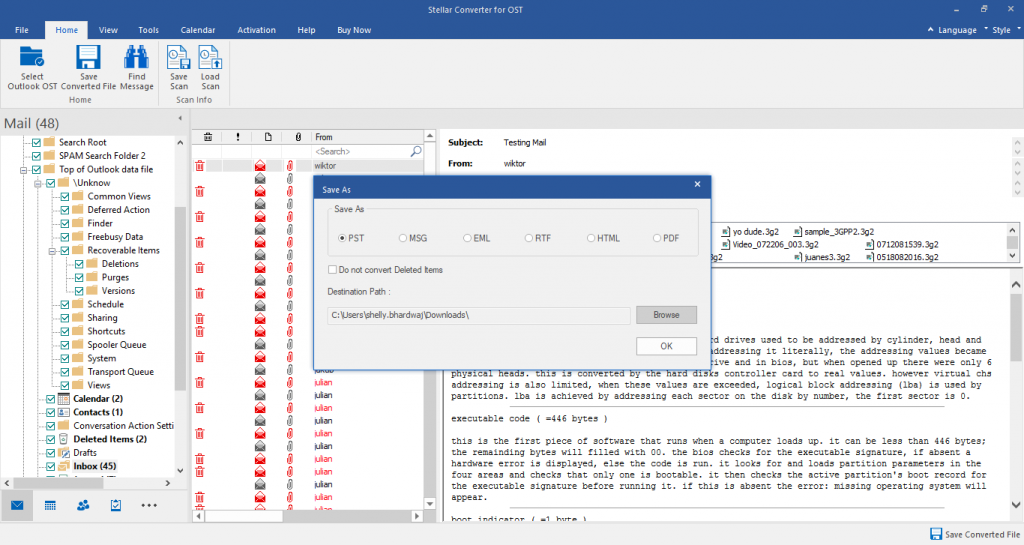
- Choose ?PST? from the option and then click ?Browse? to choose a save location.
- Click ?OK? to save the converted Outlook items into a new PST file.
Copy this converted PST file to your new computer where you want to transfer the Outlook data.
Step 3: Set up a Profile to Transfer Outlook Data on New Computer (Optional)
Skip this step if you want to import the PST file into an existing Outlook profile on a new computer. However, you may create a new Outlook profile on your computer to import or access the converted PST file.
The steps are as follows:
- Press Windows + R, type Outlook.exe /manageprofiles.
- Click ?Add? and then enter a profile name.
- Now provide account information and credentials to log in.
- Select Existing Outlook Data File and then browse to select the PST file you transferred to your computer.
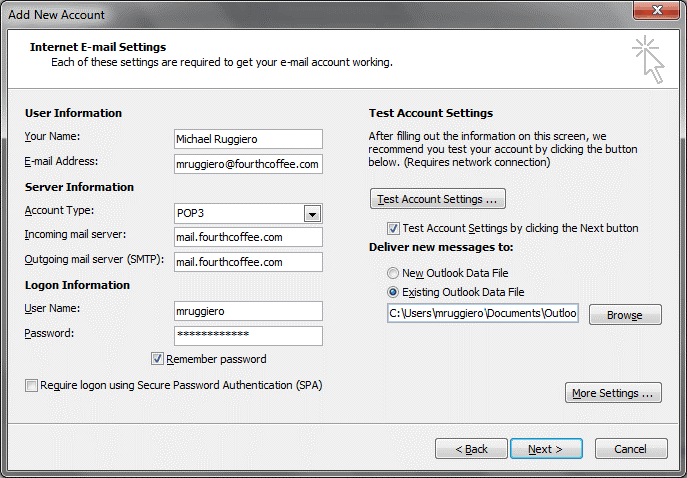 How to Convert OST File into Outlook PST file
- Click ?Next? and then ?Finish?.
Step 4: Transfer Outlook Data to Your New or Existing Outlook Profile on another Computer
After moving the PST file exported via Outlook Import Export wizard or converted using Stellar Converter for OST on a new computer, you can import this PST into Outlook.
First, ensure that MS Outlook is installed on the machine. Now, follow the given steps to import PST into Outlook.
In MS Outlook 2013, 2016, or 2019
- Click File > Open & Export > Import/Export to open the Import/Export wizard.
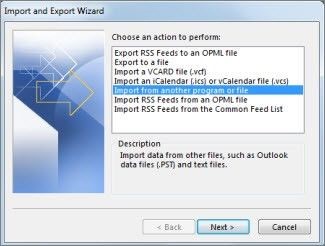
- Select Import from another program or file and click Next.
- Select Outlook Data File (.pst) and click Next.
- Click Browse to select the .pst file that you transferred and choose desired options. Then click Next.
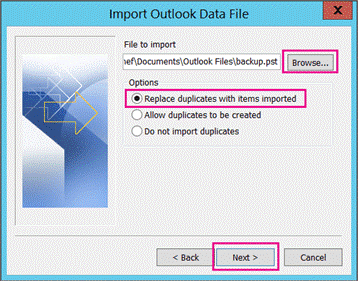
- Enter the password, if prompted, and then click OK.
- Select the mailbox folder where you want to import the mail items and then click ?Finish?.
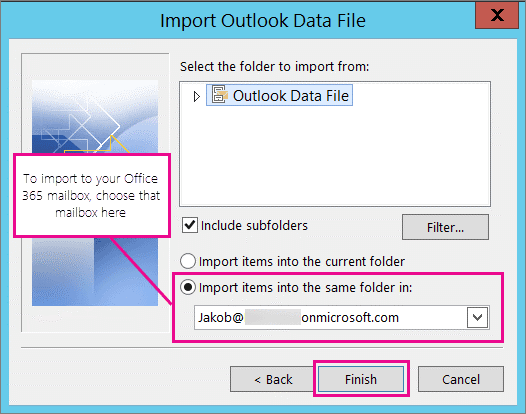
- Outlook will import the mail items into your .pst file.
In MS Outlook 2010
- Click on the File > Open > Import.
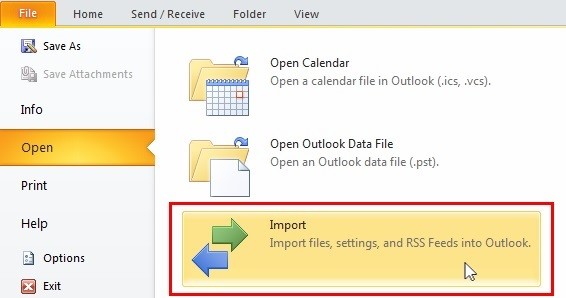
- In the Import & Export wizard that appears, select Import from another program or file and click Next.
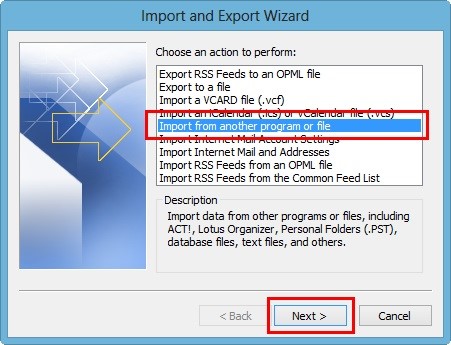
- Click on Outlook Data File (.pst) and then click Next.
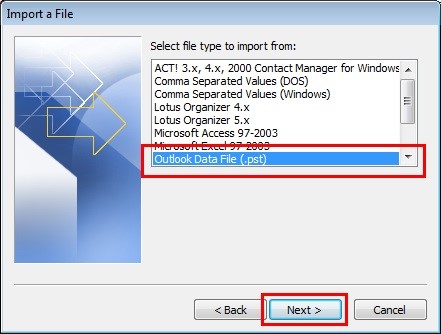
- Click on Browse to navigate to the PST file location.
- Under the Options section, select Do not import duplicates. You can select the appropriate option if you want Outlook to replace or replicate already existing items in Outlook.
- Click Next.
- Select folders that you need to import or select at the top of the hierarchy to select all the folders in the PST file.
- Click on Finish to complete the import procedure.
In MS Outlook 2007
- Click on the File tab.
- Next, click on the Import and Export option.
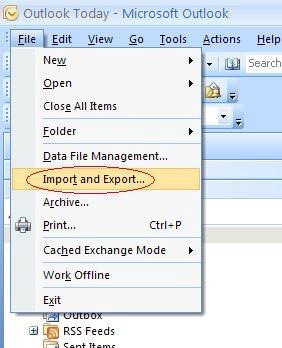
- Select Import from another program or file and click Next.
- Click on Personal Folder File (.pst) and click Next.
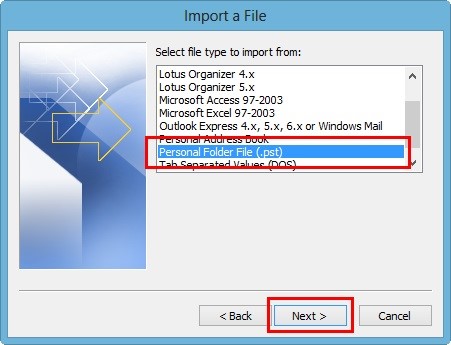
- Specify the name and path for the PST that needs to be imported and click on Next.
- Then, select the folder you need to import or click on the top of the hierarchy to select the entire PST.
- Click Finish.
You may also open and access the PST file directly in Outlook on a new computer without importing. For this,
- Open Outlook and go to File > Info > Account Settings > Account Settings.
- Click the Data Files tab and then click ?Add.?
- Select the PST file and click ?OK.?
- Give this PST file a new name and then click OK.
- Restart Outlook.
Or you can go to File > Open and select the PST file to open and access all mail items, such as emails, calendar, contacts, notes, tasks, etc., on a new computer.
Transfer Outlook Data to Outlook for Mac
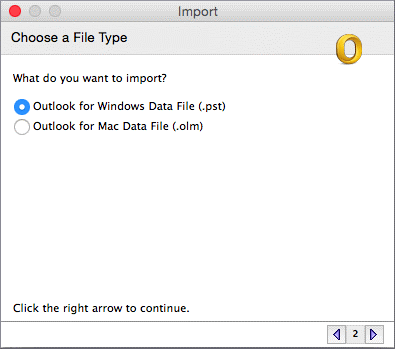
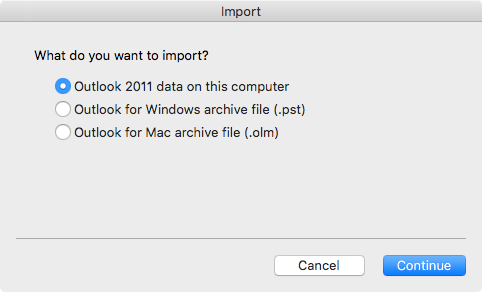
Follow these steps to import the PST file into your Outlook for Mac profile:
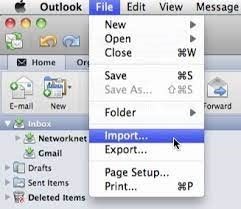
- Select Outlook for Windows Data File (.pst) option in Outlook for Mac 2011 or Outlook for Windows archive file (.pst) in newer versions and click Continue.
- Select the PST file and then click Import.
- This will import the PST file into your Outlook for Mac profile. Click Finish, once it completes.
You can view the transferred Outlook data and emails under On My Computer in the navigation pane.
Conclusion
Unlike PST, there is no direct way to transfer Outlook OST or cache Exchange mailbox data to a new computer. Instead, you need to first convert the OST to PST using the Outlook Import and Export wizard or a third-party OST converter tool, such as Stellar Converter for OST. The software can also convert orphaned or inaccessible Offline Outlook data file (.ost or .pst) files to new PST. This professional converter tool can export encrypted Offline OST files to PST in an error-free manner. Once the offline OSt file is converted to PST, you can quickly transfer Outlook data to a new computer and import the PST file into any Outlook account or profile.
Stellar Converter for OST Rating by MVP:


Was this article helpful?