A Synology RAID set or Network Attached Storage (NAS) may degrade, fail, crash, break or corrupt anytime due to mechanical, physical and logical disk errors caused by virus or malware infection, corrupt system files, sudden power loss, damaged device drivers, force shutdown, improper handling or storage, bad sectors, etc.
While popular Synology RAID sets such as RAID 1, RAID 5, and
RAID 6 can withstand up to one to two disk failures, these RAIDs can’t
withstand multiple disk failure and corruption due to logical errors and system
crash.
When a Synology RAID set breaks or crashes, you are generally left with only one option and, i.e., Synology RAID data recovery.
When we talk about Synology RAID recovery, there are only a few options, which are as follow,
- Mdadm in Ubuntu
- Stellar Toolkit For Data Recovery.
But before you proceed with Synology RAID data recovery
steps, here are some notable pros and cons of each option,
1. Mdadm for Ubuntu
Pros
Cons
- Complicated for users without knowledge of Linux
/ users not comfortable with the command line
- Synology’s FAQ doesn’t cover all possible
scenarios
- Requires a RAID hardware controller
Pros
- Highly intuitive and easy to use Windows Synology RAID data recovery utility
- Free, demo version, allows you reconstruct and scan broken or crashed Synology RAID for data recovery.
- Requires minimal efforts and ideal for newbies as well as professionals and power users
- Does not require a hardware RAID controller
- Reconstructs broken and crashed RAID even if parameters are unknown or not provided
- Features video and photo repair modules and a Disk Monitor utility that assists in secure data recovery from broken or crashed Synology RAID 0, RAID 5, and RAID 6 arrays
- Facilitates disk cloning, comes handy when RAID drives are failing due to SMART or other logical errors
Cons
- A licensed version of Stellar Toolkit For Data Recovery costs a few bucks to save the important data from the free preview window.
Now that you know about all three possible options to
recover data from a broken or crashed Synology RAID set, follow the steps given
below to get back your lost files.
Steps to Recover Data from Broken or Crashed Synology NAS based on RAID 0, RAID 5, or RAID 6 Array
Since Ubuntu way is complicated, we will detail the Stellar® way to recover data from broken or crashed Synology RAID. It’s much easier and safe as the software handles all the complicated tasks in the back-end. Get the software now!
Step 1: Disconnect RAID Drives
- Remove all Drives from the broken or crashed
Synology RAID set and connect them to a working Windows PC via SATA connectors.
- Alternatively, you may use SATA to USB converter
cables or enclosures to connect Synology RAID drives to Windows PC or laptop
Step 2: Inspect RAID Drives’ Health and S.M.A.R.T Status
Note: Alternatively, you may also use CrystalDiskInfo or similar SMART disk utility. But Drive Monitor displays more detailed information about the disk health, performance and SMART status besides an option to clone disk.
- Check the hard drive health. If the utility
displays SMART warning or any health or performance-related warning signs, immediately
clone the disk
Disk cloning is important as any further rigorous data recovery scan
and actions can cause drive failure, leading to permanent data loss.
Step 3: Clone Disk [Optional]
NOTE: This drive cloning is optional but highly recommended for safe data
recovery from failing RAID drives
- Connect a new or healthy hard drive with volume size equal or larger than the affected RAID drive
- Click ‘Clone Disk’ and choose the source (affected drive) and target disk (new or healthy drive) from respective drop-downs
- Click ‘Clone’ and click ‘Start’ to accept and begin the cloning process
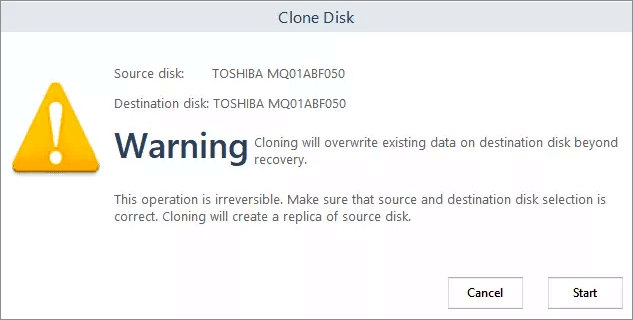
- Wait for the cloning process to finish. Repeat
the steps for other degraded RAID drives
After the clone, replace the degraded RAID drive with a
newly cloned hard drive and proceed to the next step to perform effortless data
recovery from connected RAID drives.
Step 4: Reconstruct Broken or Crashed Synology RAID Array
To reconstruct a Synology RAID 0, RAID 5, or RAID 6 set, close the ‘Drive Monitor’ utility (if running) and launch the Stellar ToolKit For Data recovery tool.
- Then choose what file types you want to recover and click ‘Next.’
TIP: You can add
a custom or uncommon file format in the supported file list for data recovery.
The ‘Add Header’ option in Settings
allows you to add unlimited file formats and enables users to recover virtually
any file type.
- Next, under Connected Drives, select Synology Disk and click Scan.
- The scanning process will start.
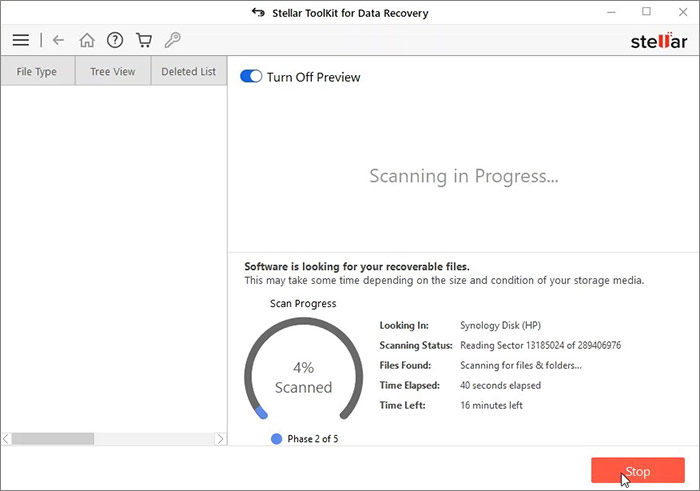
- After scanning, the software will show you the results on the screen.
- Select the files. You can see the preview of the files you want to retrieve.
- Click Recover to proceed.
- After the scan, if the desired files are not found in the scan results, click the ‘Click Here’ link at the bottom to begin ‘Deep’ Scan.
- Now, select Browse to choose a storage location. (Choose a different drive volume or an external media drive.)
- Finally, select Start-Saving to save the recovered files.
- The files will be saved at the chosen location.
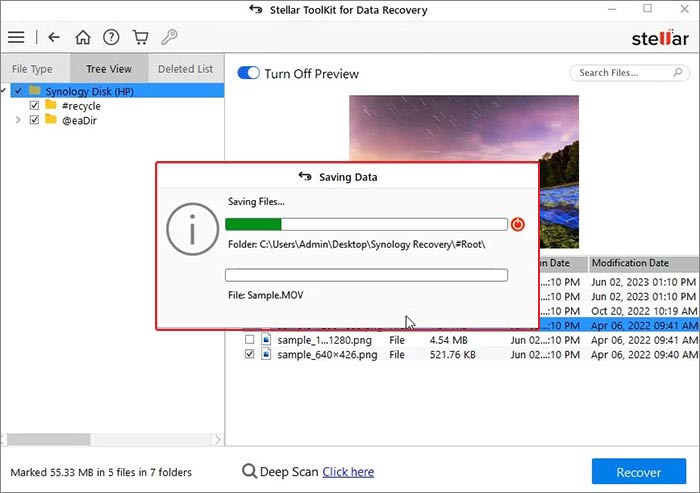
- Finally, click the ‘Start Saving’ button. The selected recovered files and folders will be saved at your desired location.
Remember, RAID is not a backup or an
alternative to backups!
Conclusion
Synology
NAS based on RAID arrays may break or crash due to disk failure caused by
logical, mechanical, or physical errors. Often, it occurs due to logical errors
such as file system errors, virus or malware infection, abrupt shutdown, device
driver issues, etc.
You can use mdadm commands to resync the RAID array for data recovery. But mdadm works in Ubuntu. If you aren’t familiar with Ubuntu or Linux command line, leverage a powerful NAS data recovery software such as Stellar® Data Recovery TOOLKIT for Windows.
The latter method is much easier and doesn’t require any specialized skills. If you are familiar with Windows, you can use STELLAR® TOOLKIT FOR DATA RECOVERY to recover data from a broken, crashed, degraded, or corrupt Synology RAID 0, RAID 5, and RAID 6 setup.
Was this article helpful?