Have you connected a USB flash drive to Mac and found that is not detectable, leaving your important photos, documents, or videos inaccessible? Some common reasons like unsafe removal or malware infection can corrupt and damage a USB drive leaving all files inaccessible. Luckily, modern data recovery softwares can help with corrupt USB drive recovery.
In this guide, we will explain the most common signs of a corrupt USB drive, the step-by-step methods to fix a corrupted usb drive using built-in Mac tools. And if all fails, this blog will guide you on how to use professional data recovery software to recover corrupted files from USB drive including photos, videos, documents and other irreplaceable data.
How to Check if Your USB Drive is Corrupted?
It’s important to know if your USB drive is actually corrupted or not, before trying to fix and recover files from it.
Here are some simple steps to check if the USB drive may have corruption issues:
- When you connect the USB drive to your Mac, see if it mounts automatically. If it does not mount, this means there is a problem with the drive.
- If it is greyed-out in disk utility, it could mean the drive is corrupted.
- Try opening the USB drive from your Mac’s Finder. If you see an error message, the drive may be corrupted.
- Check if you can open any files or folders on the USB drive. If you cannot view any files, it could mean the drive is corrupted.
- Connect the USB drive to another Mac or Windows PC. If it is still unreadable or inaccessible, it means the USB drive is corrupt.
- Also, check for any strange noises on the USB drive. Drives make abnormal clicking noises when they are physically damaged.

4 Methods to Recover Files from a Corrupt USB drive on Mac.
Updating drivers, using First Aid in Disk Utility, downloading data recovery software, and even using Terminal commands – all of these can help fix a corrupted USB and get your files back.
1: Update USB Driver
A simple driver update may be all you need to fix USB issues. Outdated USB drivers can commonly cause the drives to not work properly. Updating to the latest driver version can help your Mac recognize the device again.
- Connect the corrupt USB drive to your Mac.
- Visit the manufacturer website of the external USB drive.
- Go to the Support page, then the Downloads page.
- Select Mac compatible software.
- Select the required driver installer/software.
- Click Download, then install the USB driver.
- Safe eject the external USB drive.
- Wait for 10 seconds then reconnect the USB drive.
- Reboot your Mac. The USB drive may work normally.
2: Use First Aid of Disk Utility
MacOS comes with a handy tool called Disk Utility that has a First Aid feature to fix drive errors. Launch Disk Utility, select your USB flash drive, and click First Aid. This may fix minor corruption issues and get your files accessible again.
- Press the Command + Spacebar keys to open Spotlight.
- Type ‘disk utility’ and press the Return key to open Disk Utility.
- From the View menu, select Show All Devices.
- From the sidebar, select your corrupt USB drive.
- Click the First Aid tab. A message box appears with the message, “Would you like to run First Aid on “USB Drive Name.” First Aid will check the volume for errors. It will then repair the volume, if necessary.”
- Click Run. Disk Utility will try to verify and repair the drive. Read More: Repair macOS Start-up Drive with Disk Utility
3. Repair with Terminal Commands
Terminal commands can help repair storage devices. With its commands like diskutil, you can repair file system errors, recover partition tables and do much more. This method is more advanced among all and needs some technical expertise and know how. You can try this method when other options fail.
- Open the Terminal app, find it by searching on your Mac or clicking on the Applications folder.
- Type “diskutil list” and press enter.
- Type “diskutil repairDisk/dev/diskX,” where X is the disk you need to repair.
- Type “Y” to confirm the repair process for the drive. Enter your Mac password, if asked.
- It may take some time. Wait for 5-10 minutes to finish repairing.
- Check if the USB drive works now. You can try the next method, if still not fixed.
4. Use Stellar Data Recovery Professional for Mac
If all else fails, then a dedicated data recovery software like Stellar Data Recovery Professional can come to your rescue. The DIY software scans your USB thoroughly to recover lost or deleted files from any corrupt drive. It supports all major file systems and can restore even when the drive does not mount on your mac.
Let’s look at the steps to recover your data from USB drive with this software.
Step 1. Download and Install the Stellar Data Recovery Professional for Mac from the official website.
Step 2. Connect the non-working USB drive to your mac system. Run the Stellar Data Recovery Professional software on your Mac device.
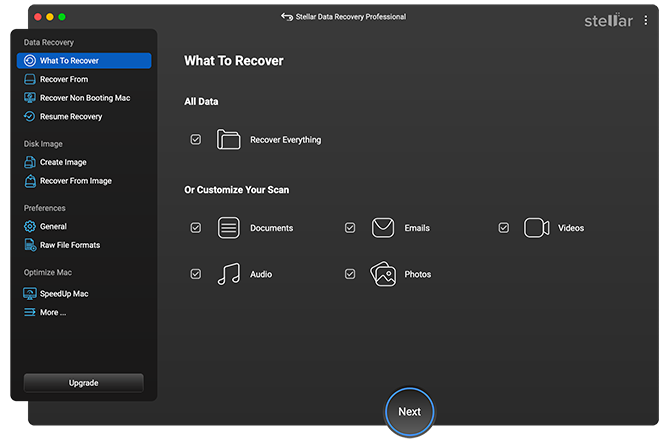
Step 3. In the “Select What to Recover” screen, select the type of files you want to recover.

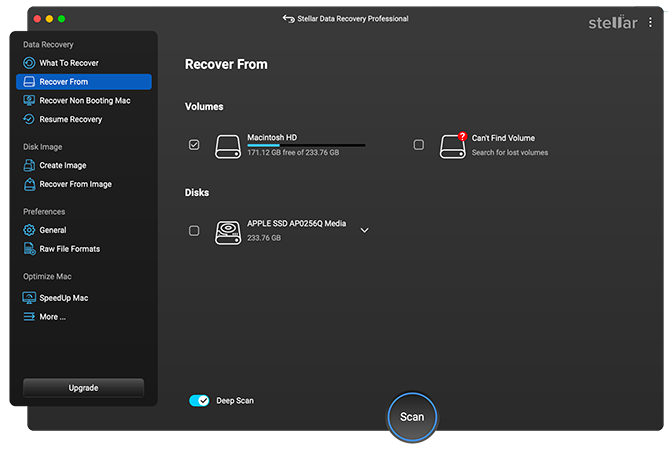
Step 4. In the next page, select “Can’t Find Drive”, this will scan your Mac system and display all the USB drives.

Step 5. Select your USB Drive from the list of drives displayed in the “Select Disk to Search Lost Volume” page and click on Scan.
Step 6. The software will scan the selected USB drive to find the list of recoverable files.
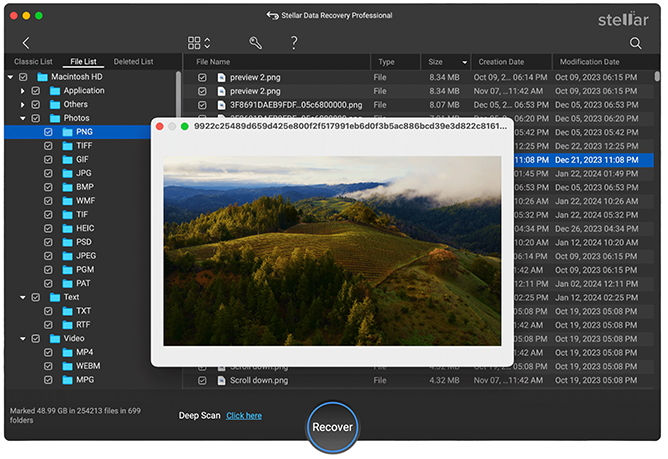
Step 7. Once the scan is completed, click OK. This will display all the available/recoverable files in the device.
Step 8. Look for the files you want to recover in the preview page, select any file to preview before recovery.

Step 9. In the next page, hit Recover, this will prompt for Activation. To proceed further and save the files to a desired location, please purchase a license key and activate the product.
Step 10. At last, click Save, to store your recovered files at a desired location.
Important Points to Avoid USB Drive Corruption
- Eject properly before removing: Always remember to safely remove the USB drive, click on unmount/eject button to avoid data loss or corruption.
- Avoid overusing the drive: Constantly using a drive can be harmful and can cause wear and tear over time.
- Be careful of power outages: Sudden power outage when files are transferring can also corrupt the drive.
- Scan for viruses: Scan the USB drive regularly for viruses and malware using your Windows Defender or third party reliable anti-virus software.
- Avoid extreme temperatures: Don’t leave the drive in very hot or cold places for long, it may damage its internal components.
- Keep it in a safe place: Keep your USB drives at a safe place away from moisture or dust to avoid corruption and data loss.
Keeping these simple tips in mind will help protect the USB drive from common corruption issues.
Conclusion:
If you lost access to important files due to a corrupted USB drive, try using First Aid tool in Mac Disk Utility to repair file system errors. Data Recovery tools can also help recover the data in simple steps. Once data is recovered, you can reformat the USB drive to repair any issues and allow usage of the drive. Stellar Data Recovery Professional is a great option for any Mac user to recover lost files. Just download the software and it will guide you through the recovery process step-by-step. With the right tools and approach, your USB drive can be back to life once again.
FAQs:
Can I preview the recoverable files before purchasing the recovery software?
With Stellar Data Recovery Professional for Mac, you can preview recoverable files before buying. It scans and finds your lost files without purchase. You need to purchase it only if you want to save the recovered files.
Can I recover files from a corrupted SD card the same way?
Yes, the process is similar. You can use data recovery software to find and preview any recoverable photo, video, and document files before corruption gets worse.
Will data recovery software work for Mac with older OS versions?
Stellar Data Recovery Professional supports macOS from OS X El Capitan to the latest version.
Was this article helpful?