Do you struggle when it comes to transferring your iPhone photos to computer? This blog post will share a step-by-step guidance to efficiently transfer your photos from iPhone to Windows PC?
It shares 6 different ways to transfer photos from iPhone to PC. You can use these methods to transfer photos from series of iPhone 14, 13, 12, 11, XS, XS Max, XR, X, 8, 7, 7s, 6s, 6 Plus, 6, 5s, 5c, 5, 4s, 4 to Windows 7/8/10/Vista/XP computer.
How to transfer photos from iPhone to PC?
There are various methods to transfer photos from your iPhone to Windows PC. Apart from using iCloud, you can use Windows Photos App, AutoPlay, Explorer or even the Microsoft Photo Companion app.
The given methods involve a few simple steps which anybody can perform to transfer photos from iPhone to PC.
Methods to transfer data from iPhone to PC
- Transfer with iCloud Photos (iCloud Photo Library)
- Transfer with iCloud.com
- Transfer photos with Windows Explorer
- Windows AutoPlay
- Import photos via Windows Photo App (Microsoft Photos)
- MS Photo Companion App
1. Transfer with iCloud Photos
To transfer photos from iPhone with iCloud Photos you should first enable iCloud Photo Library on your iPhone.
For this, go to Settings > Photos and tap iCloud Photos and download the iCloud for Windows app on your PC from the Apple website.
Steps to transfer photos to Windows PC via iCloud Photos
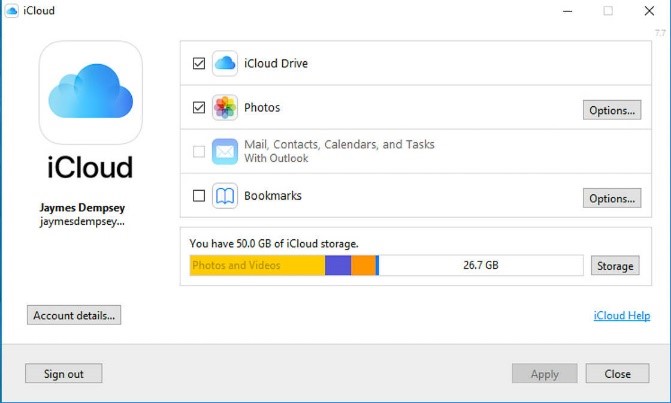
- Sign in iCloud for Windows on your PC using your Apple ID
- Select Photos checkbox and click Options in front of it
 transfer photos to Windows PC via iCloud Photos
- In the Photos Options box, select iCloud Photo Library andDownload new photos and videos to my PC options
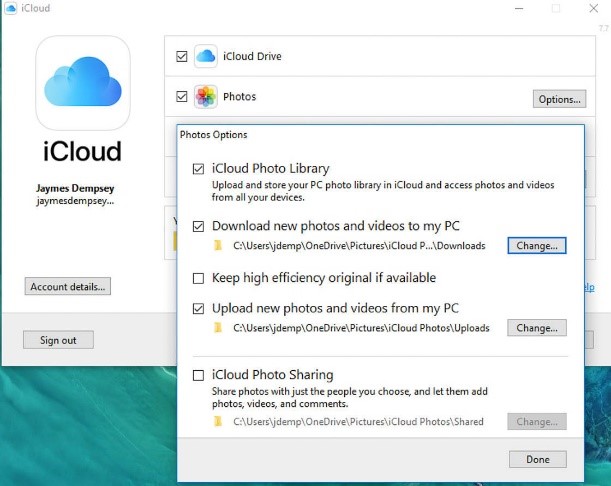 iCloud Photo Library and Download new photos and videos to my PC
- Click Done andApply. All the new photos shot with iPhone will now automatically transfer to your PC when the Internet is on in both the devices
- Now, open This PC/ Computer on PC.
- Double-click iCloud Photos > Downloads. You can view your transferred photos.
Accidently deleted photos during transfer from iPhone to PC? Accidental deletion or loss of photos during transfer from iPhone to computer is not new. However, you can always get back your deleted photos from iPhone. Just download the iPhone recovery software – Stellar Data Recovery for iPhone, on your computer. Connect your iPhone to PC. Launch the software and choose any of the applicable option –
• Recover from iPhone
• Recover from iCloud and
• Recover from iTunes
Next, follow the simple onscreen instructions to restore all your deleted and lost photos on your iPhone or computer in no time.The software is also available for Mac users. |
|---|
2. Transfer with iCloud.com
iСloud allows you to view and download your iCloud photos on computer. Though you cannot download multiple photos at a time with this method. So it will be time taking if there are several photos to transfer. You will have to download each photo one by one to your PC.
Steps to transfer photos to PC via iCloud.com
- Open iCloud.com in your PC browser
- Enter your Apple ID to login
- Click on Photos
- All your iCloud Photos are displayed. Select photo that you want to transfer
- Click on the cloud icon with down arrow in the top right corner. You can find the downloaded photos in the Downloads folder on your computer.
3. Transfer photos with Windows Explorer
Another way to transfer photos from iPhone to Windows PC is through Windows Explorer. You can only transfer Camera Roll photos with this method.
Steps to transfer photos from iPhone to PC with Windows Explorer:
- Connect your iPhone to PC
- Open My Computer
- Under Connected Devices, double click on your iPhone
- Double click on the Internal Storage icon to view the DCIM folder
- Double click DCIM folder to see the iPhone photos
- Select the photos you want to transfer. Copy and Paste them to the desired location on your PC
4. Use Windows AutoPlay
Windows users can use AutoPlay function in Control Panel to transfer photos from iPhone to their PC or laptop. You need to connect your iPhone to computer via USB cable.
Steps to transfer iPhone photos using Windows AutoPlay
- In your Windows 10 PC click on Start > Control Panel > AutoPlay (Windows 7 and 8 users can follow click on Start > Control Panel > Hardware and Sound > AutoPlay)
- In AutoPlay window, select Use AutoPlay for all media and devices Click Save
 Use AutoPlay for all media and devices Click Save
- Now, connect your iPhone to the computer via USB cable
- The AutoPlay window appears. Click the Import pictures and videos
- List of iPhone photos and video appears. Select the photos and click Import
5. Import photos via Windows Photos App
Windows Photos App has an import feature, with which you can transfer your iPhone photos to the PC. Ensure that you have the latest iTunes version on your PC. This method can transfer only the Camera Roll pictures to the computer.
Steps to transfer iPhone photos via Windows Photos App
- Connect your iPhone to the PC with a USB cable
- Unlock your iPhone using passcode
- A prompt may appear on iPhone asking to ‘Trust This Computer’, tap Trust or Allow to continue.
- On PC, select the Start Scroll to Photosand click to open the app
- On the top right, select Import> your iPhone. The PC begins import.
- You can find all the photos from Camera Roll in This PC > Pictures folder on your computer
Note: Photos that are already synced from your PC to iPhone using iTunes can’t be imported/ transferred back to your PC.
6. Use MS Photo Companion App
In Feb 2018, Microsoft launched MS Photo Companion App under Microsoft Garage Project in which the company tests its experimental ventures. The Photo Companion App can transfer photos from iOS and Android phones to Windows 10 over Wi-Fi.
If you are Windows 10 user, you can utilise this application to transfer your photos from iPhone to PC using Wi-Fi.
Steps to transfer iPhone photos to PC:
- Connect your PC and iPhone to the same Wi-Fi network
- Download the MS Photos Companion apponto your iPhone
- On your Windows 10 PC, launch the Photos app
- Go to the Options > Settings
- Toggle on Help Microsoft test the mobile import over Wi-Fi feature
- Restart the Photos app
- Select the Import top right corner
- Click From mobile over Wi-Fi
- A QR Code screen opens on computer. Next, launch the Photos Companion app on iPhone and tap Send Photos button
- A scanner opens up in the app on iPhone. Use it to scan the QR code on your computer
- Select the photos on iPhone that you want to transfer to PC
- Click You can find the photos in your Pictures folder on PC named ‘Imported from Photos Companion’
To Sum Up
There are various methods to transfer photos from your iPhone to Windows PC. You don’t need to rely on any software for the purpose and can do it for free. Take the advantage of Apple’s iCloud features (iCloud Photos and iCloud.com) to transfer photos from iPhone to PC without iTunes.
Windows utilities such as Photos App, AutoPlay and Explorer can also help you transfer the photos from iPhone to computer.
Microsoft Photo Companion App is another efficient way to bring your iPhone photos to Windows 10 PC. Although a part of testing project, it is completely secure and fast too.
Was this article helpful?