Sometimes, you boot your computer and run into a strange DLL error related to missing LogiLDA.dll file on your computer. The error message looks something like this –

The error might seem puzzling at first, but it is easy to fix. Many users have reported facing this issue after restarting their Windows PC.
In this post, we have tried to address all woes of such users by delving deeper into the problematic DLL file error along with some methods to resolve it.
What is the LogiLDA.dll File?
LogiLDA.dll is a process file associated with Logitech Download Assistant. Like any other DLL file, it contains instructions that activate the Logitech Download Assistant upon Booting the computer. Its function is to check for any new updates.
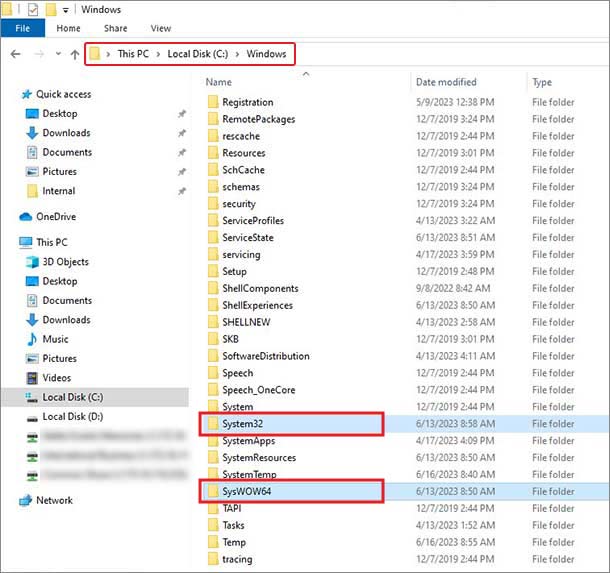
If you are looking for the logiLDA.dll, you can find it at the following locations –
On 32-bit Windows – C:\Windows\System32
On 64-bit Windows – C:\Windows\System32 & C:\Windows\SysWOW64
Reasons Behind the ‘LogiLDA.dll Missing’ Error Message
The error is mostly encountered by Windows users using a Logitech mouse or keyboard due to different reasons, such as:
- Incompatible or problematic Windows update
- Incompatible Logitech Download Assistant version
- Missing or deleted DLL file
- Issue with the download assistant
- Corrupted DLL file
- Corrupted system files
Methods to Fix the ‘LogiLDA.dll Missing’ Error
If you have encountered the ‘LogiLDA.dll is missing’ error message upon booting up your computer, you can employ the methods discussed in this section to get rid of it.
Pre-activity –
Before you jump to the detailed methods of eliminating the ‘LogiLDA.dll is missing error message, try something as simple as unplugging and plugging back the peripherals or restarting your computer. In many cases, these simple fixes prove to be useful. Hence, it’s better to start troubleshooting the problem with these methods.
If these didn’t help and you continue facing the issue, move on to the methods that will help you resolve the LogiLDA.dll missing error message.
Method 1: Download the Missing DLL File from a Trusted Source
If the LogiLDA.dll file is missing or has been accidentally deleted, you’ll probably encounter the ‘LogiLDA.dll is missing’ error message. To resolve it, you can download and install the missing DLL file from a trusted source on your Windows 11/10 computer. Follow the steps mentioned here –
- Open your web browser and go to this website.
- Download the latest available version of the missing DLL file.
Note – If you are using the 32-bit Windows OS, make sure to download and use the 32-bit DLL file only. However, if you are using the 64-bit Windows OS, you will need to download both the 32-bit and the 64-bit DLL files and use them.
- Once you have downloaded the file/s, go to the following location – C:\Windows.
- Here, find System32 and SysWOW64 folders.

- If you are on the 32-bit Windows OS, you will not find the SysWOW64 folder. In such a case, copy the 32-bit DLL file and paste it into the System32 folder. However, if you are running the 64-bit Windows OS, copy the 32-bit DLL file in the System32 folder and the 64-bit DLL file in the SysWOW64 folder.
- Now, close everything and restart your computer.
This should resolve the ‘LogiLDA.dll is missing’ error message.
Method 2: Disable the LogiLDA Process from Startup
There are times when the LogiLDA process can malfunction and cause your computer to show the ‘LogiLDA.dll is missing’ error message. For this, you can try disabling the LogiLDA process from startup. Doing so will prevent the Logitech Download Assistant from automatically starting up and checking for any updates upon booting the computer. Here’s how you can disable it –
- Right-click on the Task Bar and click on Task Manager.
- Click on the Startup tab.
- Locate the Logitech Download Assistant and right-click on it.
- Click on Disable.
- Restart your computer.
Method 3: Erase the Logitech Download Assistant Key Using the Registry Editor
While disabling the LDA process can help you avoid the LogiLDA.dll missing error message. However, sometimes, even after doing it, the error pops up randomly, indicating the LogiLDA process hasn’t been fully removed and is still present in Windows startup. In such a scenario, you can use the registry editor to delete the Logitech Download Assistant key. Carefully follow the steps mentioned below –
- Press the WINDOWS + R key combination to open RUN.
- Type in regedit and press Enter.
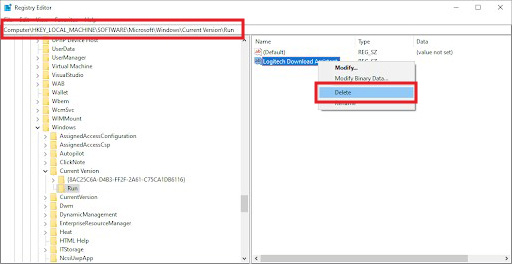
- Navigate to the following address - Computer\HKEY_LOCAL_MACHINE\SOFTWARE\Microsoft\Windows\CurrentVersion\Run

- Locate the Logitech Download Assistant key and select it.
- Right-click on it and select Delete.
Note – Modifying Registry keys is a way to fix certain issues like the LogiLDA.dll missing error. However, if incorrectly done, it can cause issues and even cause your computer to freeze or crash. Incorrect modification of registry keys could also lead to data loss.
If you have lost your data or are encountering errors on your computer after editing registry keys, you can use a powerful data recovery software like Stellar Data Recovery. This software allows you to recover data lost in various data loss scenarios like formatting, deletion, corruption, etc.
Method 4: Uninstall Logitech Setpoint
In some cases, the cause behind the LogiLDA.dll missing error message on your computer could be another Logitech app instead of the Logitech Download Assistant. This application is Logitech SetPoint, which is used for customizing various Logitech devices like mouse, keyboard, touchpad, and more.
A conflict between this application and Windows OS or some bug could be causing it to trigger an error message. In such a case, you can try uninstalling this app. To do this –
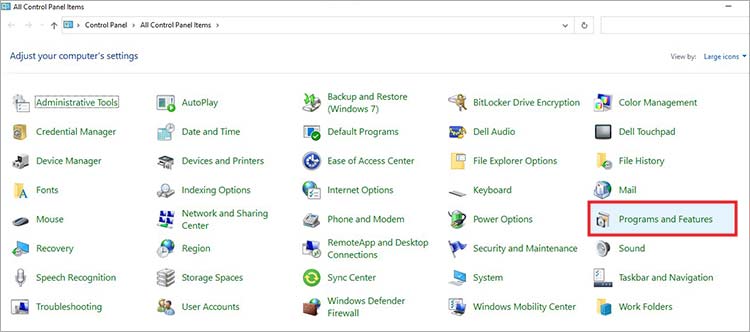
- Open Control Panel.
- Click on Programs and Features.

- Look for Logitech SetPoint and select it.

- Right-click on it and then click on Uninstall.
- Follow the wizard to uninstall the selected application.
- Once it is uninstalled, restart your PC.
Method 5: Reinstall Logitech Device Drivers
Running outdated or corrupted drivers for your Logitech devices could cause issues like the LogiLDA.dll error message continuously popping up on your screen. Updating the device drivers can help you get rid of this pesky error message.
Simply go to the Device Manager > Mice and other pointing devices. Right-click on the available devices and click on Update driver. Do the same for your Logitech Keyboard.
Conclusion
The LogiLDA.dll missing is an uncommon error that is a typical issue faced by Logitech mouse & keyboard users. This error message pops up for varied reasons, as discussed in the post. We hope this guide helped you understand the issue and fix it.
PS – You can also try using Logitech gaming software (G HUB), a newer version of the Logitech Download Assistant that allows you to download & install updates while customizing the devices.
More to read –
Fix ‘D3DCompiler_47.dll Is Missing’ Error
How to resolve the ‘MSVCR120.dll is Missing’ Error in Windows 11/10
Was this article helpful?