“I received my new Fujifilm X-H2 camera and bought a 64 GB SanDisk Extreme Pro Cfexpress card. When I inserted the CF card in the camera, it said, 'SD card not initialized.' When I tried to format the card, it failed.
Can someone tell if I am doing something wrong?”
SD card initialization erases all data stored in the memory card and recreates a new file system. You can also call it SD card formatting. But what is the ‘SD card not initialized’ error?
The ‘SD card not initialized’ error in the Fujifilm camera occurs when your memory card is not formatted or has already been formatted in another device, making the card incompatible with the camera. There is a high chance you might lose your photos and videos due to this error.
Here, we’ll discuss how to fix the SD card not initialized error and how to recover your photos, videos, and other media files from these SD cards.
Why SD Card Displays SD Card Not Initialized Error?
There can be various reasons behind the “SD card not initialized” error:
- Improper ejection, sudden power loss during data transfer, etc.
- SD card incompatible with the Fujifilm camera
- Physical damage in SD card like scratches or water exposure
- Dust or dirt on the metal contacts of the Fujifilm camera’s SD card slot
- Outdated firmware on the device or software-related issues
- Using low-quality SD cards
How to Fix SD Card Not Initialized Error?
Follow these basic steps to troubleshoot and fix the ‘Fujifilm SD card not initialized’ error.
1. Check the SD card for damage
Before diving into the solutions, you first need to inspect your SD card for any physical damage, such as scratches, cracks, or bending. If you notice your SD card is damaged, replace the card immediately; physical damage is irreparable.
2. Turn off the Camera when inserting the memory card
Insert the SD card only when the camera is turned off. Turning on and off the camera might help fix the issue.
3. Clean the SD card and Reinsert it
Remove the SD card from the camera, use a soft cloth to clean the card and slot, then reinsert the card to see if the initialization error is fixed.
4. Restart or Reload the Camera
Restart your Fujifilm camera, as it helps reset its internal settings. Or reload the camera to fix the initialization error. To reload the Fujifilm camera, switch off the camera, take out the memory card, and disconnect the battery. Wait 15 minutes, connect the battery, insert the card, and switch on the camera. See if the error is resolved with this step. If not, move on to the next method.
5. Insert SD Card on other Devices
Try inserting your SD card into a different camera or device to see if it's being recognized correctly. If it works on other devices, the camera's card slot or firmware may be the issue.
If the above basic checks fail to resolve the issue, there might be a serious underlying issue, such as file system corruption, causing the memory card initialization error.
Formatting the SD card on the camera can often resolve file system corruption issues. Here’s how to format an SD card on a Fujifilm camera:
- Turn off the camera and insert your memory card into it.
- Next, turn on the camera and press the MENU/OK button.
- Select the wrench tab, choose User Setting, and click on the Format option.
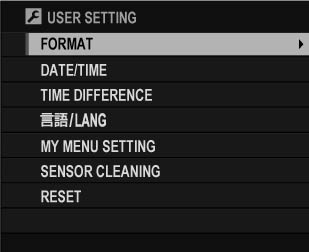
- Select the memory card slot you want to format and press MENU/OK.
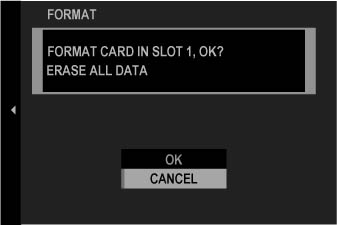
- Confirm your choice by pressing the OK button. Turn off the camera once the format completes.
If you cannot format your card on the Fujifilm camera, try formatting it on your Mac or Windows computer.
Update Camera’s Firmware
Outdated firmware on Fujifim camera can lead to compatibility issues with your SD cards. This is why you must install the latest firmware upgrade on your camera. Here’s how to upgrade firmware in a Fujifilm camera:
- Go to the Fujifilm support page on your Mac or Windows PC.
- Next, select which firmware you want to upgrade, i.e., Camera or Lens.
- Download the firmware after checking the firmware version.
- Now copy this downloaded file to a formatted memory card and eject it.
- Turn off the camera and insert this card in it.
- Press the ‘Disp Back’ button and, at the same time, turn the camera on. Continue holding the Disp Back button until a white screen appears.
- Select Firmware Upgrade and press the MENU/OK button.
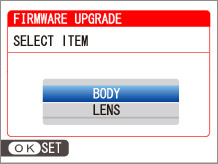
- Now, select the firmware item - BODY or LENS you want to upgrade.
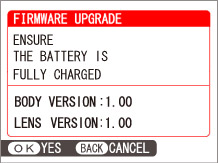
- On the next screen, the camera will show the existing firmware version along with the upgraded version. Press the MENU/OK button to continue.
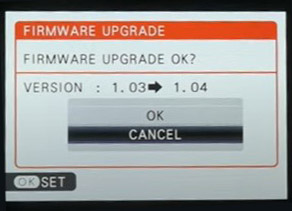
- Press the MENU/OK button when the ‘Do not open a battery cover nor turn off the camera’ screen appears. This will initiate the firmware upgrade.

- Wait for the firmware upgrade to complete. Once a message of ‘Firmware upgrade completed’ appears, turn off your camera.

How to Recover Photos from the not initialized SD card?
Whatsoever the cause behind Fujifilm SD card not initialized error, you cannot let go of your valuable photos and videos stored in it.
You need to implement the above methods first to fix the initialization error of the SD card and then recover data in it using professional SD card recovery software like Stellar Photo Recovery. This tool retrieves lost or deleted photos from formatted SD cards with their original name and date timestamps.
Stellar Photo Recovery can recover different multimedia files, such as videos, photos, and music files, irrespective of the file format. JPEG, CR3, MP4, and AVI are some formats this software supports.
Here's how to recover photos and videos from an SD card that won't initialize:
- Insert the SD card into your computer using an SD card reader.
- Download, install, and launch the Stellar Photo Recovery software on your Mac or Windows computer.
- On the software's home screen, select the SD card, and click Scan.
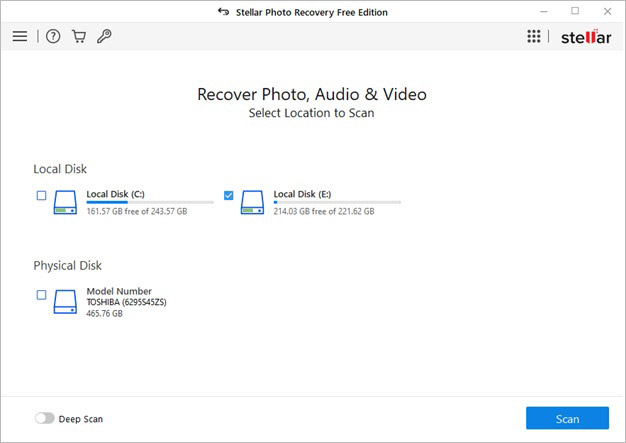
- Once the scanning finishes, preview the recoverable media files.
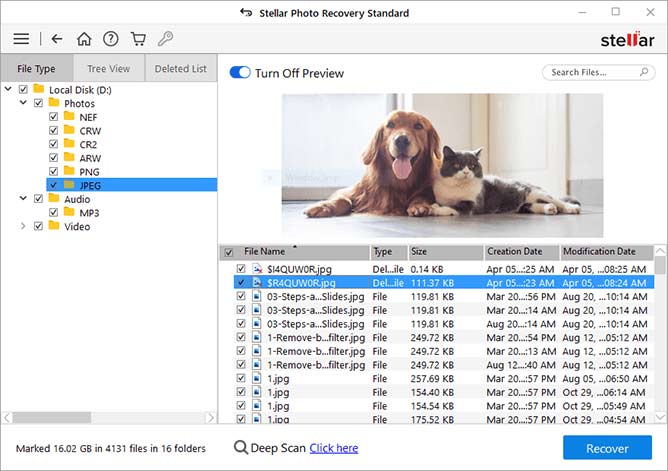
- Select the files you wish to recover and save them to the desired location by clicking the Recover button.

Conclusion
Often, formatting the SD card will fix the SD card not initialized error in the Fujifilm camera. However, before formatting the card, you can try some basic workarounds shared in this post to fix the issue.
However, to recover lost photos and videos from the SD cards, use Stellar Photo Recovery software that can also recover media files from the formatted SD card.
FAQ
How to troubleshoot SD card on Windows system?
Follow the below steps to troubleshoot SD card on Windows:
- Type Control Panel in Windows search and click Open to launch it.
- Select Troubleshooting and then click the Hardware and Sound option.
- Next, select your SD card from the list and follow the on-screen instructions to start the troubleshooting step.
Was this article helpful?