I recently started experiencing an error on my laptop, Scanning and repairing C drive on startup. I tried to boot the system repeatedly, like 8 times, but it is showing the same error every time. I’m concerned about my device and its data. Any help to fix the issue will be appreciated!
Scanning and Repairing Drive errors may occur with your system’s local disk C: or any external hard drive. You can encounter the error on startup, after updating your graphic card drivers, an improper or forced system shutdown, or on system reboot. Even if your system experiences a power cut or failure, it can show this error on the next boot-up.
The possible reasons behind the issue could be several, but the primary reasons are faulty graphic card drives or a logically damaged hard drive. Due to this error, your system may get stuck in a booting loop, crash frequently or even not boot eventually, putting your device and its data at stake.
The good thing is that you can fix the Scanning and Repairing Drive error with the methods discussed here. However, before that, we suggest you back up your system, if possible, or recover data with professional data recovery software and troubleshoot the problem.
How do I Fix Scanning and Repairing Drive Error?
Follow the DIY methods below to fix this error on your Windows system.
The system may often bring up the disk check screen, mentioning scanning and repairing the drive stuck at 100% completion. In such a situation, try performing a hard reset with the following steps:
- Remove all the external devices connected to your system and then turn off your system with the Power key/button.
- Disconnect the power adapter/supplier, and press and hold the Power key for about 40 seconds.
- Reconnect the power adapter and check if the system can boot without issues.
#2 Run Startup Repair
Some users reported encountering Scanning and Repairing Drive C on every boot. You may receive this error repetitively, even if you’ve tried turning on your PC a couple of times. In this case, you can try running Startup Repair, following the below steps, and see if the problem gets fixed.
- If you have Windows installation media available, use that to start your system. (If not, learn how to create an installation media, and once ready, boot into your system using it.
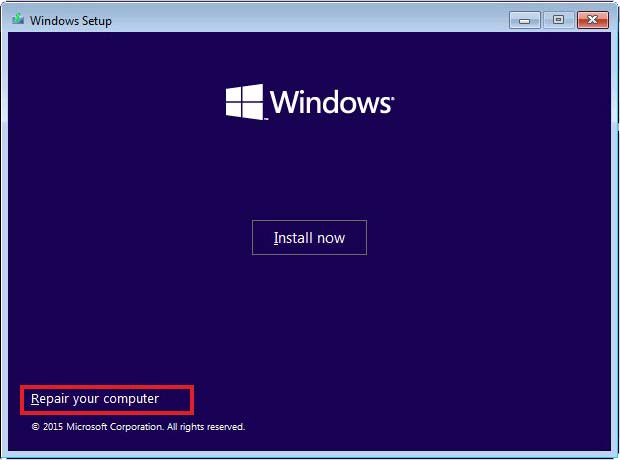
- You’ll see the Install Windows screen. There, click Next > Repair your computer.
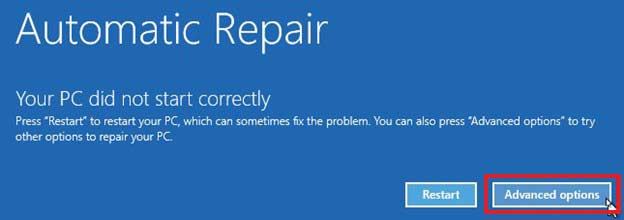
- Now, the Automatic Repair screen will appear, click Advanced options.
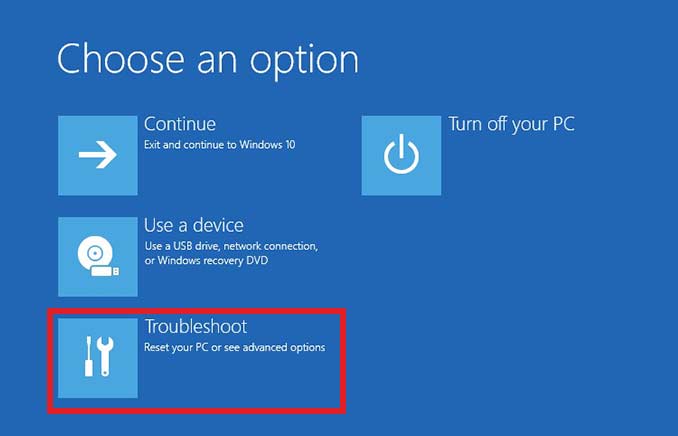
- Next, on the ‘Choose an option’ screen, select Troubleshoot.
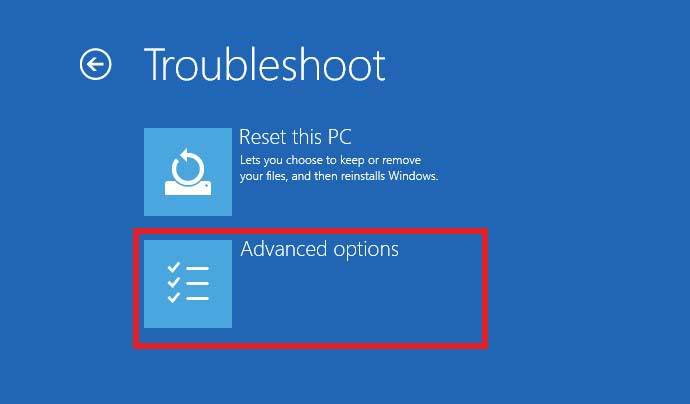
- On the next Troubleshoot screen, select Advanced options.
- Select Startup Repair from Advanced options screen.
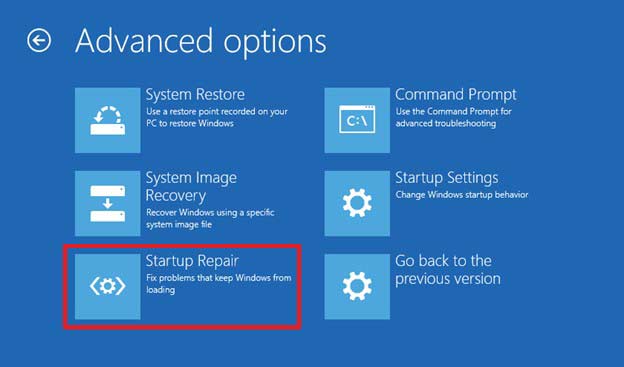
- Once the process is done, select Shutdown. Finally, boot your system and see if the issue is fixed.
#3 Roll Back Graphic Drivers
In a few cases, the scanning and repairing c drive error started popping up after updating the graphic drivers. In such a case, try rolling back the driver to their older version and see if it solves the problem. Follow the given steps:
- Press Windows + X, open Start menu, and then select Device Manager.
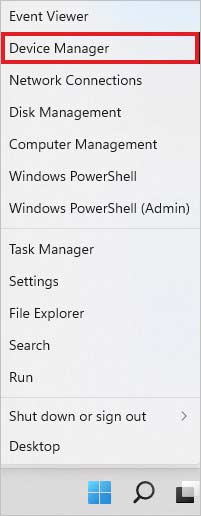
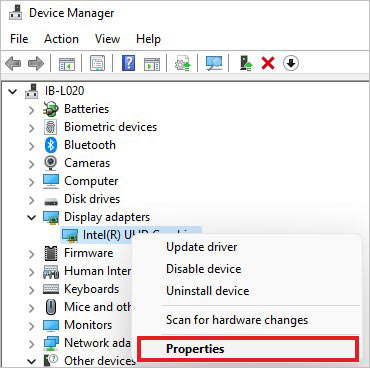
- Now, expand Display adapters category, right-click on the driver and click Properties.
- Now, go to Driver tab and then click Roll Back Driver option.
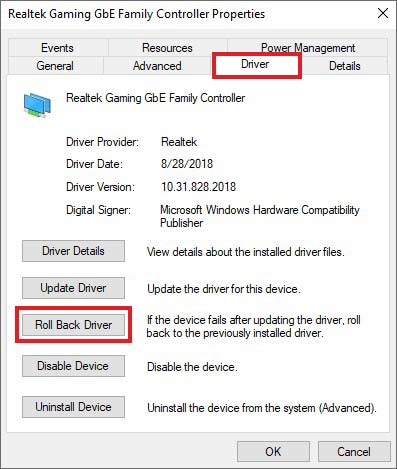
- Provide reason why you’re rolling back to the older version and proceed.
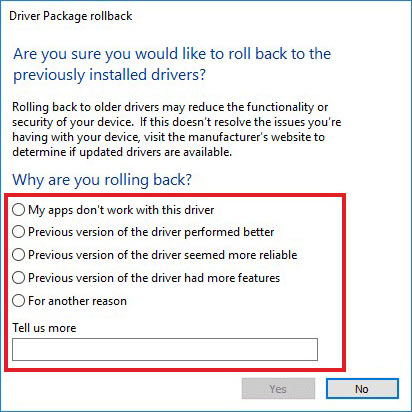
- Once done, close the window and reboot your system to see if the issue is fixed.
Sometimes, the system can show you scanning and repairing C drive errors on startup. Due to this, you may be unable to boot your system correctly. Hence, try booting your system in Safe Mode and then run Windows’ built-in error-checking tool. It will help you identify the problem with your disk and troubleshoot the issue.
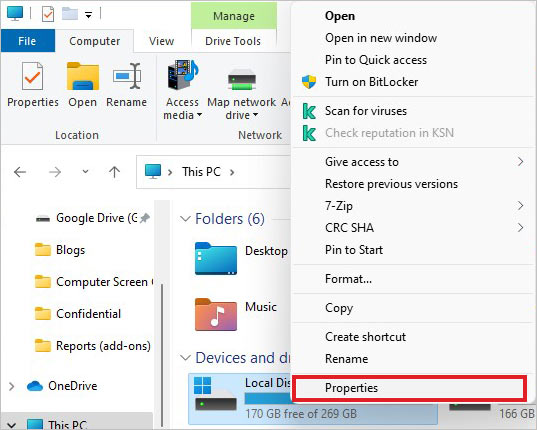
- Open File Explorer by pressing Windows + E and go to This PC.
- Right-click on Local Disk (C:) and select Properties.
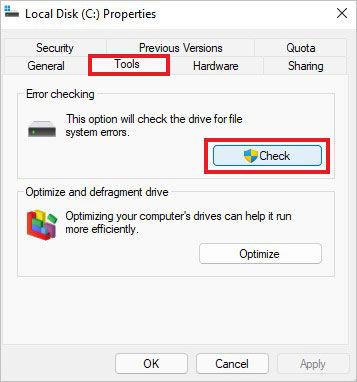
- Now, go to Tools tab and there, click Check under Error Checking option.
- Further, click Scan drive to proceed.
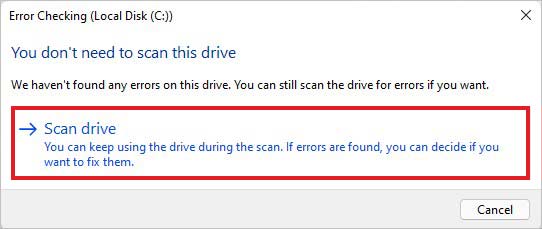
- The tool will take a few minutes to scan the drive for issues.
If it shows any details related to the issues with your hard drive and you see the Repair option, click on it and complete the repairing process. Once done, restart your system and see if the problem is resolved.
#5 Run CHKDSK Command
If the Windows Error Checking tool doesn’t help you fix the issue, you may try running the CHKDSK command. When this command is run with /f and /r attributes, it finds and marks the bad sectors and repairs the logically damaged hard drive. However, it prevents Windows from storing or reading data from those marked bad sectors, eventually causing data loss. Therefore, ensure that you have the system backup available.
- Open Command Prompt from Search (Windows + S) and run it as administrator.
- In the elevated cmd window, type chkdsk /f /r D: and hit Enter. (Replace D: with your own hard drive letter.)
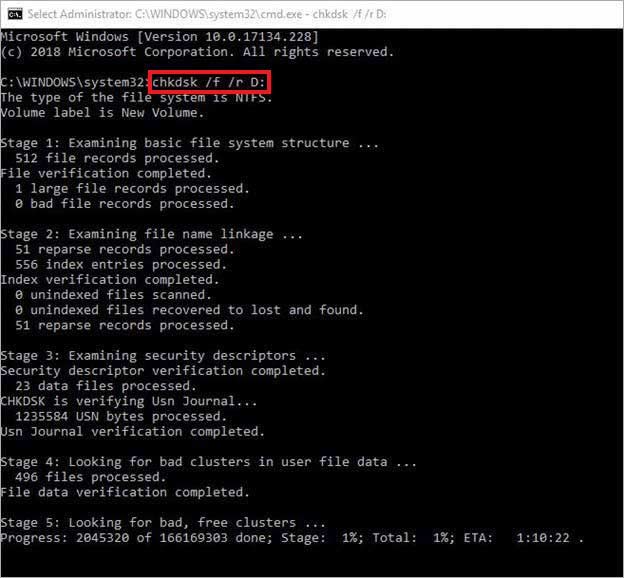
- The command will scan the drive for issues and possibly repair it.
#6 Check your Hard Drive’s Health
Scanning and repairing a drive stuck at 100, 10, or even 0%, your hard drive may not be healthy. You can check the status of your hard drive and then take the right action as required. Follow the steps below:
- Open the Control Panel from Windows Search and then open System and Security.
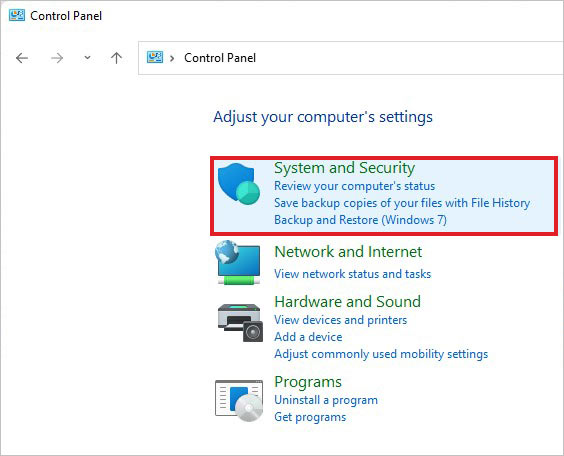
- Select Security and Maintenance on the following prompt.
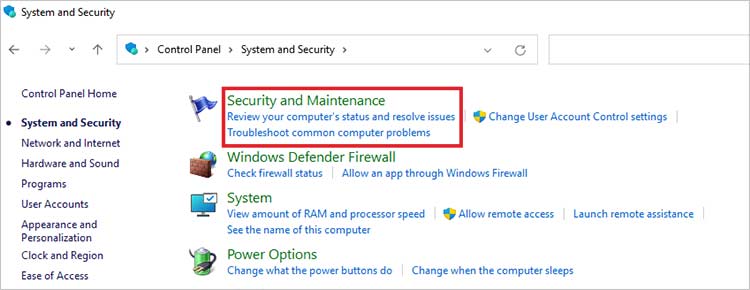
- Next, click Maintenance and there, you’ll see the Drive Status.
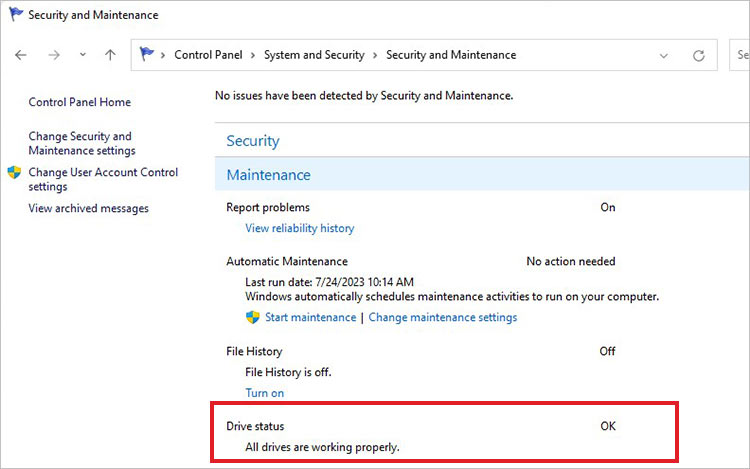
- If the drive status shows Bad, Poor or vice versa, drive may have many bad sectors or is severely corrupted.

Bonus Tip – You can alternatively use
Stellar Data Recovery Professional to
check hard disk health. It features a Monitor Drive utility to scan your drive and shows the S.M.A.R.T status of your hard drive, with temperature, bad sectors, and chances of your drive to sustain the data recovery process. If the hard drive is severely damaged, you can opt for the Clone Disk feature to clone your system hard drive to prevent further damage and recover data.
Final Thoughts:
Scanning and repairing drive errors can occur due to problematic graphic card drivers and corrupted or bad-sectored hard drives. Your system may lead to frequent boot-up errors, crashes, or complete shutdowns due to this error, putting your data at risk. However, the error is fixable with the methods shared in this blog. Further, use professional data recovery software to recover data from a crashed or unbootable Windows system.
Frequently Asked Questions
How do I fix a corrupted hard drive?
You can try running Windows’ built-in error checking tool or CHKDSK command to fix the corrupted hard drive. The command can identify and repair the hard drive issues when it is run with /f and /r attributes.
How can I fix the Startup Repair error?
Sometimes, when you run Startup Repair to fix some issue, it may become the problem itself and throw the Windows Preparing Automatic Repair error instead of fixing the one you’re trying. To fix this error, you can follow the below methods:
- Perform a hard reboot
- Disable Automatic Repair on boot
- Reset your PC
- Reinstall Windows OS
Was this article helpful?