Microsoft 365 (formerly Office 365) is a popular choice for organizations that want to move their emails and other mailbox data from Outlook to the cloud, as it offers benefits, including improved redundancy, reliability, security, and scalability at a reasonable cost. Microsoft 365 supports PST format. You can move or import PST files into Microsoft 365 using various methods. However, the preferred method, when it comes to migrating PST files to Microsoft 365, is by using the PowerShell commands.
Why use PowerShell for PST to Microsoft 365 Migration?
PowerShell is a powerful tool to perform various administrative tasks, including PST to Microsoft 365 migration. Here are some benefits of using PowerShell for PST to Microsoft 365 migration:
- With PowerShell cmdlets, you can upload multiple PST files (20 GB or smaller) to the Microsoft Azure storage for import.
- It saves time by automatically uploading all PST files to a single folder.
- It’s scalable as it allows you to migrate large numbers of PST files to Microsoft 365.
Steps to Migrate PST to Microsoft 365 using PowerShell
Before you begin migrating or importing your PST files to Microsoft 365 with PowerShell, you need to prepare your system.
Step 1: Prepare Your System Microsoft 365 Tenant
Follow the below instructions to prepare your system for PST import:
- Download the Azure AzCopy tool on your system.
- Ensure that you have sufficient administrative permissions to run the PowerShell commands with elevated privileges.
- Configure your Microsoft 365 tenant and create mailboxes for the users to import the PST files.
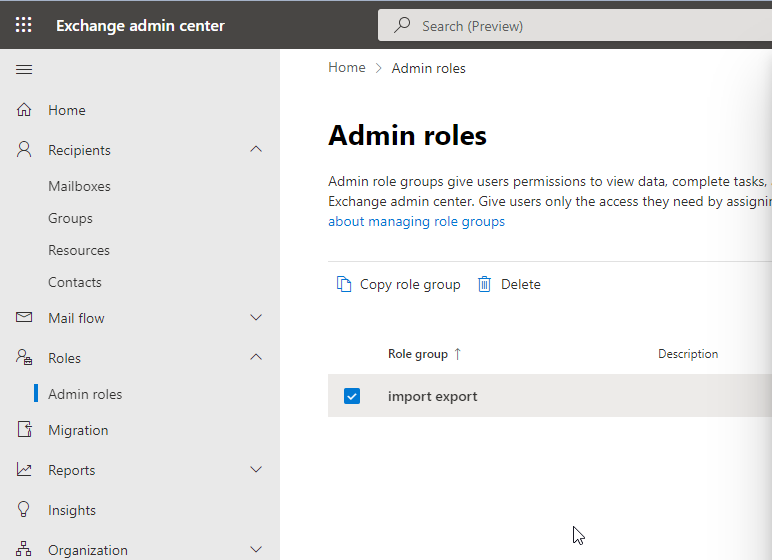
- Assign the Mailbox Import Export role in Microsoft 365.
- Export the users’ mailboxes to PST format and then copy all the PST files that you need to import into Microsoft 365 in a separate folder with proper names.
- Ensure the folder containing the PST file is accessible.
Step 2: Prepare PowerShell for PST Migration
To use PowerShell for PST migration, you need to,
- Download the Azure AZCopy tool on your system.
- Move the Azure AZCopy tool to the Desktop.
We will use the AzCopy tool via PowerShell to upload and import PST files from your local system into Microsoft 365.
Step 3: Create Mailbox Mapping File for PST Migration
Before you start migrating your PST files to Microsoft 365, you need to create a CSV mapping file to map the PST files to the user accounts in Microsoft 365. To create a mapping file, follow these steps:
- Download this sample CSV template file or create a new CSV file containing the following columns: FilePath, Name, Mailbox, and TargetRootFolder details.

- Open the CSV sheet in MS Excel or Google Sheets.
- Replace the PST file name and the user account details in the CSV sheet to map the PST with users’ email accounts on Microsoft 365 along with other required details.

Tip – Avoid using spaces, uppercase letters, or special characters while preparing the PST files for the import job.
Once you have populated the details, save the CSV file and follow the next step to create a PST import job.
Step 4: Create a PST Import Job and Import PST Files into Microsoft 365
To create a PST import job in Microsoft 365, follow these steps:
- Open and log in to Microsoft 365 as a global administrator.
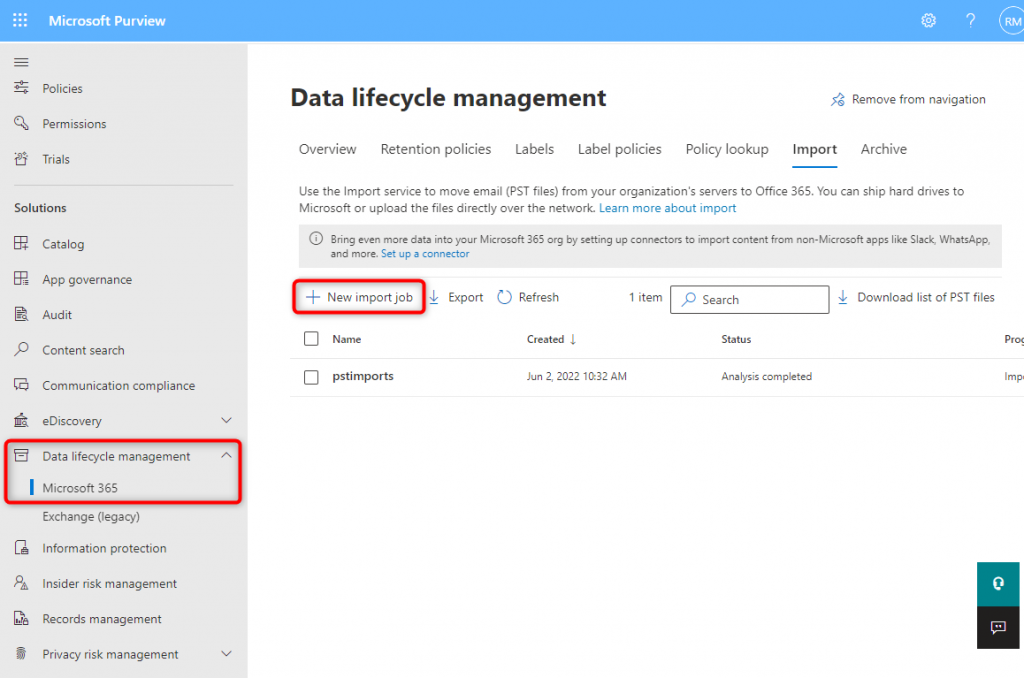
- Go to Data lifecycle management > Microsoft 365.
- Click on the ‘Import’ tab.
- Choose ‘New Import Job’. This will start a new Import Job wizard.
- Name the import job and select Upload your data.
- Click ‘Show network upload SAS URL’ and click Copy to clipboard button to copy this SAS URL into your Notepad. This SAS URL is critical to upload the PST file to Azure cloud storage. So, keep it safe and secure.
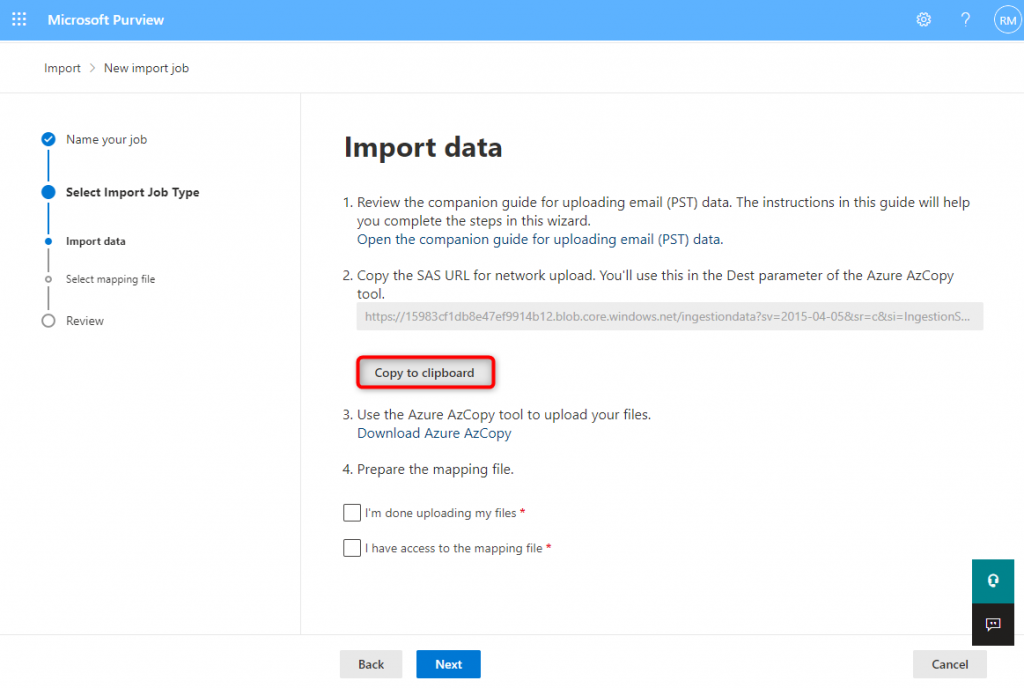
- Click Download Azure AzCopy to download and install the Microsoft Azure Storage tool. The AzCopy tool helps to quickly upload PST files (20 GB or smaller size) to Microsoft 365.
- Once the installation is complete, open PowerShell on your local computer. Navigate to Desktop where you have stored the Azure AzCopy tool and run the following PowerShell command to upload the PST files:
azcopy.exe copy “PSTFolder or Location of pst files” “sas url=”>”

- Once the PST upload operation is complete, go back to Microsoft Office 365 import process and select ‘I’m done uploading my files’ and ‘I have access to the mapping file.’
- Click ‘Next.’
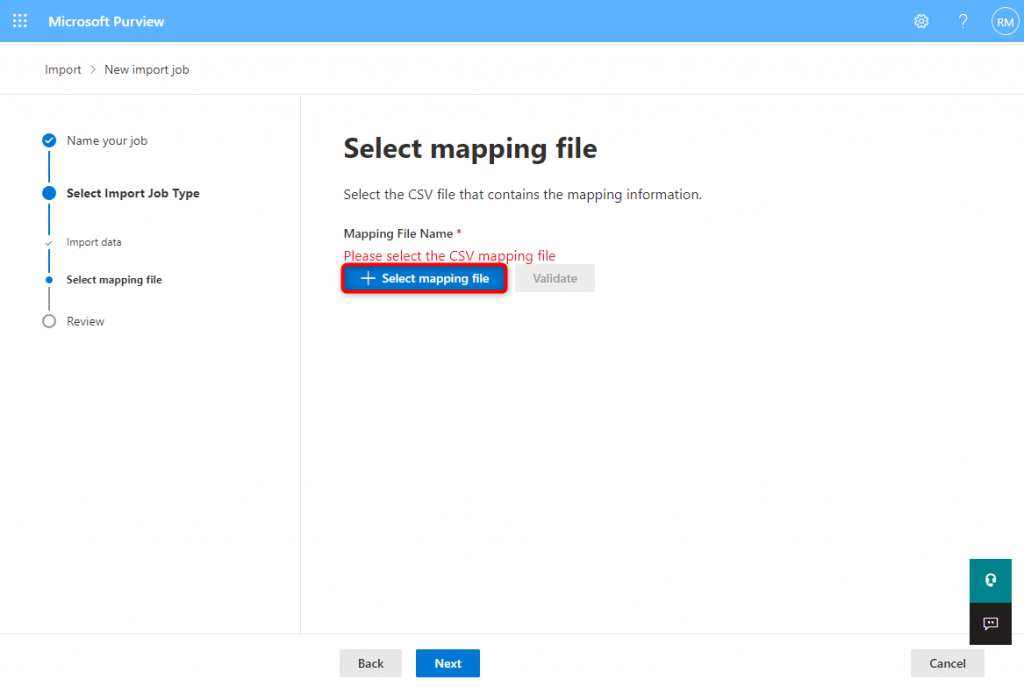
- On the next screen, you need to upload and validate your CSV mapping file.
Once you’re done, you can start the PST import wizard to successfully import the PST file into Microsoft 365. After the import, users can log in to Microsoft 365 (Outlook 365) to access all their emails, contacts, attachments, and other mail items.
Things to Consider for PST to Office 365 Migration with PowerShell
During the upload or import process, you may experience issues that may prevent you from importing the PST files. To avoid issues, ensure the following:
- Make sure that you have all the necessary permissions and roles required to perform the migration.
- If you have decided to migrate PST to Microsoft 365 via your system, make sure that your network is configured correctly and working as intended. Also, ensure you have enough bandwidth available from your internet service provider.
- Make sure that your PST files are consistent and have no errors or bad/corrupt items. For this, you can scan each PST file with SCANPST.exe, which will fix the bad items/corruption or inconsistencies and prevent issues during the PST import process.
Alternative Method – Use Stellar Migrator for Outlook
Stellar Migrator for Outlook is an advanced Outlook PST to Microsoft 365 migrator tool that aims to help individuals, IT admins, and businesses easily migrate users’ mailboxes stored in PST format to Microsoft 365.
By using Stellar Migrator for Outlook, you can automate the PST to Microsoft 365 migration and significantly save time, effort, and cost required for the mailbox migration.
The software offers an intuitive user interface, making it perfect for users with little to no expertise who want to import single or multiple PST files into Microsoft 365 (Office 365).
It also offers some advanced features, such as:
- Imports large or oversized PST files into Microsoft 365 (~50 GB or more)
- Uses secure Microsoft Modern Authentication for connectivity and PST to Microsoft 365 migration
- Allows you to select desired mail folders and items
- Helps conserve mailbox storage on Microsoft 365
- Previews all the mail items
- Maintains the original folder structure and hierarchy during the conversion and upload process
- Comes with cloud-based licensing and pay-per-mailbox plan (1-999 PSTs or more)
- Supports Outlook 2007, 2010, 2013, 2016, 2019 and 2021
Stellar Migrator for Outlook is also quite easy-to-use. All you need to do is follow these simple steps:
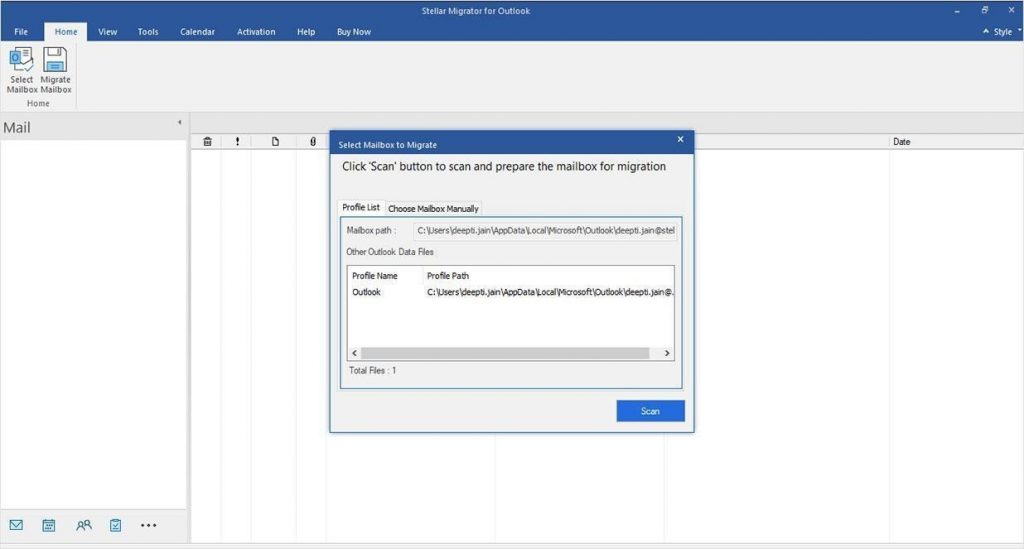
Step 1: Select the PST file you want to import into Microsoft 365 and start the scan.
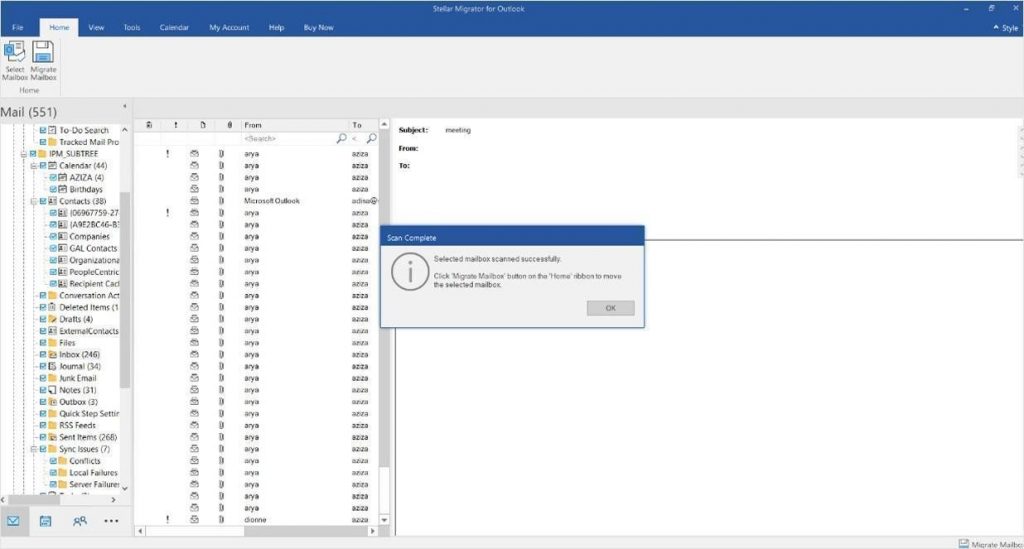
Step 2: After the scan, preview and select the mail items and folders you want to import into Microsoft 365.
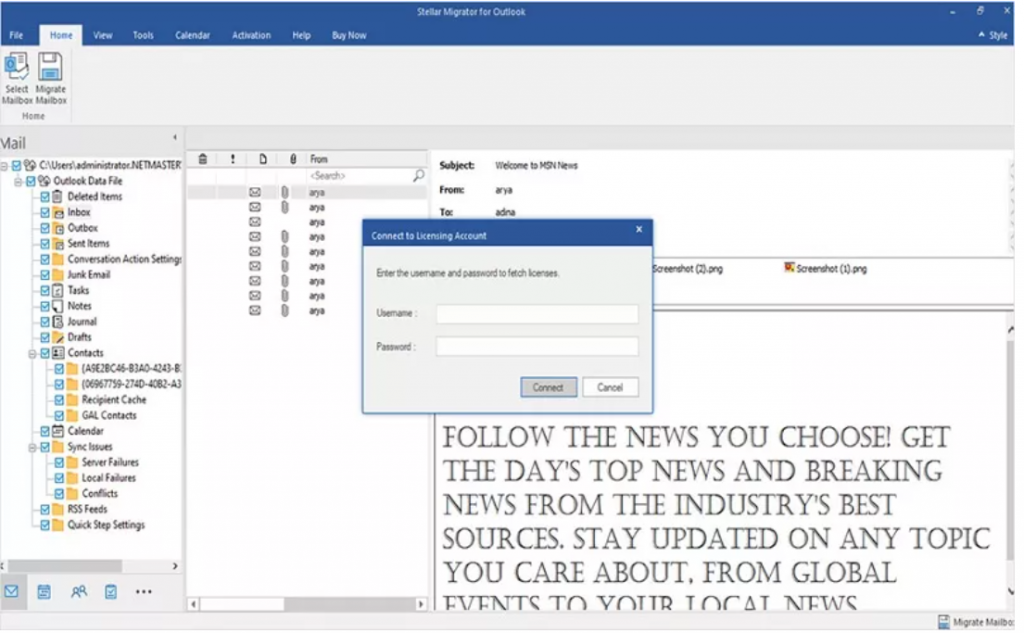
Step 3: Log in to the software using your Stellar® cloud credentials.
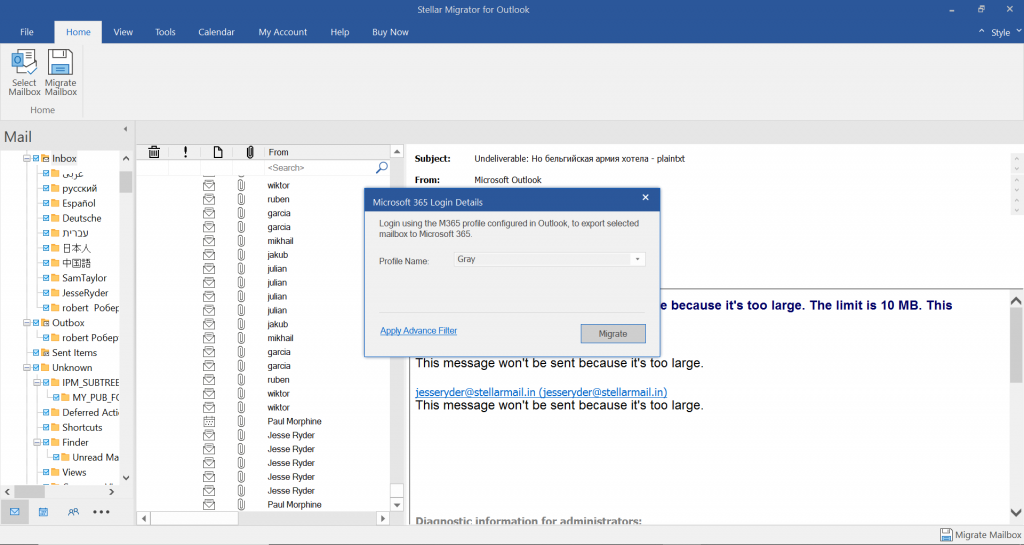
Step 4: Select the Microsoft 365 profile configured in your Outlook to start the import process.
Step 5: The migration from PST to Office 365 process is completed.
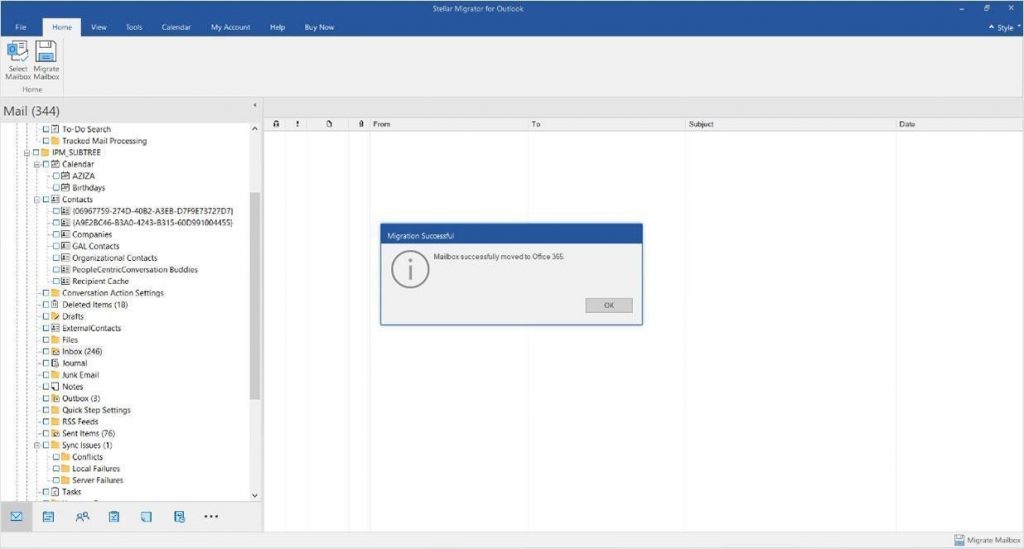
As soon as you enter the Microsoft 365 details, the software starts importing the selected PST items into the user account directly.
Conclusion
This guide discusses how to use the PowerShell commands to import PST files into Microsoft 365. However, migrating the mailboxes from PST files to Microsoft 365 is a complex and time-consuming task. If you need to import several PST files without the risk of data loss, corruption, etc., it is recommended to download and install the Stellar Migrator for Outlook software. The software is not susceptible to errors and imports all mail items from PST to your Microsoft 365 mailbox with complete integrity while maintaining the original folder structure.
Was this article helpful?