Is your Mac performing slower than usual lately? There might be several reasons behind a slow Mac. In this post, we’ll talk about a common issue where the WindowServer uses too much CPU on your Mac affecting its performance.
What is Windowserver on Mac?
The WindowServer is responsible for rendering the graphical components on your display whenever a change is required, such as a new window, application, or any other visual modification. The WindowServer process starts immediately when you power your Mac on, as it provides operations for essential components such as the Dock, macOS menu bar, and the icons on your desktop.
The more windows you have open simultaneously, the more CPU usage is loaded. Now imagine how many graphical manipulations Mac performs simultaneously. No surprise that it can cause CPU overload.
So what are the most common reasons for WindowServer operating so many CPU cycles?
Why does Mac WindowServer Use so Many CPU cycles?
There are 4 possible reasons that cause WindowServer to use many CPU cycles:
- Cluttered desktop. We know how comfortable it is to have all your necessary files on hand. This way, you access files or apps quickly and easily. Nevertheless, having many elements on your desktop makes WindowServer process all the images you see and use.
- Photoshop usage. Editing photos and pictures in Photoshop (or another pictures-related program) can also cause WindowServer overload.
- Outdated apps. Keeping your Mac and apps updated is important for smooth WindowServer functioning.
- Multiple displays. Using multiple monitors can cause Mac’s slow operation.
How much CPU Mac WindowServer Uses?
So let’s find out how much CPU your device’s WindowServer uses. Follow these steps:
1. Navigate to Finder and click Applications.
2. Double-click on the Utilities folder.
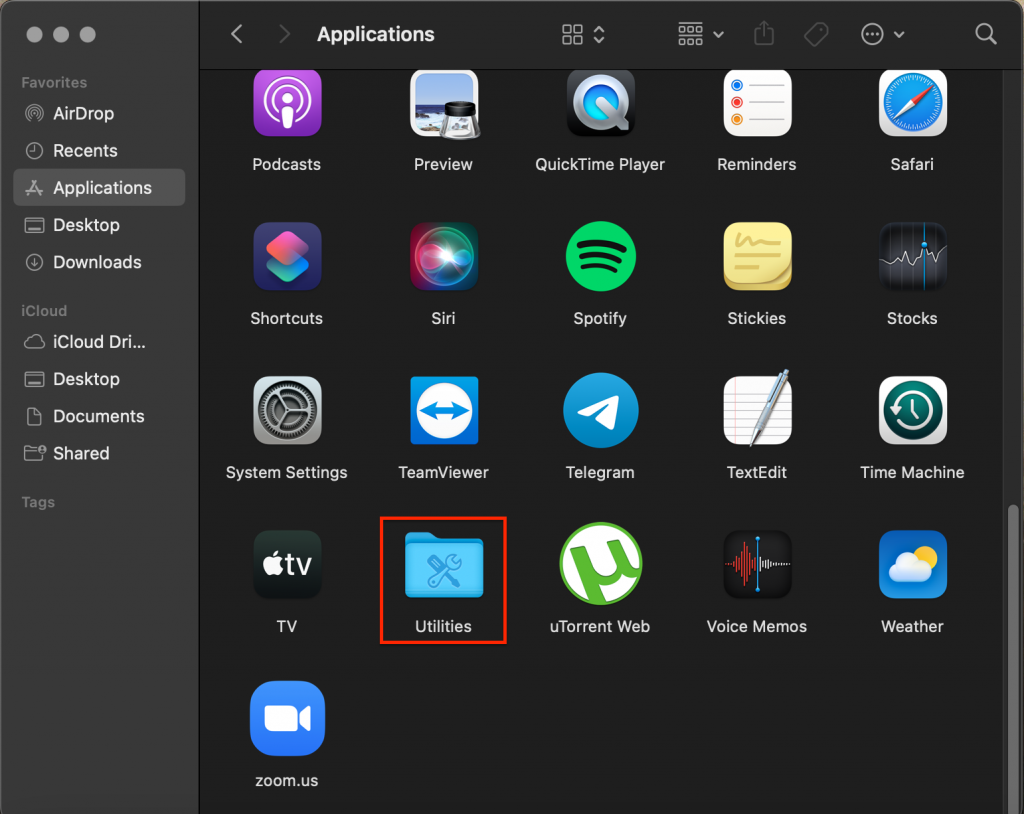 Finder > Applications > Utilities
 3. Look for Activity Monitor.
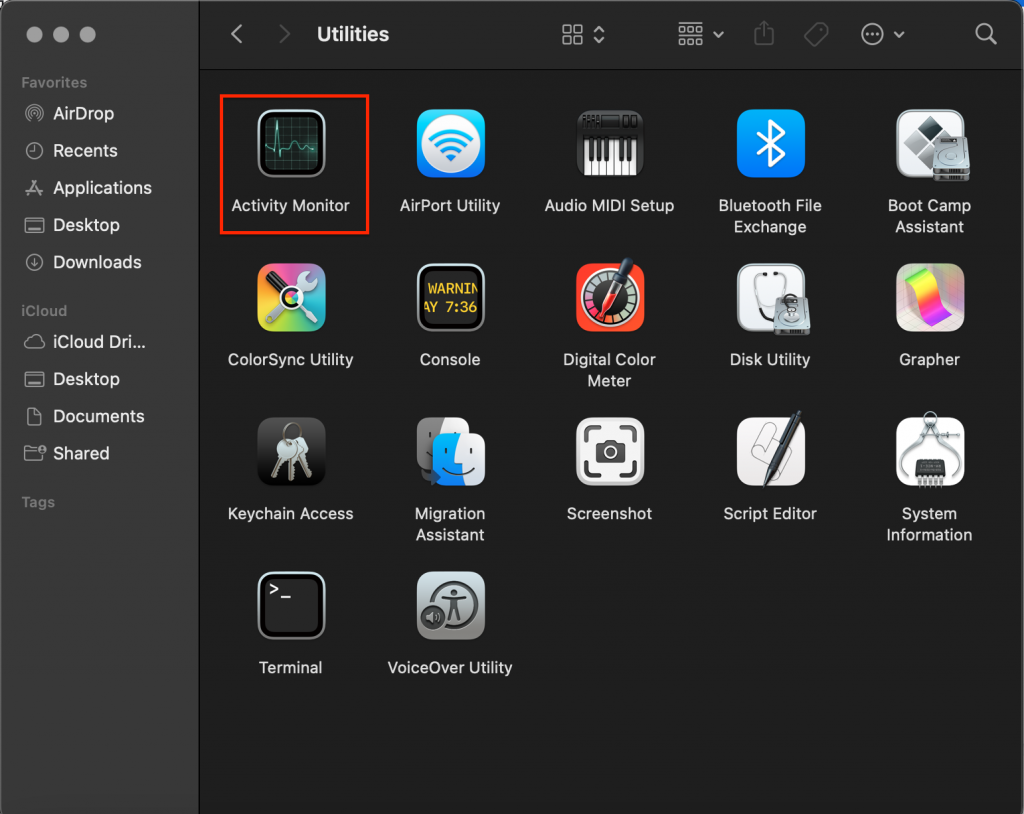 Finder > Applications > Utilities > Activity Monitor
 4. Click on the CPU tab.
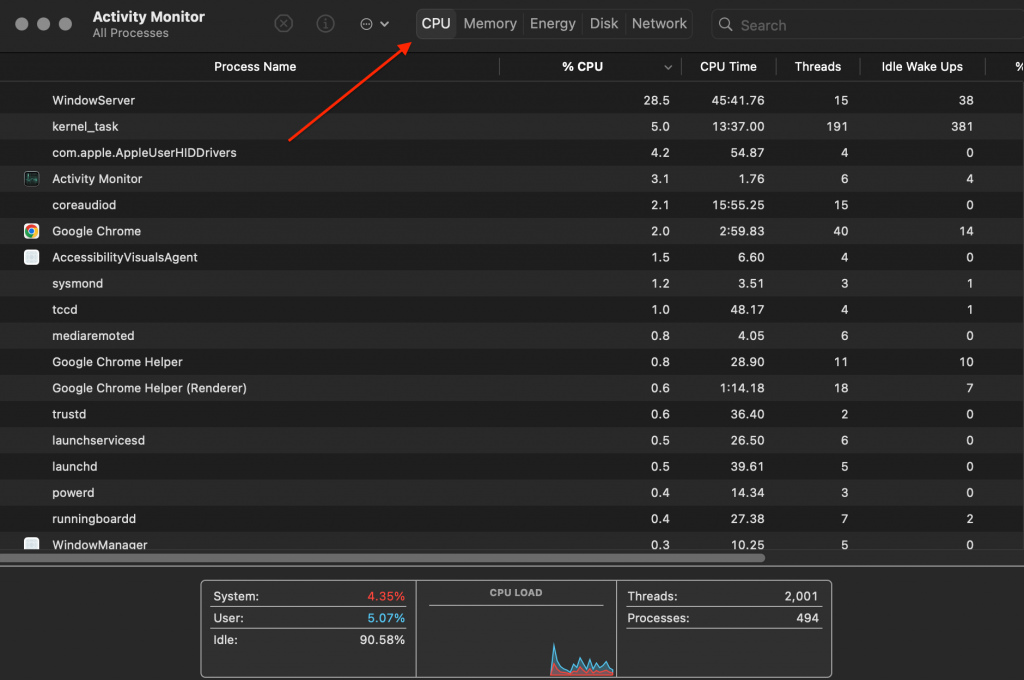 Finder > Applications > Utilities > Activity Monitor > CPU
 5. Find the WindowServer on the list and look for the % CPU it is now utilizing.
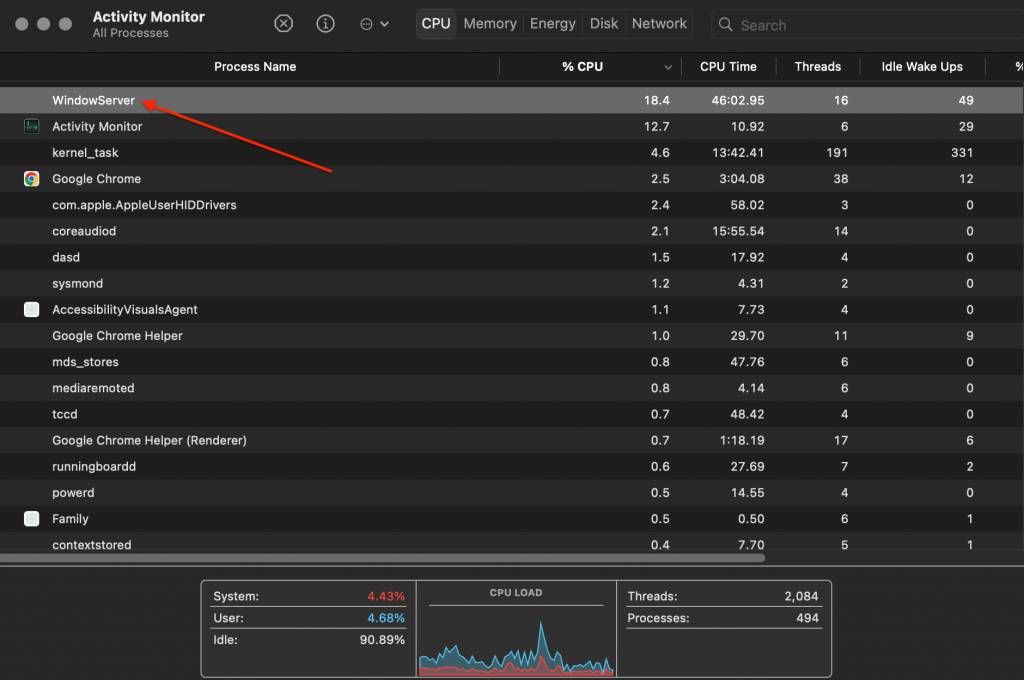 Finder > Applications > Utilities > Activity Monitor > CPU > WindowService
 The expected percentage is under 60%. If WindowServer takes extra, you should minimize its usage.
How to Minimize Mac WindowServer CPU Usage?
I. Quit Apps
If you have a lot of windows open, WindowServer will overload, especially if you have an older Mac. You may quit the open applications you don’t use (press Option+Command+Escape to open the Force-Quit menu). Also, it would help if you closed the browser tabs you don’t need. This way, you’ll lower the overall load on your system.
II. Restart Your Mac
It’s the easiest and the quickest workaround for most issues. Simply restart your Mac to close the apps running in the background.
Follow these simple steps to restart your Mac:
- Go to the Apple logo.
- Click Restart.
 Apple logo > Restart
 III. Clean Up Your Desktop
Make it a routine to check your desktop regularly and clean it up. Sometimes, there are unnecessary files on your desktop, like downloads or duplicates. Nevertheless, WindowServer uses its capacity to “draw” these icons, consequently loading the CPU cycles.
You can always arrange your files into folders in case you require to see them on your desktop. If you don’t need these files, it’s better to delete them.
Additionally, this makes it easy to find what you’re looking for, keeps your Mac’s WindowServer CPU usage low, and makes the desktop look clean and organized.
IV. Reduce Transparency
Visual effects, like transparency, overload your CPU as well. Of course, you can’t turn off every graphical element, but you can disable the Transparency feature.
Please follow these instructions to switch off transparency:
- Navigate to the Apple logo and click System Settings.
 Apple logo > System Settings
- Look for Accessibility and choose Display.
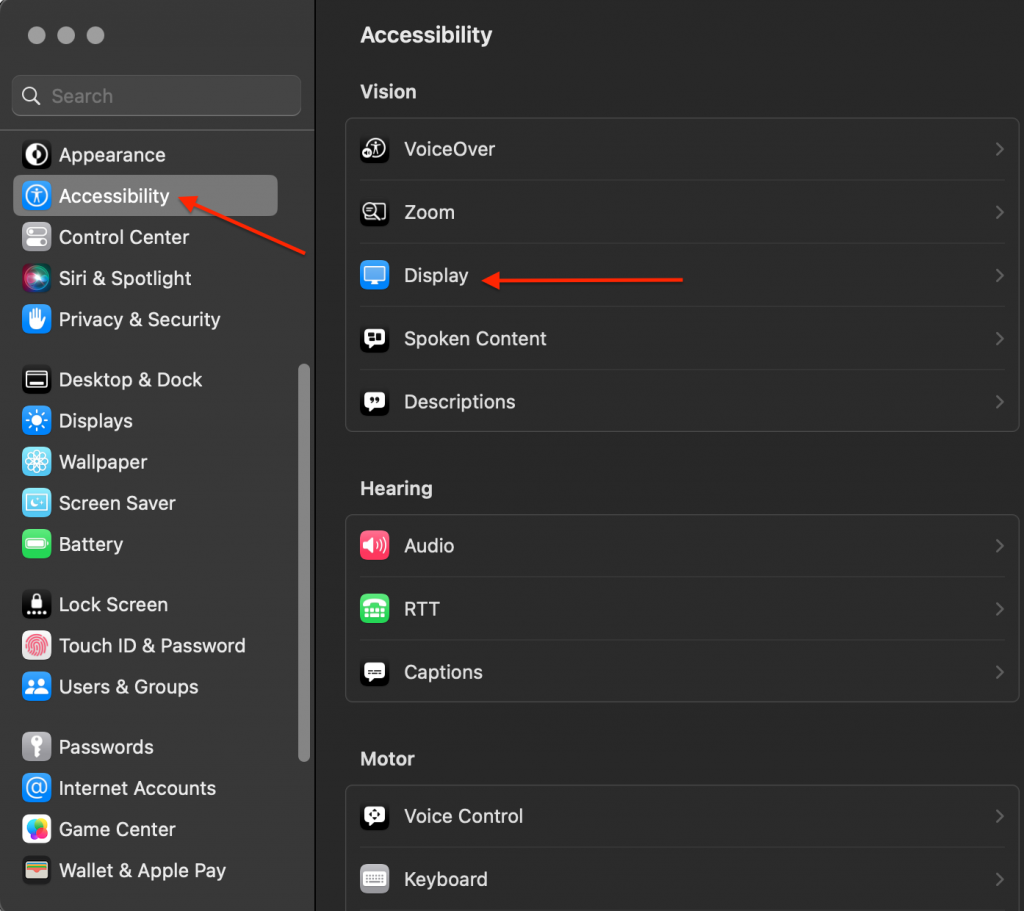 Apple logo > System Settings > Accessibility > Display
- Check the box next to Reduce Transparency.
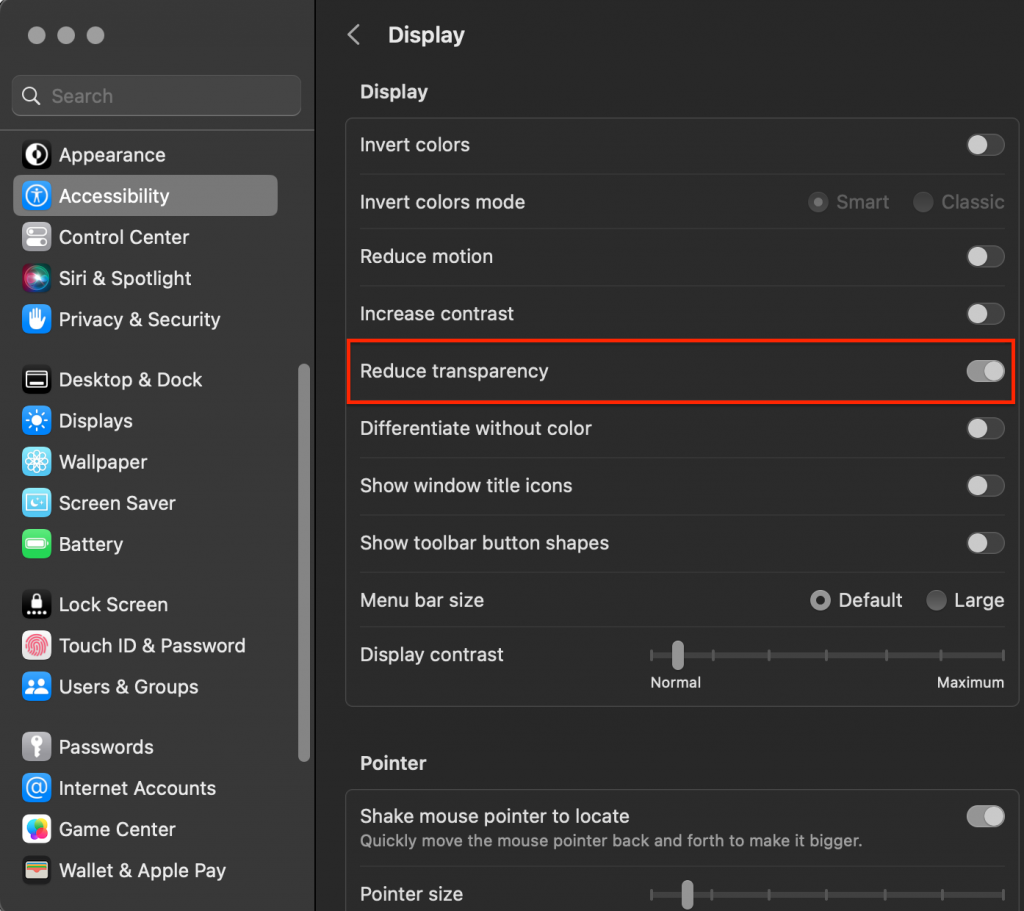 Apple logo > System Settings > Accessibility > Display > Reduce transparency
 V. Check Your Apps for Updates
Outdated apps can cause overall system bugs and can affect performance.
Open the App Store and look for the Updates tab for apps downloaded from the App Store.
For other apps, launch them, tap on the app title in the menu bar, and select the Check for Updates option.
VI. Check Your macOS for Updates
If you’re skipping macOS updates, your computer’s performance will slow down and may lead to various system bugs.
Follow these steps to check your Mac for available updates:
- Click on the Apple logo, and select System Settings.
- Look for the General tab on the left column.
- Click Software Update.
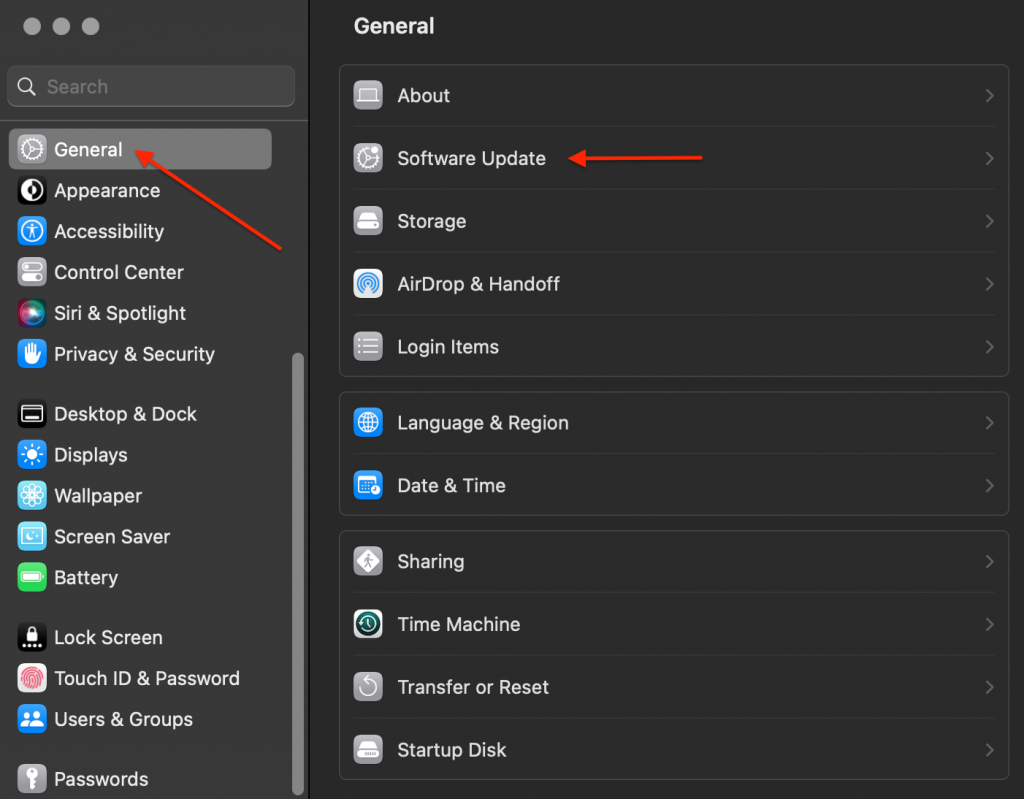 Apple logo > System Settings > General > Software Update
 If you see an available update, install it.
VII. Remove the Cache from Your Mac
Mac stores information in caches to optimize the computer’s performance. A cache is automatically generated temporary data, which helps your Mac to run faster. Even though cache files are designed to be helpful, they can also cause your system to malfunction.
If this is the case, the cache can increase the CPU usage of WindowServer on your Mac.
Follow these steps to delete the cache from your Mac:
- Navigate to Finder, and click Go in the menu bar.
 Finder > Go
- Hold the Option button on your keyboard, and click Library in the dropdown menu.
 Finder > Go > Library
- Look for a Cache folder and delete all the files there.
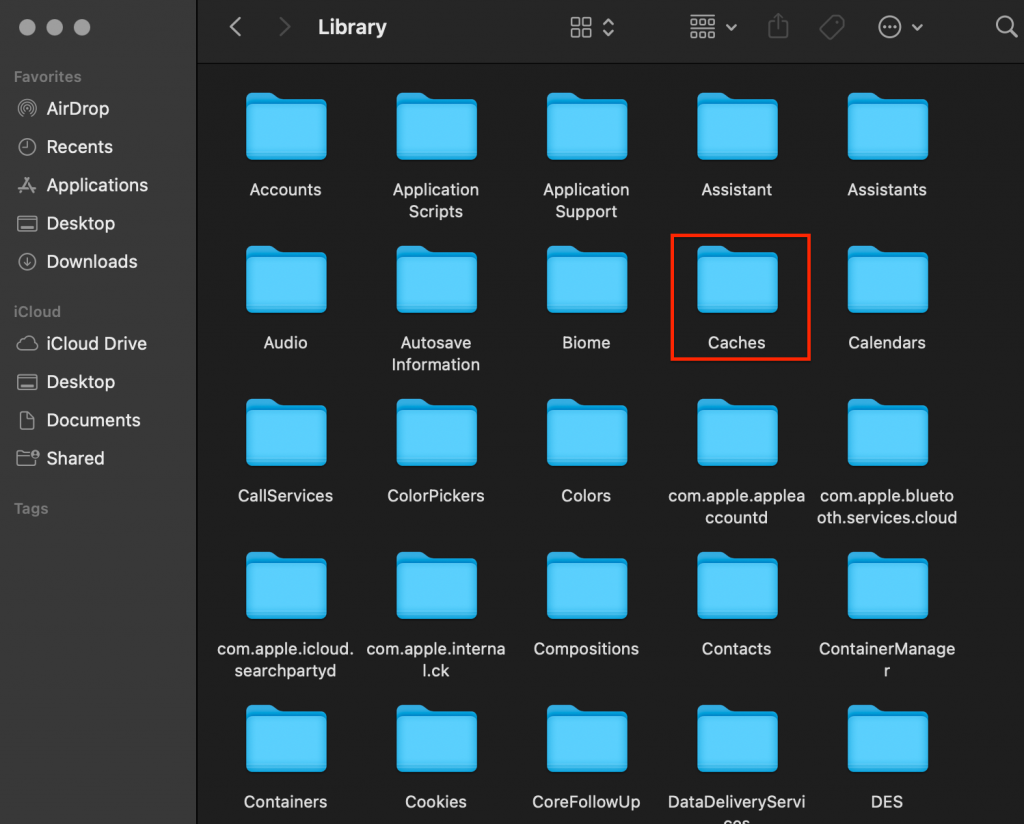 Finder > Go > Caches
 Before proceeding to remove any file, always ensure your data is safe. Stellar Data Recovery is an excellent choice for data recovery with a 98.6% data recovery rate. Try the effectiveness of this user-friendly yet powerful software designed to retrieve lost or deleted Mac files from internal and external storage devices. You’ll be able to rescue lost documents, photos, videos, emails, audio, and other important files.
You can download and try Stellar Data Recovery by following these instructions:
- Launch the Stellar Data Recovery, then choose the files you want to recover.
 Stellar Data Recovery > Select What To Recover
- You have two recovery options: customized scan (if you want to restore specific files) or Recover Everything. Choose the one suitable for you and click Next below.
- Now you need to choose the drive from which you want to restore your files. After, click on the Scan option.
 Stellar Data Recovery > Recover From window
- The scan cycle begins momentarily. You can monitor and analyze it.
- After completing the recovery process, you will see the list of all the restored files on the left.
 Stellar Data Recovery > Recover Files
- Look for specific files on the right; you need to double-click on them. In case you want to bring the file back, put a checkmark on it and click Recover.
- All you are left to do is to choose the destination to save your data. You can select another drive or an external storage device.
Wrapping Up
In conclusion, we’ve learned what Windowserver on Mac is an established the possible causes for WindowService’s influence on CPU cycles. Also, we explored how to check the WindowService’s CPU usage on your Mac and highlighted 7 possible solutions to fix the issue. Last but not least, we provided information that can help you to protect your data using Stellar Data Recovery.
Related reading:
Was this article helpful?