While using your system, you don’t want to bump into any problems. However, a lot of problems are inevitable and may occur at any moment. One such issue is –the Driver PNP Watchdog error. This error is causing Windows 10 and 11 users to face different setbacks, such as system freezing, boot-up error, app crashes, problematic Windows Update installation, BSODs (Blue Screen of Death), etc.
However, there is no need to stress over this error, as some proven fixes will help you combat it and let you access the system and its data.
What is Driver PNP Watchdog Error?
Driver PNP Watchdog Windows 11 error is related to PNP drivers that support physical, logical, and virtual devices on machines. This error occurs when a system driver fails to complete the PnP operation within a specific time. It usually contains a bug check value of 0x000001D5. However, it can also appear with a bug check value of 0xc1900101.
The error arises with BSoD (Blue Screen of Death), a common Windows OS problem. There could be many reasons for this error, including malware/viruses, invalid or damaged PC registry, outdated system files, drivers, etc.
You may encounter the error message – Driver PNP Watchdog on boot or while installing Windows updates. It may cause system freezing, hanging, boot-loop, startup error, OS crashing, or even epic failure.
How to Fix Driver PNP Watchdog Error?
Despite all the challenges you may face due to this error, you must have the knowledge to overcome and solve the problem. Here, we’ve provided effective methods to solve Driver PNP Watchdog error. You can go through the fixes and apply them as you find suitable.
#1 Run Windows Troubleshooter
Driver PNP Watchdog Windows 10 /11 error may hinder the Windows Update installing process. However, you can give a shot to Windows Troubleshooter to fix the problem. Follow the given steps to run the troubleshooter.
- Open system Settings by pressing Windows + I and then open Update & Security.
- Next, in the left panel, locate Troubleshoot and open it.
- Choose ‘Run troubleshooters automatically, then notify me’ from the drop-down given on the right.
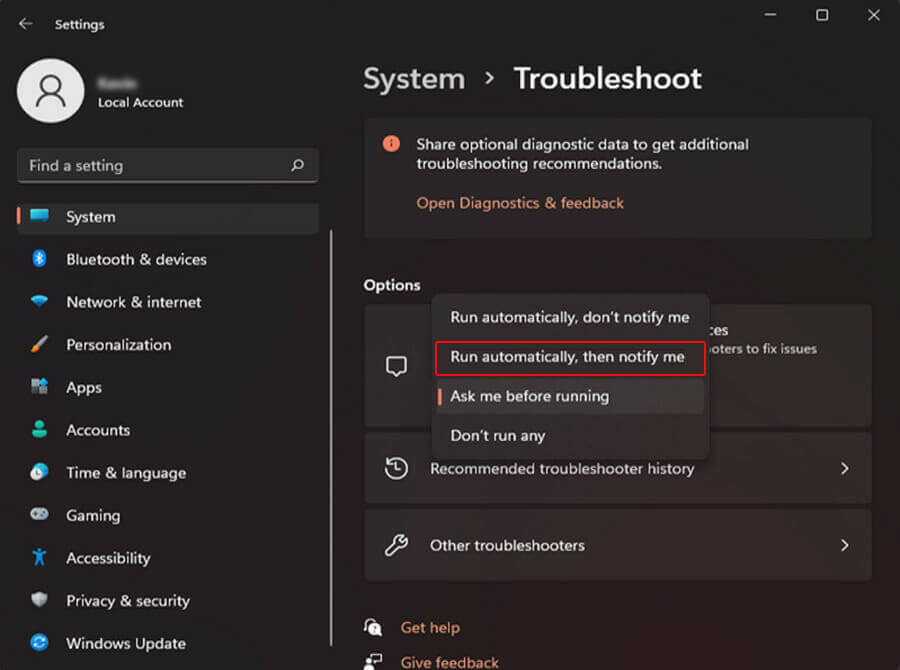
- Once done, your system may restart automatically. If it doesn’t, reboot it and check if the issue is solved.
#2 Run Windows Defender to Full Scan your PC
As stop code Driver PNP Watchdog can occur due to malware or viruses, try running a complete scan using the Windows Defender Program. This Windows built-in antivirus program helps you identify any malware or virus in the system and guides you to remove them. To run Windows Defender, follow the given steps:
- Open Windows Settings by pressing Windows + I and go to Update & Security.
- Next, select Windows Security from the left and click Virus & threat protection from the right panel.
- Now, click Scan options.
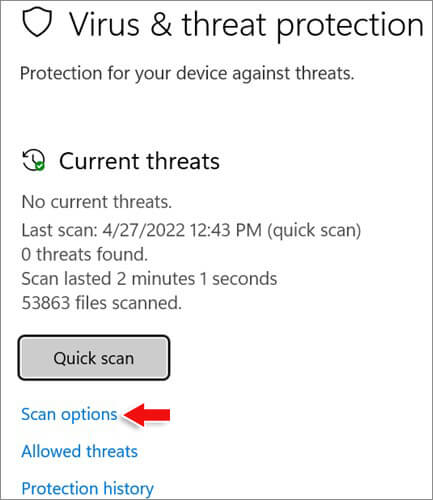
- You’ll see the scanning options as ‘Quick scan,’ ‘Full scan,’ ‘Custom scan,’ and ‘Microsoft Defender Offline scan.’
- Choose Full Scan from the given options and then click Scan now.
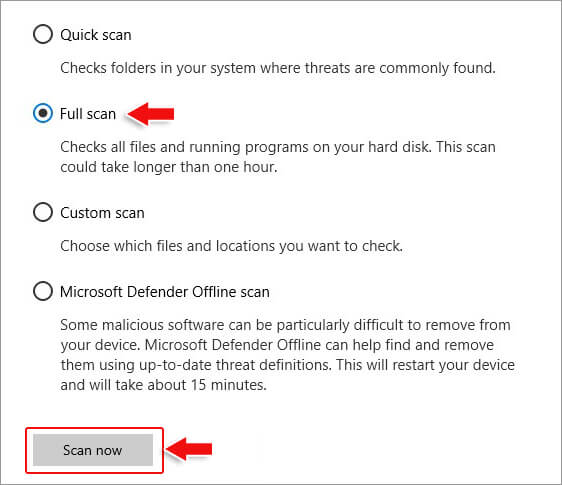
- Let the process finish, and then restart your PC. Now check if the error is fixed.
#3 Repair Invalid/Damaged Windows Registry
Sometimes, corrupted system files on your system may lead to an invalid or damaged Windows registry. You can try the System File Checker (SFC) utility to repair the registry and fix the issue. This utility checks the integrity of protected system files and replaces the corrupt or damaged ones with the correct versions.
- On your system screen, locate the Search bar and type cmd.
- Right-click the Command Prompt and choose the ‘Run as administrator’ option.
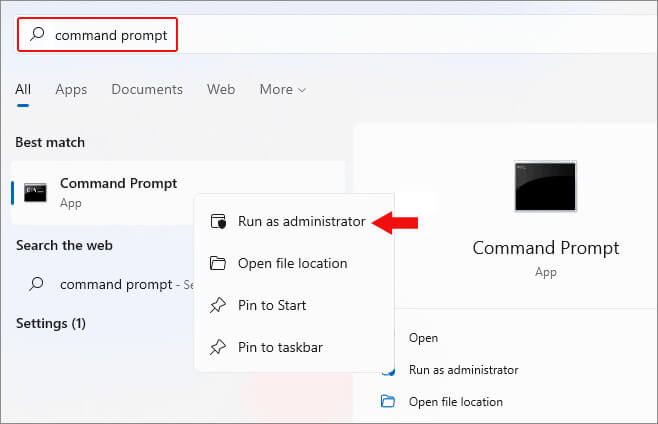
- Further, click Yes (if prompted) to confirm the action.
- Now, in the Command Prompt window, type sfc/scannow and hit Enter.
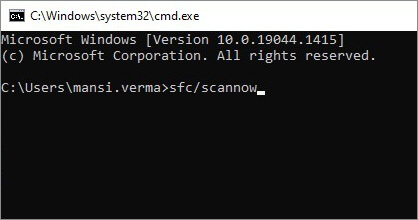
- The System File Checker will initiate scanning and check for corrupted/damaged files.
- If you’re a Windows 8, 8.1, or 10 user, first run DISM.exe /Online /Cleanup-image /Restorehealth and then run the SFC command.

- Once the process is completed, proceed with the SFC command.
- Don’t interrupt the process. Instead, wait until the scan is done and then reboot your system.
#4 Uninstall the Malicious Apps/Software
Sometimes, the issue may occur after installing a particular application/software on your system. That application or software may be incompatible with the system or corrupted or malicious. You can try to uninstall such apps/software and see if the problem is fixed.
- Press Windows + I to open system Settings.
- Navigate to Apps > Apps & features and locate the app/software you recently installed.
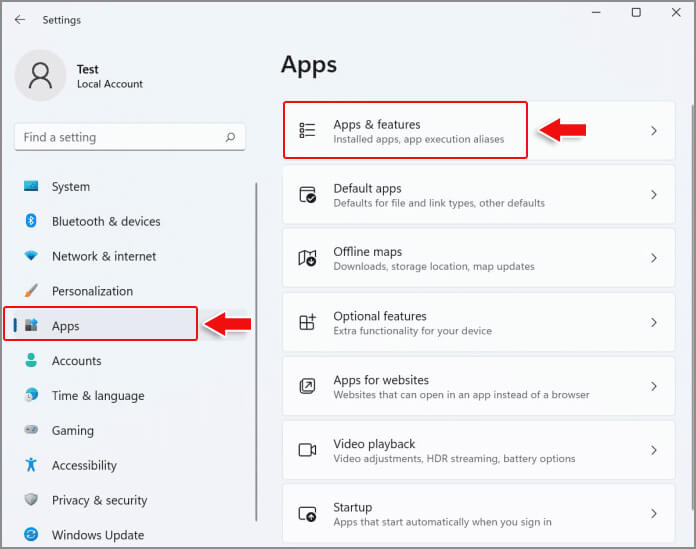
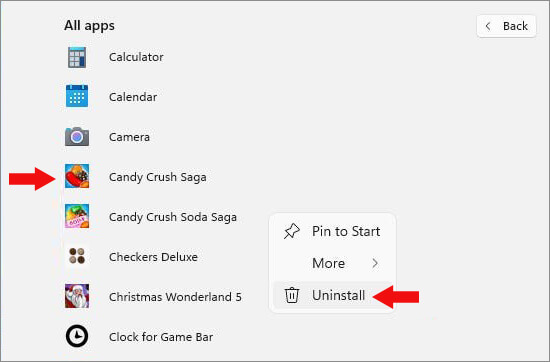
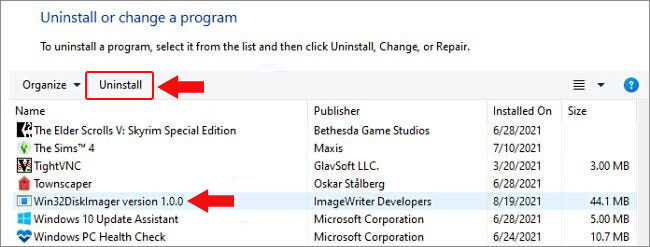
- Right-click on the app and click Uninstall.
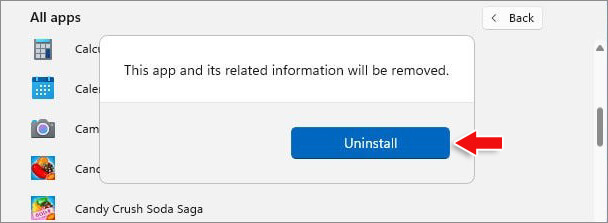
- If the app is a Windows Store app, you may get a confirmation pop-up box; click Uninstall to proceed.
- If it is a classic Win32 App, you will see Programs & Features page in the Control Panel. Here, locate the app and click Uninstall, given in the toolbar.
#5 Adjust System Services
System Services confirms that your system runs and performs at optimum level. However, Driver PNP Watchdog Windows 11 error may occur when a service is faulty. Therefore, try to adjust the system services with the following steps to overcome the issue.
- In the Search bar, type cmd and run Command Prompt as an administrator.
- In the Command Prompt window, type the below commands and hit Enter.
net stop wuauserv
net stop cryptSvc
net stop bits
net stop appIDsvc
- Let the process complete. Once done, close the window.
- Now, open File Explorer and follow This PC > Local Disk (C:) > Windows > System32 > Catroot2.
- Right-click on Catroot2 and rename it to Catroot2.old.
- Next, open the Command Prompt window, and run the given commands.
net start wuauserv
net start cryptSvc
net start bits
net start msiserver
net start appIDsvc
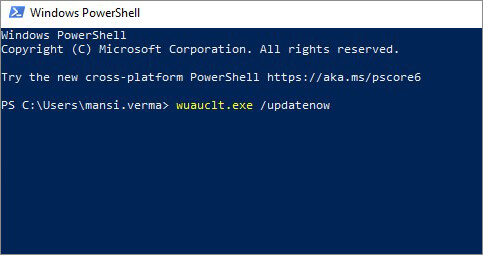
- Once completed, exit the window and open Windows PowerShell as administrator.
- Type the following commands and hit Enter.
wuauclt.exe /updatenow
- Wait until the process is done and reboot your system to check if the error is gone.
#6 Reset your system to Factory Settings
Restoring your system to the factory settings may resolve the Stop Code Driver PNP Watchdog error. However, doing so will uninstall the apps, services, files, drivers, etc. All the changes made to your system will be lost. Therefore, take a backup of your data before performing this method. To reset your PC, follow the given steps:
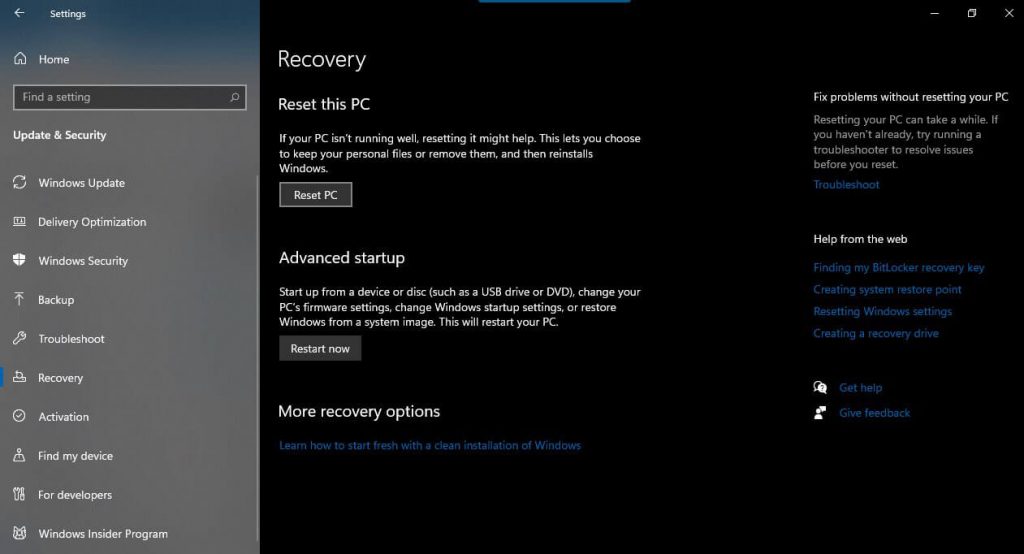
- Press Windows + I to open system Settings. There, select Update & Security.
- Next, choose Recovery and click Reset PC.
- Enter admin credentials, if required.
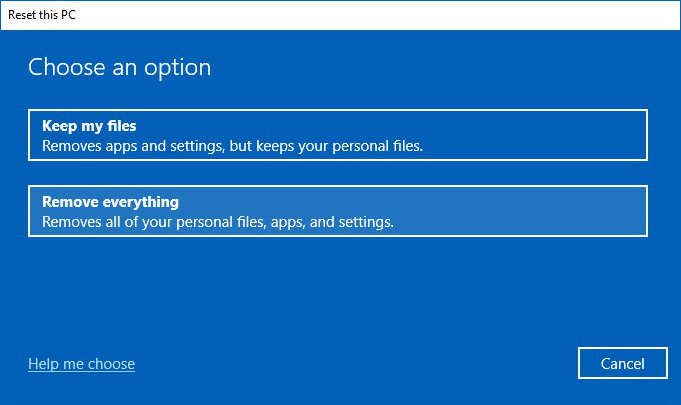
- On the next prompt, you’ll see two options – Keep my files and Remove everything. Then, choose to Remove everything for the process to work efficiently.
- Now, choose Local reinstall from the given options.
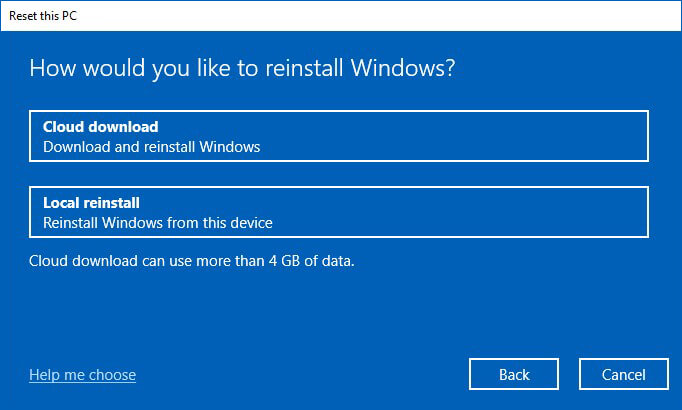
- Next, you can proceed with the current settings and click Next. Else, you can click Change Settings.
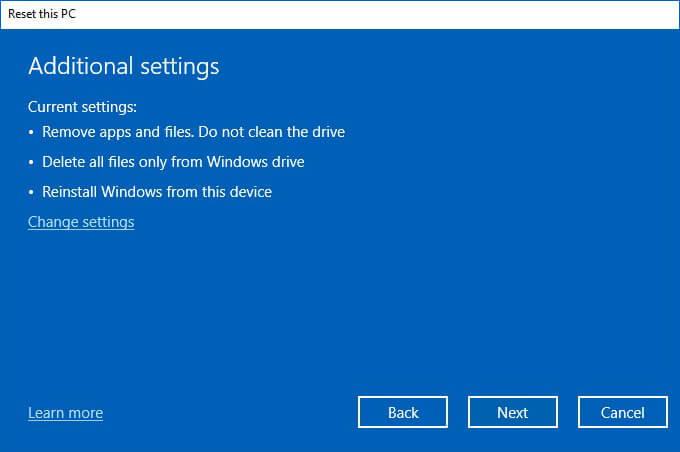
- If you select ‘Change settings,’ you will get the options to Clean data, Delete files from all drives and Download Windows.
- All these options will cause data loss. It is advised to back up your system data first and then proceed. If you already have a backup, choose Clean data; it will only remove your files. Proceed by clicking Confirm.
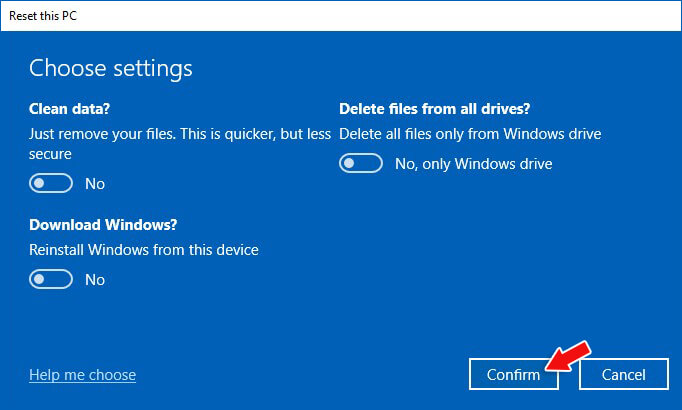
- Finally, proceed with resetting the PC and wait until the process is complete.
So these are some methods you may try to resolve Driver PNP Watchdog errors on Windows 10 and 11. However, there is a risk of losing data in some methods, such as adjusting system services or resetting the PC. Make sure you first back up your system data before performing these methods.
But what to do if you forget to back up as well? Don’t worry! You still have a chance to restore your data. You may use Stellar Data Recovery Professional to recover data after a factory reset.
FAQ