Let’s say you have just installed a fresh update of macOS Monterey 12.1. Your machine works fine for some time, then all of a sudden, all of your apps or windows are crashing, computer freezes or reboots spontaneously.
Then the error message shows:
“hash mismatch detected on volume disk1s5
macOS should be reinstalled on this volume”
You follow the advice and reinstall macOS, but it doesn’t help, and the error appears again right after reboot, or reinstalling helps only for some time, right?
Possible Causes for Volume Hash Mismatch Error
You might think the issue happens because your Mac is getting old, but that is certainly not the cause, as many users with various machine versions experience this problem. Rest assured, your device is okay. No need yet to replace it because of this situation only.
It is not yet reported what is the main cause of the error, as users complain of experiencing system crashes, random problems, or simply Hash Mismatch errors without any significant decrease in performance absolutely randomly, without any particular pattern of occurrence.
Steps before you Fix Volume Hash Mismatch
Before trying numerous ways to fix the case, first things first, it is recommended to back up your data.
Backup your Data with Time Machine
To start a new backup with Time Machine, do the following:
1. Begin with connecting the Time Machine backup disk to your Mac.
2. From the Time Machine drop-down menu, choose the item and choose Back Up Now. This will start a backup of the Mac to the Time Machine disk.
3. Wait until the backup is complete.
Another way is to try installing data recovery software to prevent data loss — go with Stellar Data Recovery:
1. Visit the official website of Stellar Data Recovery for Mac.
2. Download the app to your device.
3. Open the file and run the installation process (click Allow opening the file downloaded from the internet if prompted).
4. After installation, the app will ask you to grant access. After giving it access to your disk — restart your Mac to finish the process.
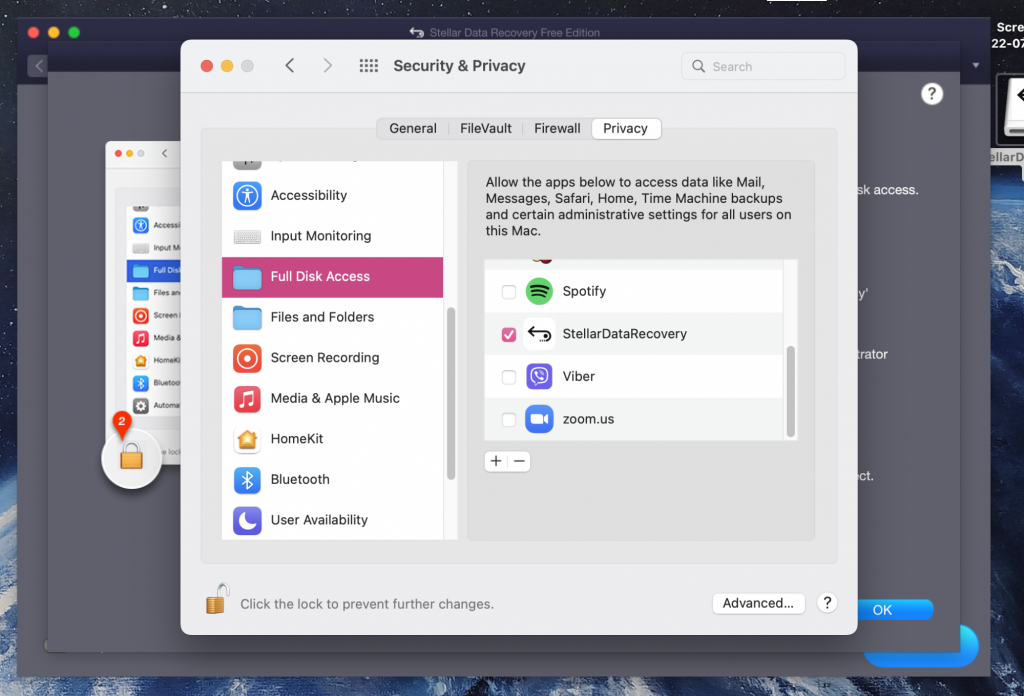 Security & Privacy tab > Full Disk Access
 5. Run the scan, choosing the drive.
How to Fix the “Volume Hash Mismatch” Error in macOS Monterey
Now that you have safely backed up your data, you can proceed to fix stuff.
1. Reinstall macOS
M1 Macs
If you are an owner of the newer versions of Apple devices, the instructions will be slightly different. Hence we will start with it.
1. Go to the Apple icon at the top of your screen. From the drop-down menu, choose Shut Down.
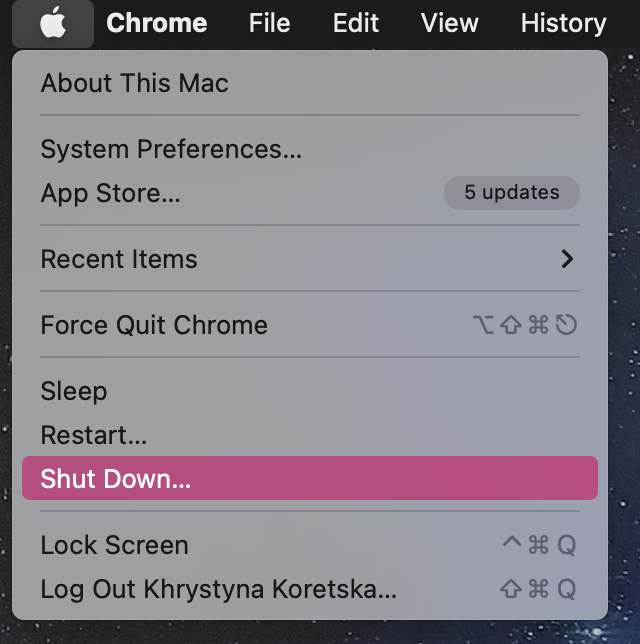 Apple menu > Shut Down
 2. Give it a few seconds and press the Power Button (where you put your finger for a Touch ID).
3. Hold the Power Button until you see the Loading startup options (before that, you will see the Apple logo; do not stop pressing the button until the text is shown).
4. After that, you will see startup and options on the screen. Move the mouse to the Options and press Continue.
5. Fill in the admin password if prompted.
6. You are in recovery mode now. Choose Reinstall macOS Big Sur > press Continue.
From this point, keep following the instructions on the screen to start and finish the reinstallation process.
Intel Macs
For these Apple devices, we will use the same Recovery Mode, which will help us reinstall the macOS version without doing a complete and clean reinstall that erases all the data.
1. This time from the same drop-down Apple menu, choose the Restart option.
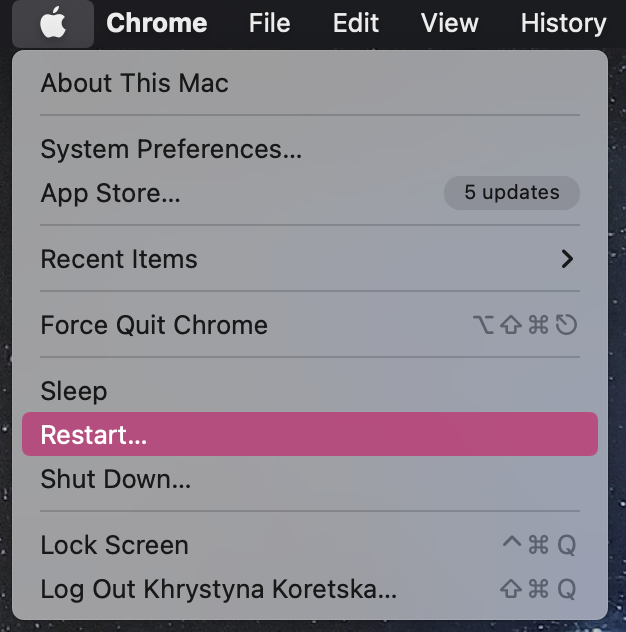 Apple Logo > choose Restart
 2. Then instantly press Command + R on your keyboard together. This will start your Mac into Recovery Mode.
3. macOS Utilities should appear on the screen. Choose Reinstall macOS and click Continue.
4. You will be prompted to agree to the terms and do so to start the process.
5. Now you are asked to select a drive you want to reinstall macOS onto. After choosing one > press Continue.
6. Wait for the installation to end. The screen will be black with only the Apple logo on it, but the progress line will also be visible under the logo.
2. Reset SMC
On M1 Macs
The news is that it is actually impossible to reset SMC on the newest Apple devices because the system management controllers on these models are simply absent. Or better say, the actions run by the chip are now implemented into the M1 processor itself.
The only workaround is to change some of the settings that the SMC previously ran.
If you are still willing to give it a go, put your device in DFU mode, after which you will need to reinstall firmware with Apple Configurator 2 using a different Mac to help with it. For more information, visit the link.
On Intel-based Macs
As for all the other devices where it is possible to reset SMC, the instructions will vary based on the type of the machine.
Desktop Macs
1. Shut down the device and unplug it.
2. Give it 15 seconds and plug the power cord back in.
3. Give it 5 more seconds and start your computer.
MacBooks (non-removable battery)
1. Shut down the device and unplug it.
2. On your keyboard, press Shift + Ctrl + Option (Alt) and the Power Button simultaneously, and hold for 10 seconds.
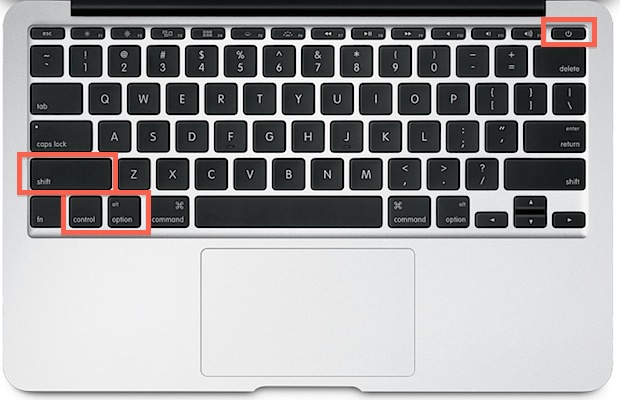 Shift + Ctrl + Alt + Power Button on keyboard
 3. Stop holding all the keys altogether, and then press the Power Button alone to start the Mac.
MacBooks (with removable battery)
1. Shut down the device and unplug it.
2. Remove the battery.
3. Press the Power Button, wait five seconds, and then let it go.
4. Insert the battery.
5. Plug the power cord back in.
6. Start up the device.
3. Reset NVRAM
M1 Macs
Similar to SMC, it is impossible to reset NVRAM on the newest Macs. NVRAM is present on the Mac M1 version. Unlike SMC, it provides different functionality. And since there is no command to reset the contents of NVRAM entirely, it is recommended to treat the terminal command NVRAM with caution.
Intel Macs
1. Press all these keys together: Command + Option (Alt) + P + R.
2. While still holding these altogether, start up your device.
3. Hold the keys until you hear your machine restarting itself.
4. Wait until Mac reboots for the second time, and only then you can let go of all the keys.
Even after that, your Mac might want to reboot one more time, which is fine. After trying these most often used steps to fix the error, try to perform your usual actions, run a few apps, and see whether the performance of your Mac has stabilized.
Wrapping Up
We hope you will manage to fix the Hash Mismatch error on your Mac safely without any extra help or waiting for the new macOS version. After backing up your data, you are safe to try running through these steps to solve the issue on your own!
Related reading:
Was this article helpful?