Are you tired of your Mac being slow? Does your Mac’s fan keep spinning and making noises like a space shuttle? We know exactly what the problem is. Moreover, we know how to fix it.
In case you tried force quitting all active apps, and it didn’t help, the kernel_task process could cause the issue. With this article, you will learn six solutions to reduce the high CPU load of the kernel_task process.
What is Kernel_Task?
The kernel_task resides in the macOS core. This process involves a number of low-level operations that enable computers to function. One of its most important roles is to prevent your Mac from overheating. To put it simply, if kernel_task notices specific CPU-demanding operations (opening Photoshop, for example) which take up a lot of Mac’s memory, gobble up the resources itself, and most likely overheating your Mac.
The kernel_task CPU usage may become unreasonably high if the CPU temperature rises due to the following factors:
- Active mode programs and operations running in the background and using the CPU too intensively.
- Your Mac is heating up while charging.
- Cooling fan issues.
- Hardware-related cases.
Essentially, when macOS observes an extraordinary increase in the temperature of your CPU, it sends a kernel_task to cool your Mac down. When trying to chill a Mac, kernel_task can use a huge chunk of CPU. Now, let’s check how many CPU processes the kernel_task uses.
How to check CPU Usage on Mac?
You’ll need to run Activity Monitor to review the CPU usage of the kernel_task process and other programs. Here’s how:
1. Click anywhere on the Desktop > press the Go button in the menu tab > select Utilities.
 Menu bar > Go > Utilities
 2. Then, click Activity Monitor.
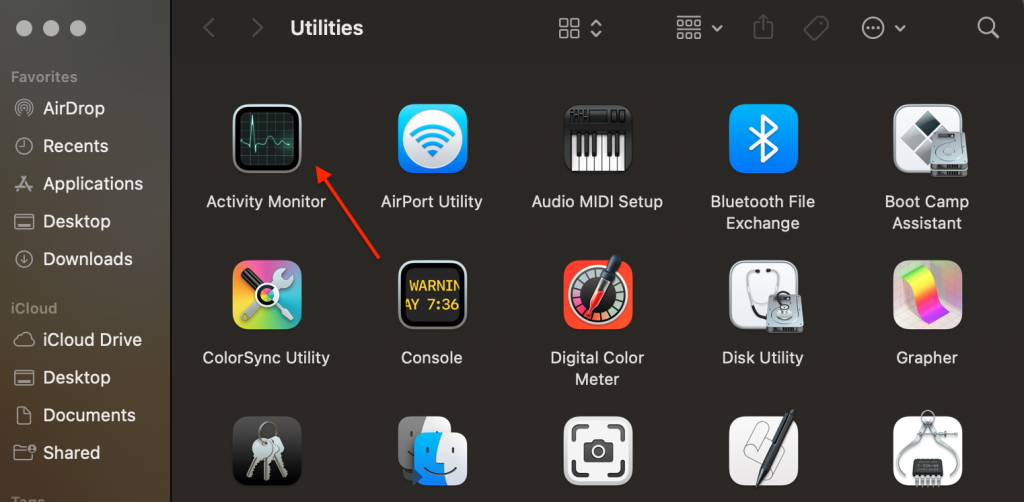 Utilities folder > open Activity Monitor
 3. Select the CPU tab > navigate to the % CPU column to find out which programs and operations are eating up your Mac’s CPU.
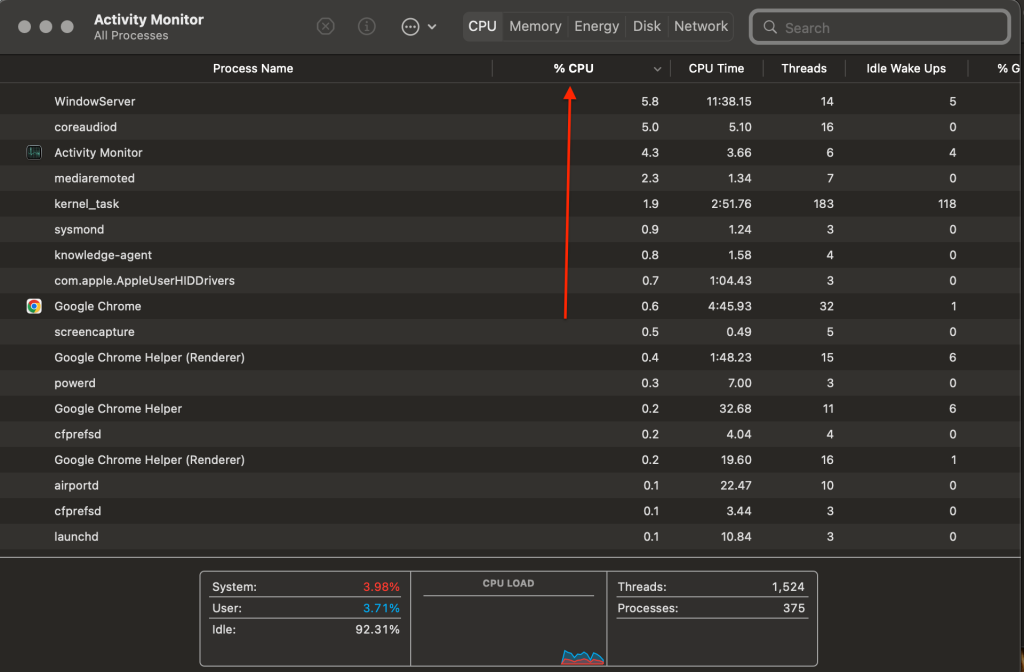 Activity Monitor > % CPU tab
 CPU usage of apps is calculated in percentage and sorted from highest to lowest.
NOTE: If you don’t find the kernel_task operation in the Activity Monitor, here’s what you should do:
1. Open Activity Monitor > press View in the menu bar.
2. In the View tab, make sure there is a checkmark near the All Processes option.
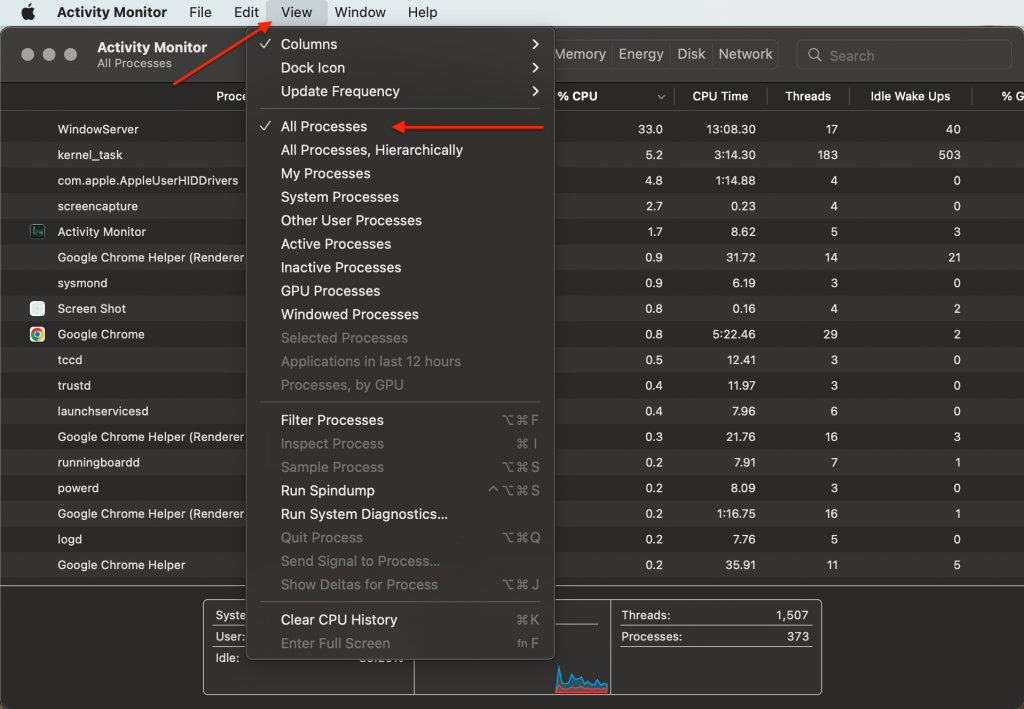 Activity Monitor > View > All processes
 Now you should see the CPU usage of the kernel_task process on your Mac.
How to Minimize CPU Usage on Mac?
Now that you’ve learned how much of your Mac’s processing power is used by third-party apps, how can you downsize CPU usage? You can begin with force quitting programs that are not in use:
- Highlight an app in the Activity Monitor > press Force Quit to quit the app.
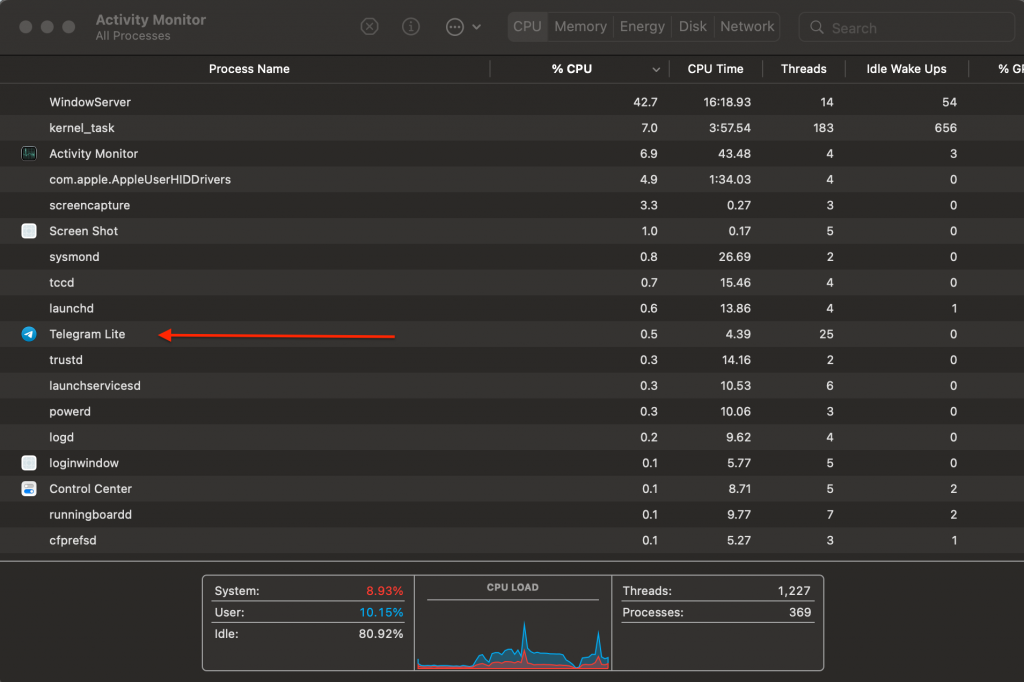 Activity Monitor
 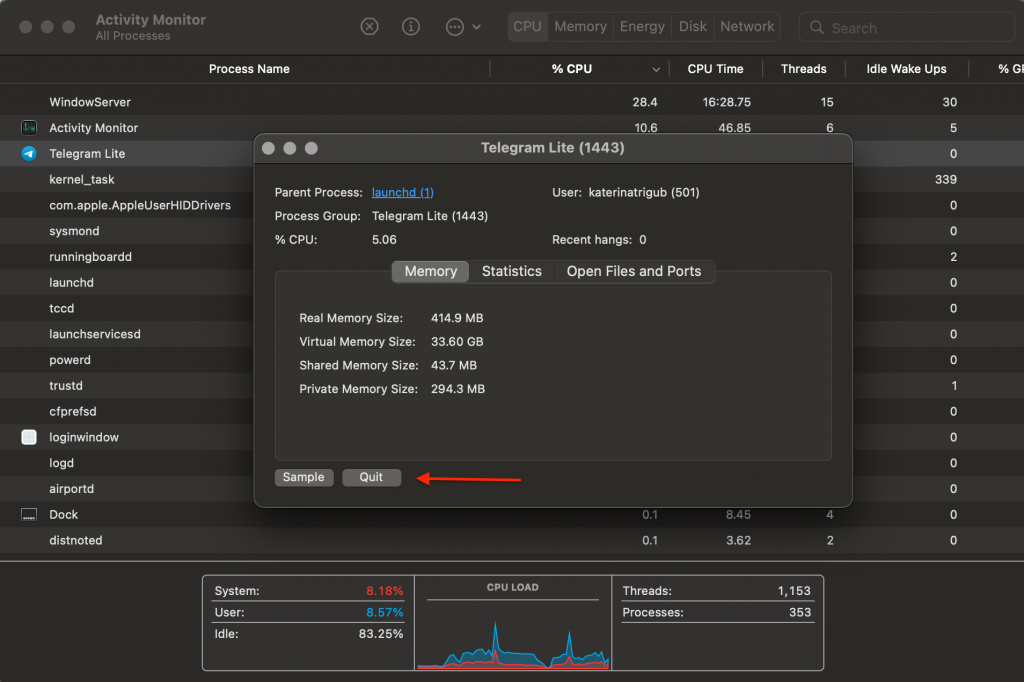 Activity Monitor > Force Quit
Accumulation of unneeded browser tabs also raises CPU usage on your Mac. So, we suggest closing these tabs, especially for CPU-intensive browsers like Firefox or Chrome.
Ideally, reducing CPU usage by other programs should cause the kernel_task process to use fewer CPU resources. In case that doesn’t help, try the troubleshooting tips below. For your convenience, we’ve sorted the fixes from the easiest to the hardest ones.
1. Switch the USB Charging Port
Using fake chargers (which are usually of low quality) causes your Mac to overheat. And you’d be surprised that genuine chargers may cause heating issues as well. Some users reported they could lower CPU temperatures (and high kernel_task CPU usage) by just charging through the right side of their device.
Some MacBooks appear to have a design flaw that causes the CPU temperature to spike when charged to either port on the left. If your MacBook has charging ports on both sides, it’s a great idea to use the ports on its right side and find out if this trick helps reduce CPU usage.
2. Move your Mac to a Cooler Room
It’s recommended to work on your MacBook in acceptable operating temperatures (50° to 95°F or 10° to 35°C). Anything outside this can cause the kernel_task process to use a much higher CPU load for temperature regulation.
You can adjust the CPU temperature with a MacBook cooling pad or simply move to a cooler room. Also, don’t use your MacBook on a cushion, bed, or any surface that accumulates heat and blocks your Mac’s vents.
3. Restart your Mac
If the kernel_task problem with high CPU usage remains, this is the sign for you to restart your MacBook. This simple maneuver will update your device’s operating system and help delete malware that is hogging your Mac’s CPU usage. If kernel_task CPU usage remains unjustifiably high when your Mac restarts, try resetting its system management controller.
Related post: How to Force Shut Down or Restart a Frozen Mac
4. Boot into Safe Mode
Booting your computer into Safe Mode can help analyze third-party applications responsible for high CPU usage by the kernel_task process.
Follow these steps to boot your Mac into Safe Mode:
- Turn off your Mac and wait for the shutdown.
- Press the Power button and press and hold the Shift key. Release the Shift key when the Apple logo shows on the screen.
How to check if you’ve successfully booted into Safe Mode? In the right upper corner of the menu bar, you’ll see Safe Mode in red.
5. Reset SMC (System Management Controller)
The System Management Controller (SMC) is the element that powers the MacBook’s fan, battery, keyboard, and other critical hardware. The kernel_task process can increase CPU load if your Mac’s fan isn’t working properly. In this case, the SMC should be reset. In the following section, we’ll guide you through two instructions — for Apple Silicone and Intel Macs.
Reset SMC on M1 Macs
You don’t need to reset the SMC on M1 Mac. Actually, there is nothing to reset. The M1 Macs perform all the functions of the SMC, so these devices don’t even include a system management controller.
But there is another helpful trick. Try shutting your Mac down and waiting for 30 seconds. By doing this, you can reset the SMC.
Reset the SMC Apple T2 Security Chip Mac
Before you reset the SMC on any MacBook check to see if your Mac model has an Apple T2 Security Chip. These chips are built in MacBook, Macbook Pro, and MacBook Air models (2018 or newer).
Here’s how it goes:
- Shut down your Mac.
- Hold the Power button for about 10 seconds and release the button.
- In a few seconds restart your computer.
If that didn’t help, try this:
1. Shut down your Mac once again.
2. Press the Shift button located on the right side of the keyboard, the left-sided Option key, and the left-sided Control key > hold for 7 seconds. Next, hold the Power button.
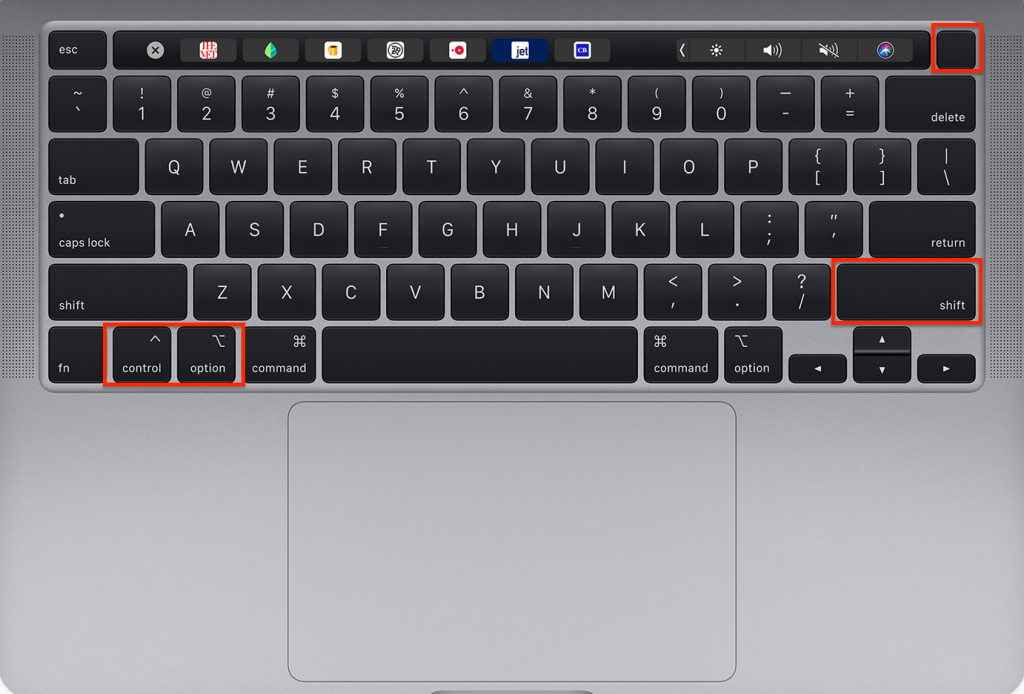 Keyboard > Shift + Option + Control buttons > Power
 3. Hold down all four keys for 7 seconds once again. If your device is turned on, this will turn it off while you keep pressing these keys.
4. Release these keys and wait a bit. Next, restart your computer.
6. Reset NVRAM
Non-volatile random access memory (NVRAM) is an element that reserves specific data about your Mac’s configurations and settings. Resetting NVRAM is a practical troubleshooting procedure that can help restore kernel_task CPU usage to normal.
Note: Resetting NVRAM on M1 Macs is not possible. Try simply restarting your Mac.
To reset NVRAM do the following:
- Shut down your Mac completely.
- Press the Power button (once).
- When the display turns on or once you can hear the startup chime, immediately hold these keys: Option + Command (⌘) + P + R.
- Don’t release the four keys until your Mac restarts.
If nothing works, you may need to use Recovery Mode to restore your Mac to factory settings fully.
How to Boot Into Recovery Mode?
Booting into Recovery Mode on Intel-based Macs goes like this:
1. Click the Apple logo on your desktop. Click Restart.
 Apple logo > Restart
 2. That very moment, hold down the Command + R on your keyboard till the moment you see a spinning globe or Apple logo.
3. In case you see a lock, fill in the password for your Mac.
4. Select the volume on your disk (if you have more than one) that you want to recover, then click Next.
5. If asked, pick an administrator account, click Next > enter the password > click Continue.
When you see the Recovery app in the menu bar, you can select any available options in the window or the menu bar.
M1 Mac Recovery Mode
The process is slightly different if you have an Apple Silicone Mac.
Here’s how to start an M1-based Mac in Recovery Mode:
- Turn off your Mac > press and hold the Power button.
- A message will appear saying that you will soon be able to access the startup options. Continue to hold the button.
- Click Options > Continue to open up Recovery.
Does Recovery Mode Delete Everything on a Mac?
Just booting into Recovery Mode won’t erase everything on your Mac. However, you’ll delete everything on your Mac if you choose to reinstall macOS or wipe the drive with Disk Utility.
To ensure your files are safe, we recommend using specifically designed software. The Stellar Data Recovery software can restore your files even if you have emptied the Trash. It can get back the deleted files using the Command-Shift-Delete or Command-Option-Shift-Delete options.
 Stellar Data Recovery for Mac
 Stellar Data Recovery app:
- Recovers deleted documents, photos, and videos without any charge.
- Recovers up to 1 GB of data for free.
- Compatible with M1 & T2 chip-enabled Macs.
- Supports the latest macOS Ventura 13 and Lower versions.
You can download Stellar Data Recovery to try it yourself and ensure that all your files are safe.
Wrapping Up
Although the kernel_task problem is sometimes a headache, there are many ways to solve it. Try one of the fix solutions mentioned below, and we are sure you’ll manage to resolve kernal_task efficiently.
Was this article helpful?