Despite being a powerful machine, Mac isn’t immune to storage-related problems. MacBooks used to come with internal hard drives till 2013. By 2020, Apple completely switched to SSDs over HDDs in every Mac.
Although hard drives in Mac have become a thing of the past, some users still use older Macs or external hard drives. These users time & again report various hard drive-related problems, such as inaccessible or corrupt data, non-booting Mac, or worse, data loss in extreme cases.
To assist users who are using old mac hard drives, we have created this guide covering some major Mac hard drive problems and solutions. Let’s dive in.
Types of Mac Hard Drive Problems
A hard drive on a Mac works similarly to how it works on a Windows PC. Be it external or internal hard drive, the hard drive problems are quite similar –
- Mac stuck on Apple logo screen while booting
- Crashing or freezing system
- Errors displayed by disk utility
- File corruption due to bad sectors
- Missing or corrupted MBR/GPT
- Damaged SATA cable
- Hardware issues
- Aging hardware
Solutions to Fix Mac Hard Drive Problems
Mac hard drive problems are not just limited to the above-mentioned scenarios. They also include minor issues we tend to ignore until it’s too late. From using old hardware to hard drive brimming up to its capacity, many hard drive problems must be resolved for an error-free Mac experience.
Read ahead and understand various Mac hard drive problems and their solutions.
Problem 1: The Mac Hard Drive Is Running Slow
Aging, prolonged usage, lack of free storage spaces, and logical errors can slow down a Mac startup disk. Many other factors can degrade Mac performance, such as an exceeding storage space limit, outdated macOS, several login items enabled, multiple apps running in the background, hardware issues, etc.
There are several things to do to give a slow Mac a performance boost:
- Delete large unwanted files, unused apps, and duplicate data from the hard drive.
- Clean up the Desktop and login items.
- Update macOS and third-party applications.
- Check background processes in Activity Monitor and quit the ones that aren’t required.
- Upgrade Mac hardware and firmware.
- Remove inessential plugins, widgets, and Internet caches from Safari.
- Repair startup disk with Disk Utility.
The above list of activities often looks simple, but it isn’t; manually deleting data from a Mac hard drive can get frustrating. However, you can speed up your work using a powerful Mac File Eraser.
Read More – Learn more about the top Mac file cleaners
Problem 2: Mac Hard Drive Running Low on Storage Capacity
A low capacity Mac hard drive will show the “Your startup disk is almost full” error multiple times. Even if essential data is in iCloud and large multimedia files are on an external storage drive, Mac storage drive free space will disappear automatically. Your device loses storage space due to junk file build-up, temporary files, caches, logs, and leftovers of uninstalled applications.
To resolve the drive space storage issue, make more space available on the startup disk by deleting temporary files, junk files, unnecessary files and apps.
Also, delete all the temporary files from specific folders present in the Library folder, such as Logs, unnecessary iTunes files, and Application Support files.
Problem 3: Mac Hard Drive Is Not Showing Up In the Disk Utility
If the Mac hard drive fails to show up in the Disk Utility window, it could be a result of an improper SATA connection or a hardware issue. However, if you have connected an external hard drive to your Mac and it appears in the Disk Utility as greyed out, it could be due to a failure in mounting the hard drive. In such a case, try to mount it. To do this –
- Select the drive in the Disk Utility.
- Press the Mount button.

You can try plugging in the external drive to another USB port or using a USB hub for the same. If you have another Mac with you, plug in the problematic Mac hard drive to it and see if it is accessible.
If the above tweak doesn’t work, use the free Mac data recovery software to rescue the stored files from the unmounted Mac hard drive.
Problem 4: Disk Utility Can’t Repair Mac Hard Drive
The First Aid tab present in Disk Utility allows users to fix hard drives or other storage media for errors, bad sectors, etc. But sometimes, it fails to do so and displays the following message: “Disk Utility can’t repair this disk”. This error occurs because Disk Utility fails to repair the problematic Mac hard drive.
To resolve the underlying issues behind this problem, use the “file system consistency check” (fsck) command in Single User Mode. It will review and repair the basic structure of the problematic storage drive.
Before using the command, make sure to back up the drive to a healthy external storage drive to avoid unnecessary data loss. Once taken, perform the following steps –
- Start or restart Mac, then immediately press-hold Command + S keys until white text appears on the startup screen. Mac will boot into Single User Mode.
- On the command prompt, type fsck –fy and hit Return. Don’t interrupt till the command finishes, as it can incur data loss.
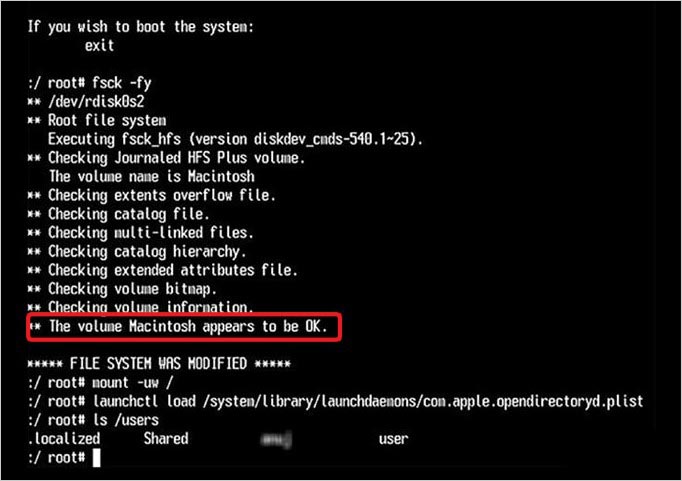
- If the message “The volume was modified” or “The volume Macintosh HD could not be repaired” appears, use the above command again.
- Use the command multiple times until the message “The volume Macintosh HD appears to be OK” appears. Type Exit to restart Mac.
In some cases, an external hard drive or internal Mac hard drive fails while running a S.MA.R.T. scan. If you see your Mac throwing errors or failure messages, it indicates an imminent hard drive failure. You can try repairing the Mac hard drive using the FirstAid utility in the Disk Utility.
Related Guide: THE NOOB GUIDE TO MAC HARD DRIVE RECOVERY
Problem 5: Data Lost From a Mac Hard Drive
Hard drive problems on a Mac can result in data loss. It could be either temporary or permanent, depending upon the type of hard drive failure – logical or physical.
There are many reasons behind unexpected data loss from storage media, such as accidental deletion, emptying Trash, hard drive formatting, file corruption, malware, physical damage, etc.,
If you have lost your data due to any of the above-mentioned reasons, do not worry. Use the solutions mentioned ahead to recover your lost files. However, stop using the hard drive/SSD right away to prevent overwriting and possible permanent data loss.
Restore from Time Machine: If you have configured Time Machine backup on your Mac, use the external backup drive to restore lost, deleted, or corrupt files from it.
- Go to Menu Bar, click Time Machine, and then click Enter Time Machine.

- Search for lost files or folders by using the Timeline or Up/Down arrow.
- Select all the required items and click Restore.
The files and folders will be restored to their original location.
Restore hidden files: In some cases, the files you are looking for may be hidden or are present in the hidden library folder. Unhide the hidden files by pressing Command + Shift + . (Dot) in the Finder. You can also try navigating to the hidden folder path to access missing files.
Data Recovery Software: If Time Machine backup is unavailable, or you want to skip the hassle of using it, you can simply download a professional data recovery software for Mac to recover lost data from your Mac hard drive. But first, you must stop using the drive immediately to prevent any overwriting.
Next, download the trial version of Stellar Data Recovery Professional for Mac on the system. Once downloaded, follow the steps mentioned below –
- Select the type of data to be recovered.
- Select the storage drive from which the data got lost.
- Scan the selected hard drive for recoverable data.
- Preview the scanned items.
When satisfied with the recovery result, activate the software to recover all missing data to a different drive location.
Problem 6: Mac Hard Drive Is Making a Clicking Noise
If you hear the internal Mac hard drive or external hard drive generate unusual noises like clicking, screeching, or grinding sounds, stop using the hard drive right away. A hardware issue like damaged platters, head, etc., is a clear indicator of a physical failure. If this is the case with your hard drive, stop using it, and contact a professional data recovery service.
Method 7: Mac Hard Drive Is Not Booting
Sometimes, the Mac hard drive simply won't work on boot. This issue could happen due to file system corruption, bad sectors, electronic component damage, or other hard drive issues. As a result, all valuable photos, videos, documents, and other files stored on the Mac drive become inaccessible.
The best course of action in the case of a non-booting Mac is to implement the following methods and retrieve your data.
Access non-booting Mac using Target Disk: Connect the non-booting Mac to a working Mac using a FireWire or Thunderbolt cable. Power on the working Mac. Next, turn on the non-booting Mac, then immediately press and hold the T key. Release the key when the FireWire or Thunderbolt icon appears. Access the non-booting Mac hard drive from the working Mac.

Boot non-booting Mac by using a recovery drive: If your Mac has become unbootable, the best way to resolve this is to recover your files from it and then reinstall macOS. Boot your Mac in Recovery mode using the Command + R key combination. Once inside, use the Terminal to run the command for recovering data from an unbootable Mac via a professional Mac data recovery software.
Problem 8: Mac Asking to Initialize Hard Drive
On connecting an external hard drive via a USB cable, Mac asks to initialize it. This message window is a sign of the drive’s file system format being incompatible. However, doing so will also lead to data loss, as macOS will erase the incompatible or corrupt hard drive with a new file system format. This will consequently result in loss of all the stored content on the hard drive.

Check the hard drive’s file system format using Disk Utility. If the drive’s file system is incompatible with macOS, use a computer that supports that file system and copy files to the system. Next, erase the hard drive with a file system that is compatible with both systems.
Problem 9: Mac External Hard Drive Is Ejecting Itself
While upgrading older MacBooks (MacBook Pro 2012), some Mac users replaced the Mac CD/DVD drive with a large-capacity internal hard drive, thereby, augmenting their Mac’s storage capacity. However, the auto hard drive ejection issue appears after a few minutes of drive idleness.
Tweaking Mac’s power management settings seems to be resolving the underlying issue. The steps are –
- Go to Finder > Applications > Utilities > Terminal.
- On Terminal, type pmset –g | grep disksleep and hit Return.
- Check the value of disksleep. If it is low, provide a significant number.
- Type sudo pmset –a disksleep # (here, replace # with a suitable number) and hit Return.
- Provide the admin password when prompted.
- Check the changed sleep value using the pmset –g | grep disksleep command.
The above solution will fix the drive auto-eject problem. Now, use the hard drive to save and access data as usual.
Problem 10: Remove Hard Drive Encryption
If your Mac’s internal hard drive is encrypted using FileVault and encryption is no longer required, remove the hard drive encryption using the following steps:
- Go to Apple menu > System Preferences > Security & Privacy. Click the FileVault tab.
- Click the lock icon and enter the administrator name & password to change preferences.
- Click Turn Off FileVault to decrypt the Mac startup disk in the background.
Once the decryption process is complete, the hard drive no longer requires a password to access its stored content.
However, if the non-startup volume or external hard drive is encrypted through Finder, it will be a password-protected drive. In this scenario, you will need to remove the hard drive encryption. To do this –
- Launch Finder and select the non-startup volume or external hard drive from the sidebar.
- Secondary-click on the selected drive icon and choose Decrypt.
- Enter the password that was provided at the time of encryption.
After this process, you can access the external hard drive without entering any password.
Note – As FileVault requires a decryption key for accessing the drive and its contents, losing or forgetting it can lead to permanent data loss. To avoid this, note it down somewhere safe, use the password hint feature, reset the keychain using Apple ID, use the recovery key obtained during FileVault disk encryption, or reset the password using the Reset Password assistant.
If none of the above steps works, contact Apple Support for help.
Problem 11: Mac Hard Drive Won't Format
While erasing data from a Mac, users are unable to reformat the Mac hard drive to the chosen file system. This also happens with the external hard drive. This problem occurs when the internal Mac startup disk is in use and the system won’t format. As a workaround, you can try to erase the startup disk (Macintosh HD) using Disk Utility in macOS Recovery mode or a bootable installer drive (CD, DVD, or USB flash drive.)
Problem 12: Mac External Hard Drive Is Read-Only
Some users stated that while trying to save files on an external hard drive, they found that the external drive is read-only. The best explanation behind an external hard drive connected to a Mac in read-only mode is its incompatible file system.
As a workaround, users can access the NTFS drives connected to their Macs using a third-party software like Microsoft NTFS for Mac by Paragon Software. This allows the reading and writing of files on an NTFS-formatted hard drive on a Mac system.
Problem 13: Mac External Hard Drive Sleeps
Many users have reported that external hard drives go into sleep mode automatically when the Mac is left idle. Upon digging deeper, we found that macOS was turning off the hard-drive motor to save energy. While this is a perplexing issue for an average user, it is also quite simple to fix. Here are the steps for resolving this issue –
- Navigate to the Apple menu > System Preferences > Energy Saver.
- In the Energy Saver window, unselect the Put hard disks to sleep when possible checkbox.
The external hard drive will remain active and won’t go into the sleep mode.
Problem 14: Mac Hard Drive Is Not Detected In Windows
On connecting a Mac-based storage drive on a Windows PC, the drive won’t appear on File Explorer. This issue arises due to file system incompatibility. The storage drive is in APFS or HFS+ file system format, which is compatible exclusively with macOS. No other operating system is harmonious with Apple’s proprietary file system format.
To fix the issue, do the following:
- Back up all the data from the storage drive from its compatible operating system.
- Format the drive in the ex-FAT file system. (Or format a USB flash drive in FAT32, but it will only allow storing files with a size limit of 4 GB.)
- Restore the backed-up data to the storage drive.
Now, use the storage drive in both Mac and Windows computers. Windows can read and write to an ex-FAT and FAT32 file system-formatted storage drive.
Wrapping It Up
We hope the guide provided the required solution for various Mac hard drive problems related to both internal and external hard drives. Data loss is unexpected, and hence, you must be prepared to avoid such unpleasant scenarios. Here are some tips –
- Back up your Mac data using Time Machine before any critical troubleshooting.
- Replace the failing Mac hard drive with an SSD restore Mac from Time Machine backup.
- Always keep a data recovery software installed on your Mac to get back lost data.
- Create multiple backup copies of your data, as backup copies are also prone to errors.


An experienced Senior Content Developer with a deep interest in technology.
 5 min read