Mac systems are indeed one of the most reliable devices around the world. However, even the best electronic devices might get into trouble or be broken due to unforeseen circumstances.
As breaking or failure of a Mac system is a sudden event and not a gradual process, you might not be able to safely retrieve data from such a device and save it on a working or new one.
Through this article, we will help you with the methods to transfer files from Mac to Mac and provide you with ways to recover the data lost on your Mac. Having said that, let us start with our first method to transfer files from Mac.
Method 1: Use the recent backup to transfer files from Mac to Mac
It is always advisable to maintain a backup of your data on Mac. You can use Time Machine to back up your data on an external storage drive or any other method using iCloud, etc. If you have been careful enough and maintained a backup, transferring data from Mac to Mac is a child's play.
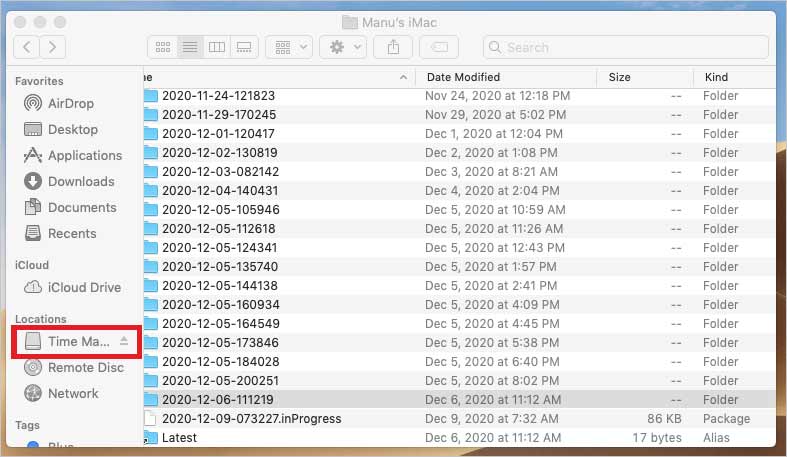
To transfer the data from your broken Mac to the new Mac, connect the Time Machine backup drive to the new Mac. Now, access the drive from the Finder under the Locations section in the left sidebar.
Double-click the Backups.backupdb and then click the folder with the name of your broken Mac. A list of all the backup folders will be displayed.
Locate the folder designated with latest date and time. You can copy the files and folders from the latest backup to your new Mac's internal storage.
Note: If you cannot find a file you back up recently on the Time Machine, you can use Stellar Data Recovery Professional for Mac to recover all the missing, corrupted, or deleted files from your Time Machine external hard drive.
Method 2: Transfer data using Mac Sharing Mode on M1 Mac
With the advent of new Apple Silicon-powered M1 Macs, the Target Disk Mode in Intel Macs has been replaced with Mac Sharing Mode.
The Mac Sharing Mode is an easy method of copying files from one Mac to another, thus easing data transfer.
First, confirm if you have an M1 Mac, and then follow the steps below to transfer files from your M1 Mac to another Mac.
Step 1: Connect your M1 Mac to another Mac using a USB, USB-C, or Thunderbolt cable.
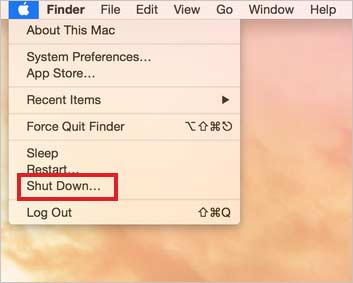
Step 2: Select Apple Menu > Shut Down on your broken Silicon-powered Mac.
Step 3: Press and hold the power button until you see the Loading Startup Options to boot your M1 Mac into Recovery Mode.

Step 4: Click the Options tab and then click Continue. If prompted, insert the admin password.
Step 5: Click Utilities and select Share Disk.Choose the disk or volume of your M1 Mac and hit Start Sharing.
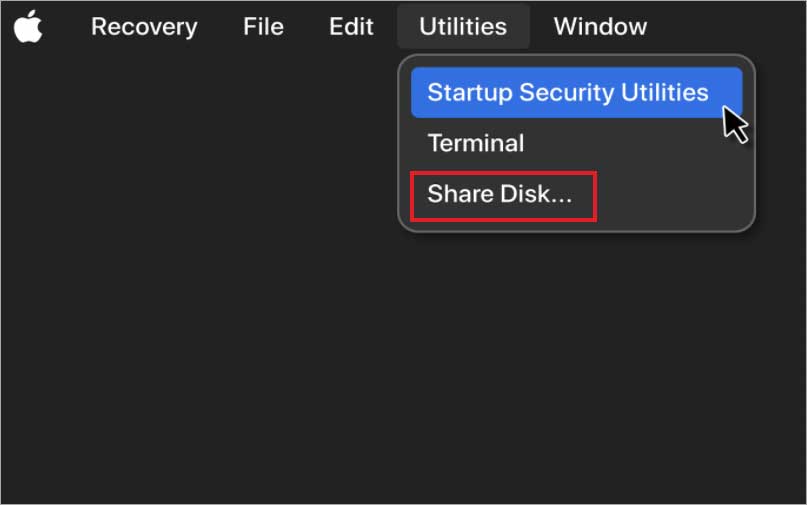
Step 6: Now, open Finder on the other Mac and select Network from the left sidebar under the Locations tab.
Step 7: Double-click the Mac from which you want to copy files and select Connect As. In the new Connect As window, select Guest and then click Connect.
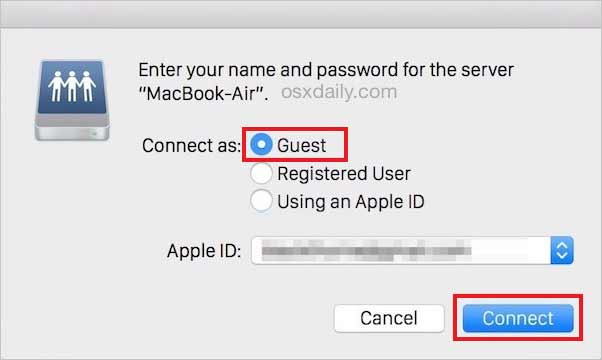
Step 8: Now transfer the files you wish to transfer from the broken Mac to the new Mac.
Once the transfer process is complete, safely eject the disk representing the broken Mac.
Method 3: Transfer files from Mac to Mac with Target Disk Mode on Intel Mac
If your broken Mac is an Intel chip-powered machine, you can connect it to another Mac using a USB, USB-C, or Thunderbolt port, and it will appear as an external hard drive on the other Mac.
This feature of Intel Mac is called the Target Disk Mode. To transfer data from a broken Intel Mac to another Mac, you should follow the steps given below.
Step 1: Once you have connected the two Macs using USB, USB-C, or Thunderbolt cable, perform any following processes on the source Mac (broken Mac).
- Start your Mac while pressing and holding the T key if your Mac is off.
- Click Apple Menu > System Preferences > Startup Disk > Target Disk Mode if the Mac is on.
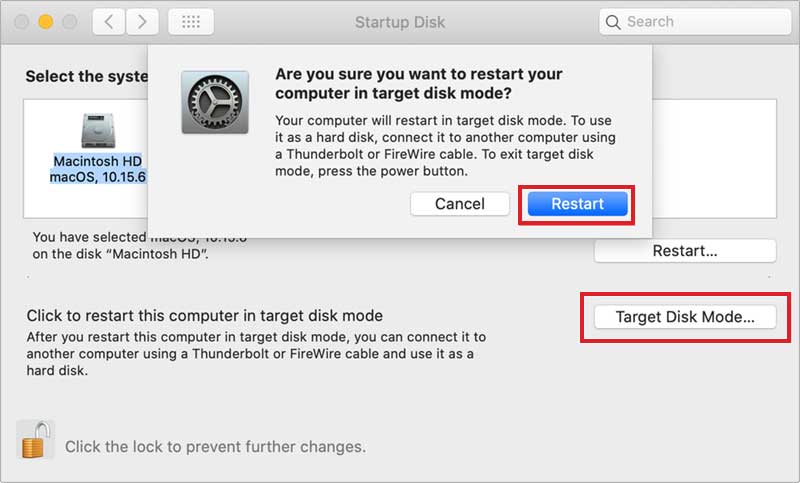
Note: In both of the above situations, you will see a disk icon on the Desktop of the other Mac.
Step 2: To transfer the files, you need to drag and drop them from the broken Mac disk icon on the Desktop to the other Mac's storage. (If you want, you can create a new folder and drop all the files into it)
Step 3: Once you transfer data, eject the broken Mac by dragging the disk icon to Trash on the destination Mac.
Step 4: Shut down the broken Mac and disconnect the cable from the destination Mac.
Method 4: Recover and transfer lost files using software
If your old Mac is not booting up normally, but you need to retrieve your data and transfer it to another Mac, you can easily do so using Stellar Data Recovery for Mac. Stellar Data Recovery Professional for Mac is an advanced data recovery software with bootable recovery.
The software can easily recover data from a non-booting or crashed Mac. Once you have recovered the data, you can simply copy it to other Mac. Here is how you can create bootable recovery drive and recover your data using Stellar Data Recovery Professional.
Step 1: Download and install Stellar Data Recovery Professional on Mac in a working condition.
Step 2: Connect a USB flash drive (minimum 8 GB) to the Mac with Stellar Data Recovery Professional.
Step 3: Launch the software. Click More Tools on the top-right corner of the main UI window and select Create Recovery Drive option.
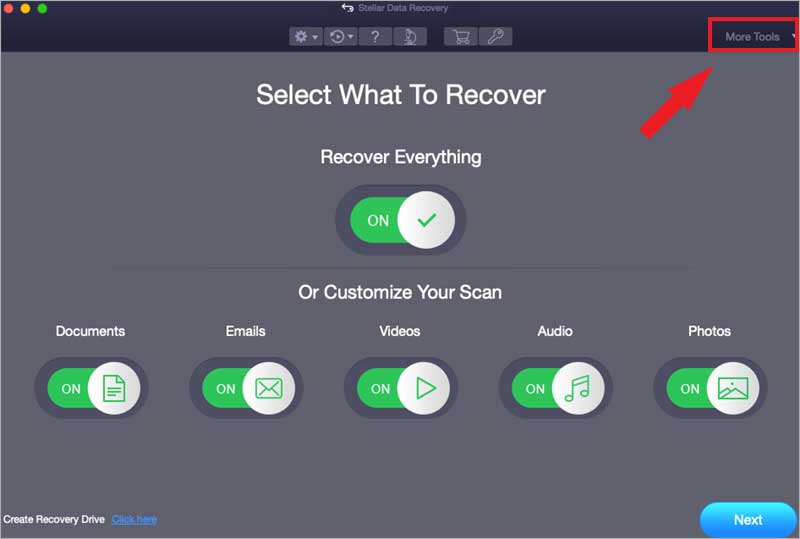
Step 4: The USB drive appears automatically in the new Create Recovery Drive dialog box.
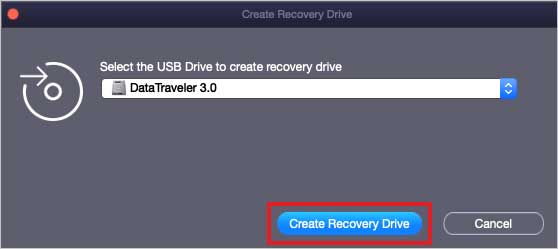
Note: Select the other USB drive from the drop-down menu if you want to change the listed USB drive.
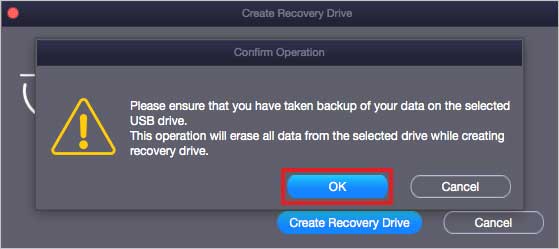
Step 5: Click Create Recovery Drive.In the warning dialog box, click OK. This will erase the existing data on a USB drive.
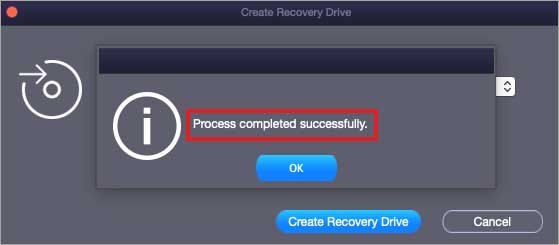
Step 6: Process Completed Successfully message appears on the screen confirming that the recovery drive is ready to be used.
Step 7: Insert the bootable USB in the available port of your broken Mac and Restart your Mac.
Step 8: While your Mac is starting up, press the Option key after hearing the chime. This will open the Startup Manager. You can release the Option key now.
Step 9: Select the Bootable Recovery Drive and hit Return. From the macOS Utilities dialog box, select Stellar Data Recovery and click Continue.
Step 10: Accept the license agreement, and the main software window of Stellar Data Recovery Professional for Mac will appear.
Use Stellar Data Recovery Professional to recover all the data you want to transfer and copy it to an external hard drive. Then, connect the external hard drive to other Mac and copy-paste the data to its internal storage.
Conclusion
Now that you have successfully transferred the data from your broken Mac to a new Mac, it is time to focus on repairing your Mac machine. You can use our comprehensive guide enlisting the worst Mac Hard Drive problems and solutions.
However, if you still find yourself unable to fix your Mac on your own, you should visit an authorized repair store. Don’t forget to share your thoughts and tell us the method that worked for you.
FAQ
1. How do you get files off a Mac that won't turn on?
The best method to get your files off a Mac with startup trouble is by booting it into recovery mode and using the bootable recovery option of Stellar Data Recovery Professional for Mac. With ease, you can use this advanced software to recover data from a non-booting or crashed Mac system.
2. What file types can be recovered from a Mac internal hard drive?
You can recover almost any type of file, including docs, videos, audios, photos, email files, etc., from your Mac's internal HDD. You should install a good data recovery software such as Stellar Data Recovery Professional for Mac, and it would fulfill all your data recovery needs in any data loss situation.
3. How do I know if my MacBook Air is broken?
If any or more than one of the statements below matches your situation, then you might deduce that your MacBook Air is broken, and you need to take action and save your data.
- I cannot turn on my MacBook Air.
- The screen of my MacBook Air is not working.
- My MacBook Air battery is not powering up the system anymore.
- My Mac’s battery is draining very fast.
- I feel like my MacBook Air is overheated more than what’s normal.
- My Mac’s data is getting corrupted without any reason.
- I can’t hear any sound on my Mac.
- I am facing a frequent restart on my MacBook.
The above reasons are not exhaustive, and you might also face other situations if your Mac is broken or about to fail.


 5 min read