-667.jpg&url=https://www.stellarinfo.com/article/setup-new-exchange-server-2019.php)


Exchange 2019 is the latest version of Microsoft Exchange Server. It is a much faster and more reliable on-premises Exchange Server version, capable of running and utilizing up to 48 processor cores and 256 GB memory. As a result, it can handle more users without any hiccups.
On February 10, 2025, Microsoft released the latest Cumulative Update (CU15) for Exchange Server 2019. With this update, the older versions of Exchange Server - up to and including Exchange Server 2016 CU22 - are no longer supported. Additionally, this is the last CU that is released for Exchange 2019 Server. Now, Microsoft will release the Exchange Server Subscription Edition (SE), which will be code equivalent to Exchange 2019 (with CU15). So, it is recommended to upgrade to the Exchange Server 2019 as this will help in easily moving to the Exchange Server Subscription Edition when available. This article describes the detailed procedure to set up a new Exchange 2019 Server.
System Prerequisites to Setup a New Exchange 2019 Server
Before you start the process to install and set up the Exchange 2019 Server, ensure the below-mentioned system requirements.
1. Requirements for Network and Directory Server
| Components | Requirements |
|---|---|
| AD Forest | A comprehensive list of supported forest functional level can be found in the Exchange Server supportability matrix. |
| DNS Namespace |
Exchange 2019 supports the following DNS namespaces:
|
| AD Site | The Active Directory site where you install the Exchange Server must contain at least one writeable domain controller that's also a global catalog server; or else, the installation will fail. Furthermore, you can't install the Exchange server and then remove the domain controller from the Active Directory site. |
| IPv6 | Exchange 2019 supports IPv6 only when IPv4 is also installed and enabled on the Exchange server. |
| Domain Controller | All domain controllers in the forest must be running one of the supported versions of Windows Server. |
2. Hardware
|
Component |
Requirements |
|---|---|
| Processor |
Either of the following types of 64-bit processors:
|
| Memory |
Varies by Exchange server role:
|
| Disk Space |
|
Steps to Deploy and Setup Microsoft Exchange Server 2019
Follow these steps in the given order to install and set up Exchange 2019 Server from scratch.
Step 1: Install Windows Server 2019
Exchange Server 2019 requires Windows Server 2019 with ‘Desktop Experience’ or ‘Server Core.’ The latter is preferred and recommended by Microsoft as it is considered more secure. However, it requires expert technical skills to operate or administer the server.
Download the preferred Windows Server 2019 edition and install it on a virtual or physical machine where you want to deploy the Exchange Server.
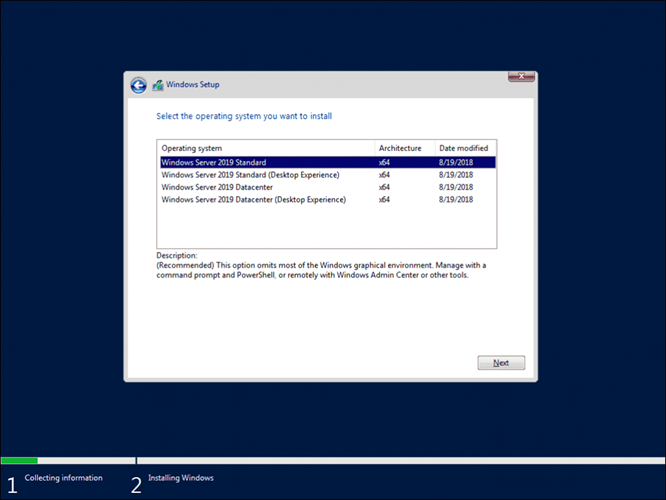
After Windows Server 2019 installation, check the Windows Update section and install all OS updates.
Step 2: Install Prerequisites for Microsoft Exchange 2019 Mailbox Server
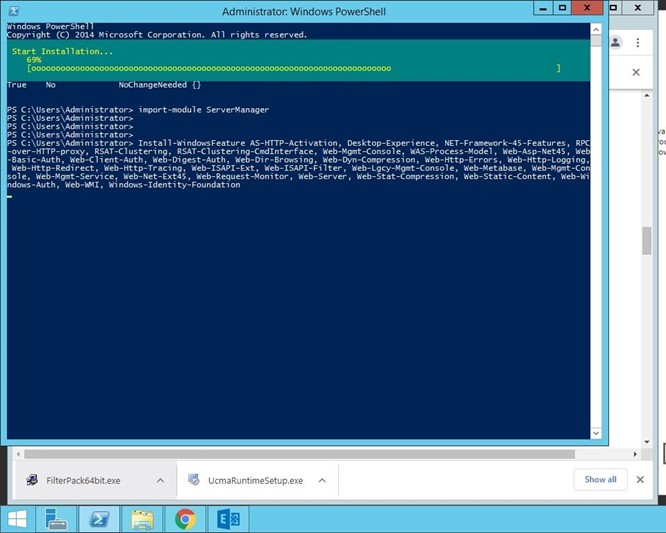
Before installing Microsoft Exchange Server on Windows Server 2019, you need to prepare the system by installing the following prerequisites.
- Install .NET Framework 4.8
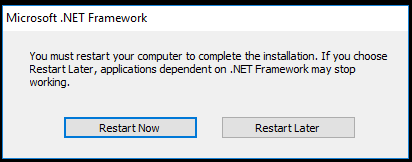
Download the .NET 4.8 and install it on Windows Server 2019. Make sure to run and install the .NET software package as an administrator.
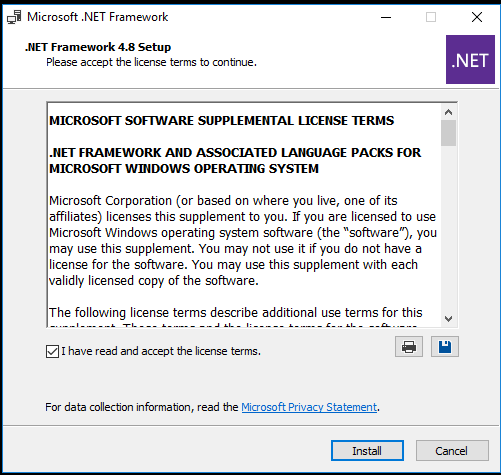
After the installation, click ‘Restart Now’ to reboot the system.
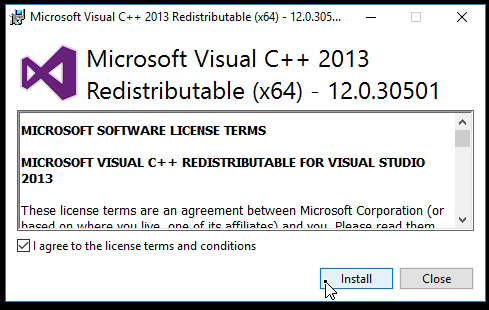
- Install Visual C++ Redistributable Package
Download and install the Visual C++ Redistributable Package for Visual Studio 2012 and Visual Studio 2013 as administrator on the Windows Server 2019.
Install the IIS Rewrite Module on your Windows Server for integration with existing IIS features.
- Install Server Media Foundation
To install the Server Media Foundation feature, run the following command in the elevated PowerShell window.
For setting up Exchange 2019, you need to download and install the Unified Communications Managed API 4.0 Runtime. This is required for unified messaging services.
- Install the Remote Server Administration Toolkit and other Required Components
To install the Remote Server Administration Toolkit and other required components, run the following PowerShell command:
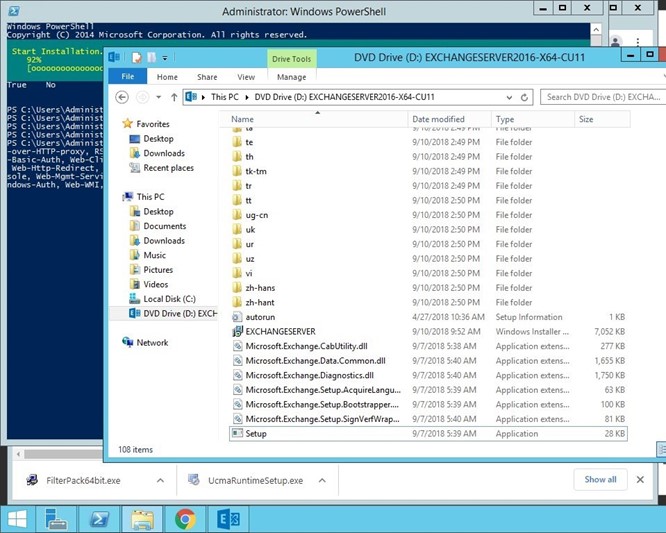
Step 3: Install Exchange 2019 Server
To install Exchange Server 2019, download the latest Exchange Server 2019 CU and then right-click on the downloaded ISO file and choose Mount.
Open the Command Prompt and use the cd command to navigate to the ISO mount location where Exchange Setup.exe is located.
Then, run the below command in Command Prompt window to prepare the Schema and the Active Directory.
Replace Contoso with your organization’s name.
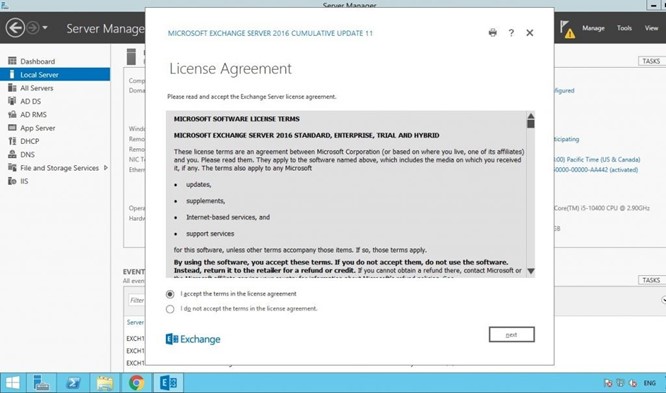
After preparing the Active Directory and Schema for Exchange 2019, you can start the installation by running the Setup.exe file as administrator.
Click ‘next’. Accept the license agreement and click ‘next.’
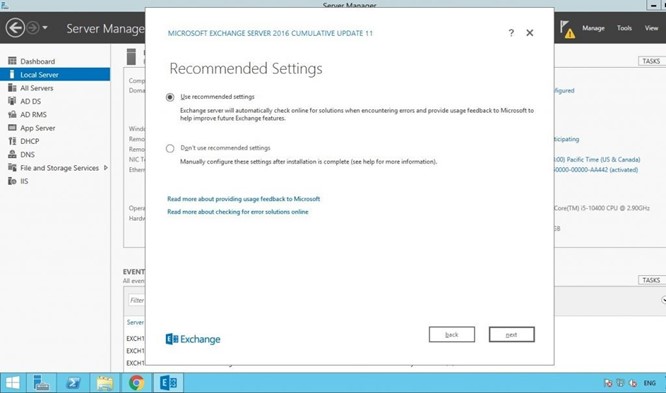
Choose ‘Recommended Settings’ and click ‘next.’
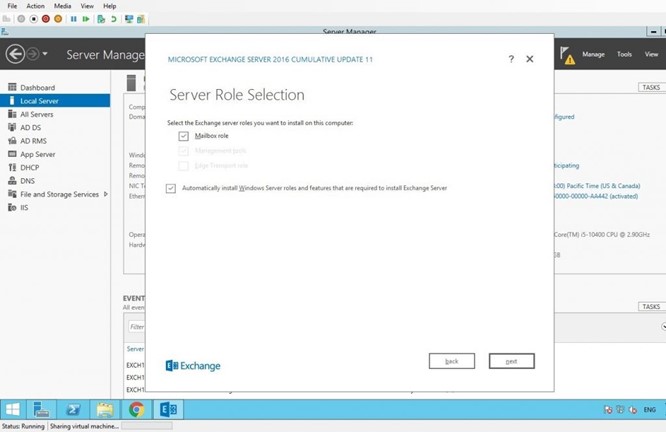
Choose Mailbox Role and check ‘Automatically install Windows Server roles and features required to install Exchange Server.’ Then, click ‘next’.
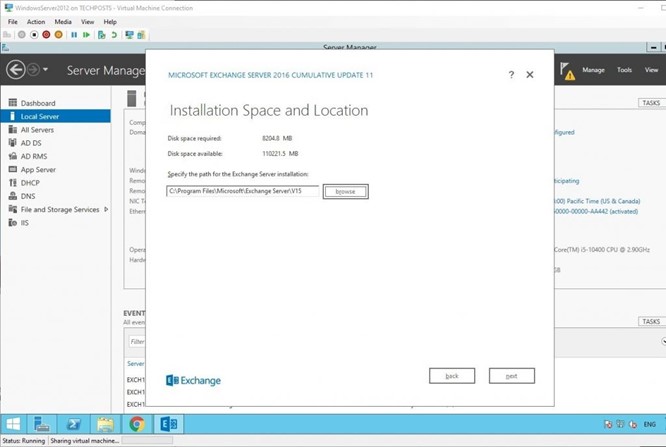
Select the location where you want to install the Exchange Server and click ‘next.’ Prefer location other than the system drive.
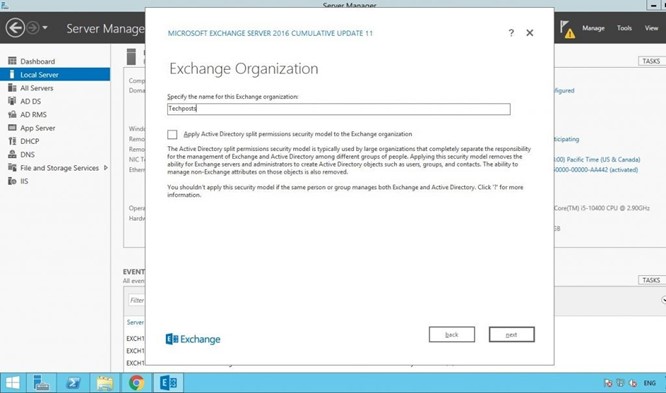
Enter your organization’s name and click ‘next.’
Select No in On the Malware protection setting as you do not need it for now and can enable it later.
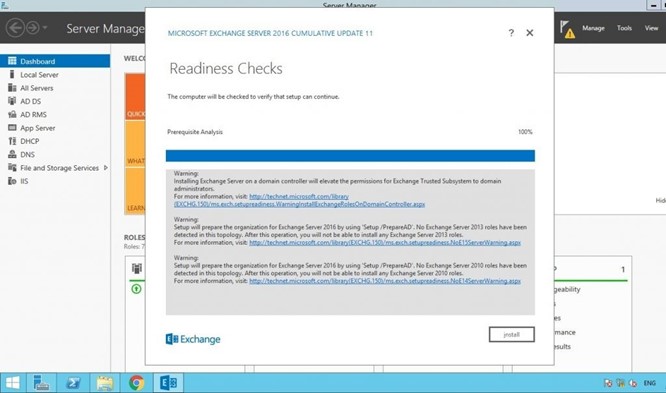
Now, click on Install to start the installation process.
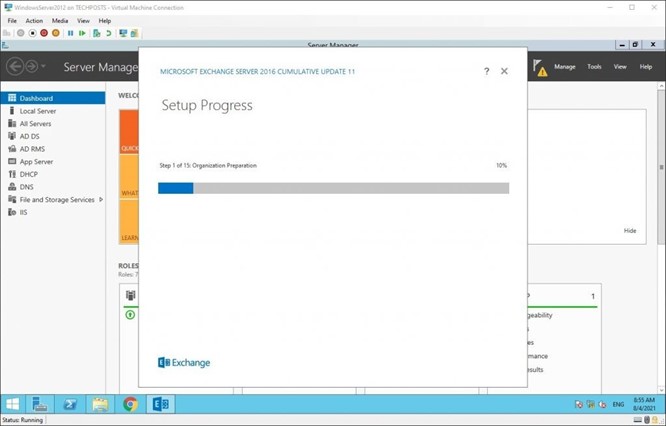
After the installation, check if any security updates are available for the installed CU. Install them to patch the Exchange Server and protect against malicious attacks.
Step 4: Setup Outlook Anywhere
To set up Outlook Anywhere, login to Exchange Admin Center (EAC) and click ‘servers.’
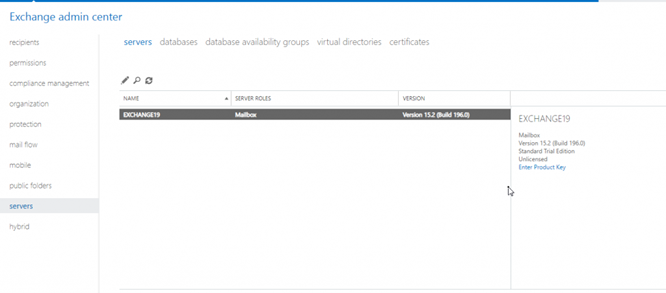
Select the Exchange 2019 Server from the list and click the edit (pen) icon.

Select ‘Outlook Anywhere,’ enter the internal and external FQDN (Fully Qualified Domain Name) and click ‘Save’.
Step 5: Setup the Service Connection Point (SCP)
To set up the Service Connection Point (SCP), run the following PowerShell cmdlet in the Exchange Management Shell (EMS).
This will start to point the users to this server.
Step 6: Import the Certificates into Exchange Server 2019
To import the certificates into Exchange 2019 Server, you can use the PowerShell cmdlets or Exchange Admin Center (EAC). Below are the steps to import certificates into Exchange 2019:
- Purchase and download the certificate from certifying authority. You can get one from hosting and domain service providers, such as GoDaddy.
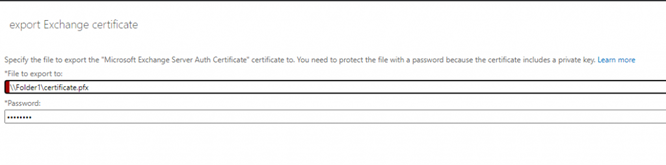
- Copy the certificate to a UNC folder path location on the Exchange 2019 Server and open the EAC.
- Go to servers > certificate and click on the three dots (…) icon.
- Choose Import Exchange Certificate.
- Enter the UNC path location where the certificate is located with the certificate file name and enter the password. Click Next.
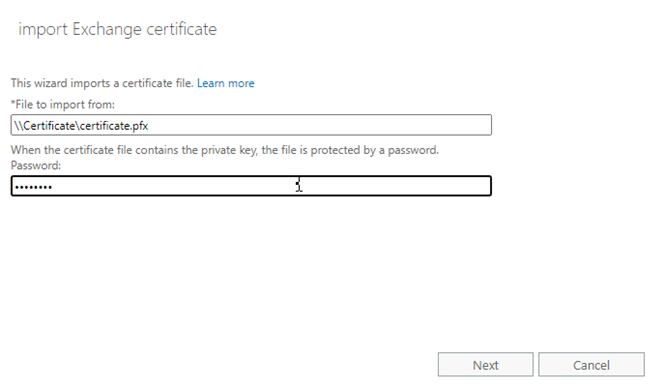
- Choose the server from the list where you want to import the certificate and click finish.
You can now assign the certificate to the IMAP, POP, SMTP, and IIS services by following these steps:
- Choose the imported certificate and click the Edit button.
- Select ‘services’ and click the POP, IMAP, IIS, and SMTP checkboxes.
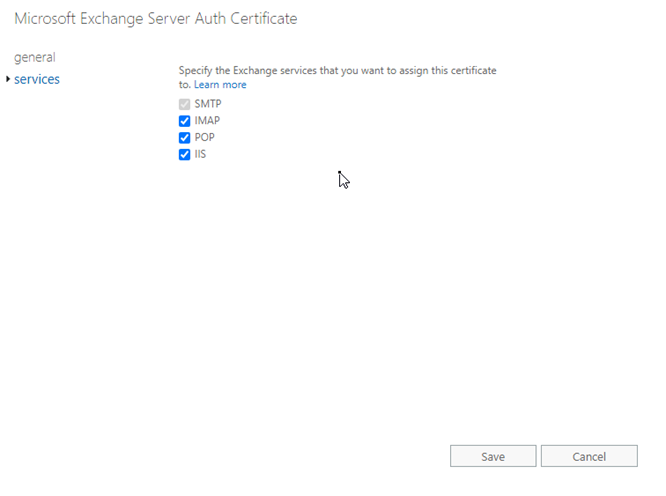
- Click Save.
Step 7: Configure Virtual Directories
The next step is to configure virtual directories. You can use PowerShell cmdlets or EAC to modify or view Exchange 2019 Server virtual directories. The steps are as follows:
- In EAC, go to server > virtual directories.
- Double-click on OWA.
- Type the FQDN in Internal URL and External URL sections.
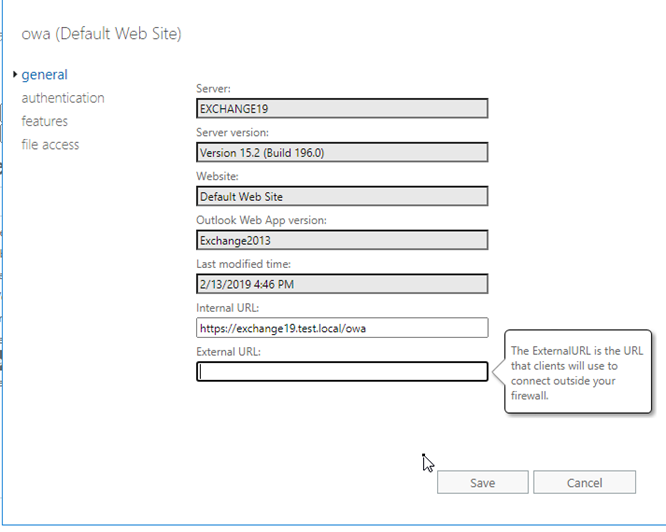
- Repeat the steps and update the Internal and External URL fields for OAB, ECP, ActiveSync, WebServices, and MAPI.
Follow these steps to recycle the Application Pool for MSExchangeAutodiscoverAppPool:
- Open IIS and expand the Exchange 2019 Server.
- Under Application Pools, find the MSExchangeAutodiscoverAppPool.

- Under the Actions pane, click on Recycle.
At this stage, the Exchange 2019 Server is successfully deployed and ready for use. Further, you can setup Email Address Policy.
To Wrap Up
This article describes how to setup and configure Exchange 2019 Server on Windows Server 2019. After server setup, create and add new mailboxes for users to use email services. You use a backup containing the mailboxes and mailbox data from the previous server and restore the mailboxes to the newly set up server. However, if you do not have a backup or the backup is obsolete, use Stellar Converter for EDB, and scan EDB files from your previous server that contain user mailboxes. The software will export mailboxes straight to live Exchange Server, even the recently installed Exchange 2019, by extracting them from offline EDB. The program may be downloaded for free in order to test it.


 4 min read
-to-Office-365-1733.jpg)