'Windows Reset' is often used as the last resort to resolve any system-related errors like BSoD error screen, system file corruption, etc. It is mainly performed when you are not able to fix a critical system problem using standard fixes.
Resetting your Windows 11 PC puts a fresh breath of life into it by cleaning and restoring all the settings to their factory settings, along with eliminating any pesky bugs or critical system issues.
Let's look at the methods you can employ to safely reset your Windows 11 PC without losing your data.
Methods to Reset a Windows 11 PC Without Losing Data
There are several methods to perform a factory reset on your Windows 11 computer. You must be aware of the fact that reinstalling your Windows 11 computer could lead to data loss. Hence, before proceeding, it's recommended to take a complete backup of your data to keep yourself safe from any unprecedented data loss.
However, if you want to reset your Windows 11 PC and remove everything from it, you can do so without any worry.
Following are the best methods to reset your Windows 11 PC –
Method 1: Resetting Windows 11 Computer Without Losing Your Data
This is an easy way to reset your Windows 11 PC and bring it back to its factory state. It preserves all your data and files on your computer. This method can be performed without using any external media, like bootable media, etc.
Simply, follow the steps mentioned below in the given order –
- Press WIN + Q or WIN + S and type Reset this PC.
- Click on the result.
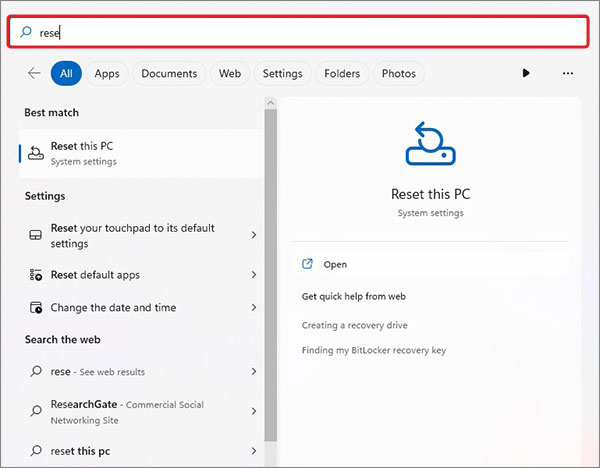
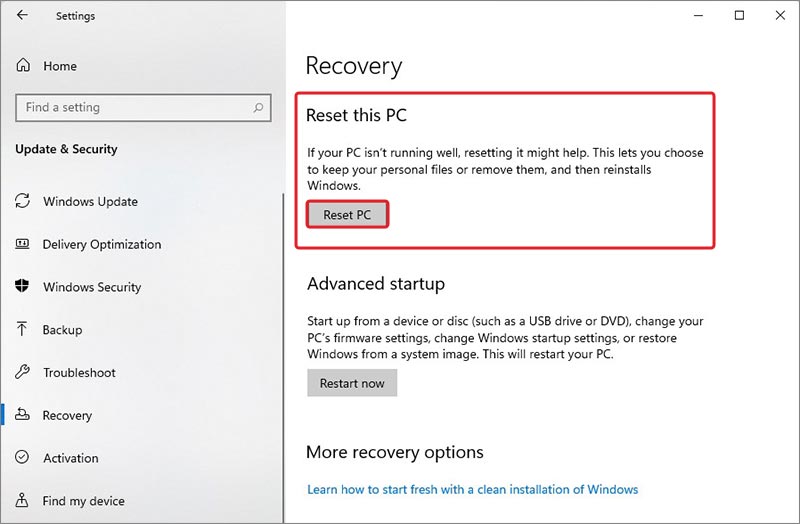
- In the Recovery window, navigate to Reset this PC option and click on Reset PC.
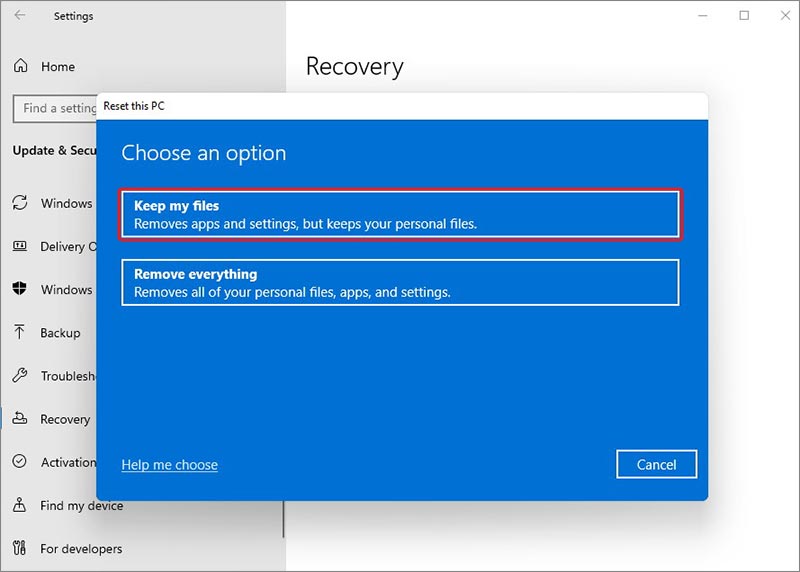
- In the following dialog box, click on Keep my files option.
- In the next dialog box, make your selection between either Cloud download or Local reinstall to reset Windows 11.
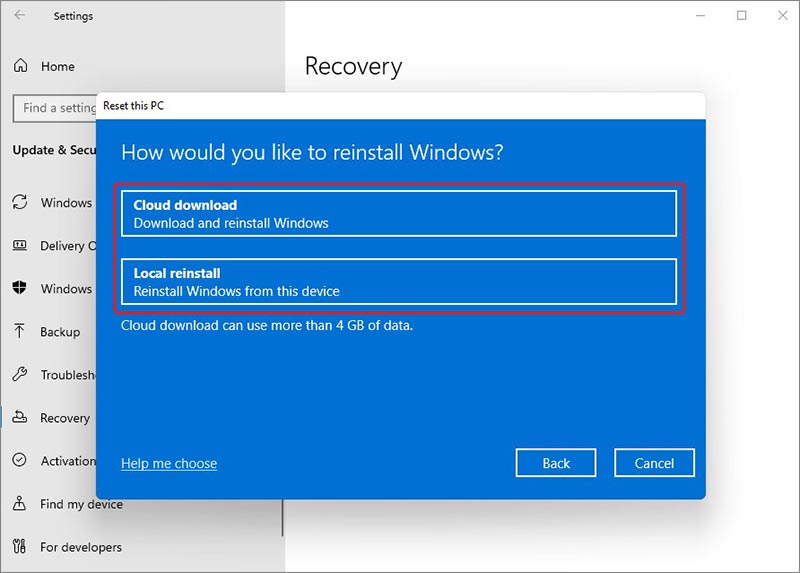
- Next, in the Additional settings dialog box, click on Next.
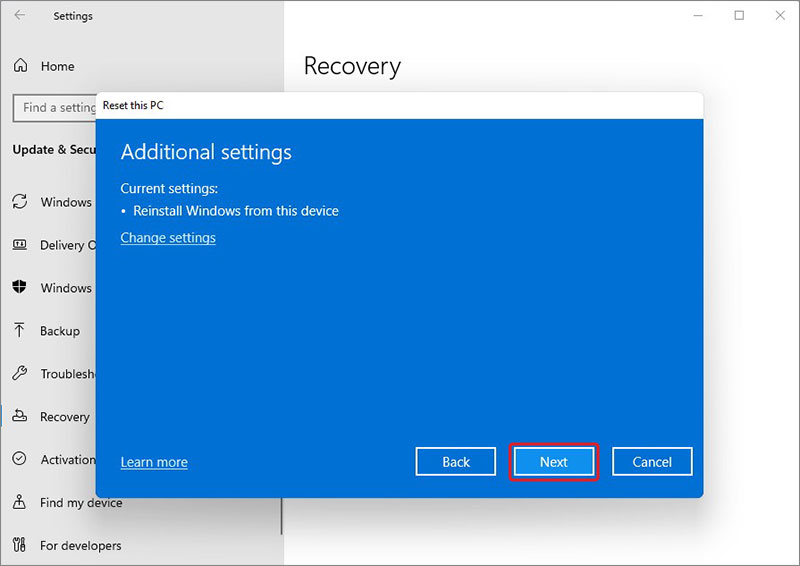
- In the last dialog box, click on Reset. This will begin resetting your PC.
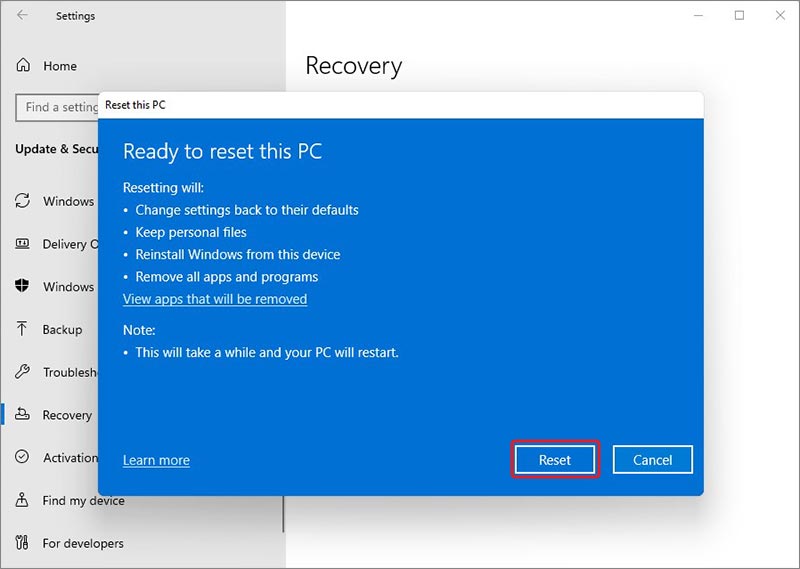
Method 2: Resetting Windows 11 Computer While Erasing All Data
This is an alternative way to perform a factory reset on your Windows 11 computer. This will reset your Windows 11 PC to its factory state and will remove all your data, files, and installed apps.
Simply, follow the steps given below –
- Press WIN + Q or WIN + S and type Reset this PC.
- Click on the result.
- In the Recovery window, navigate to Reset this PC option and click on Reset PC.
- In the following dialog box, click on Remove everything option.
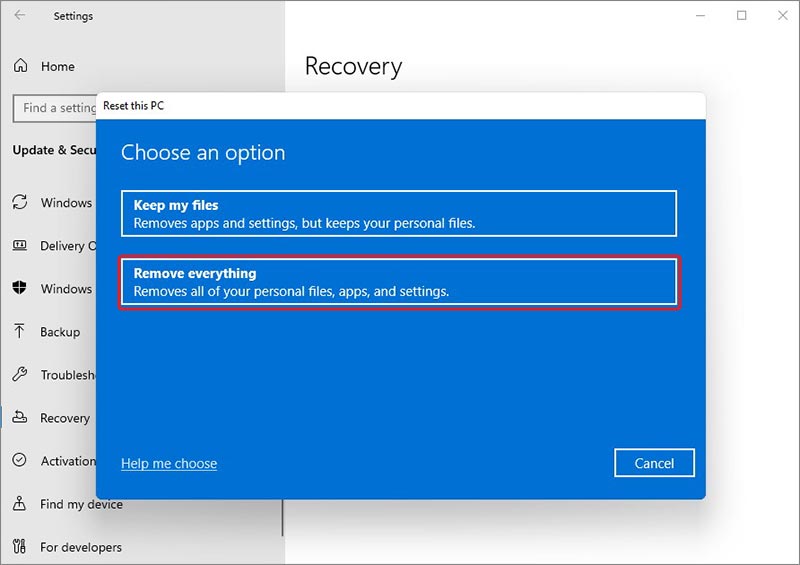
- In the next dialog box, make your selection between either Cloud download or Local reinstall to reset Windows 11.
- Next, in the Additional settings dialog box, click on Change settings.
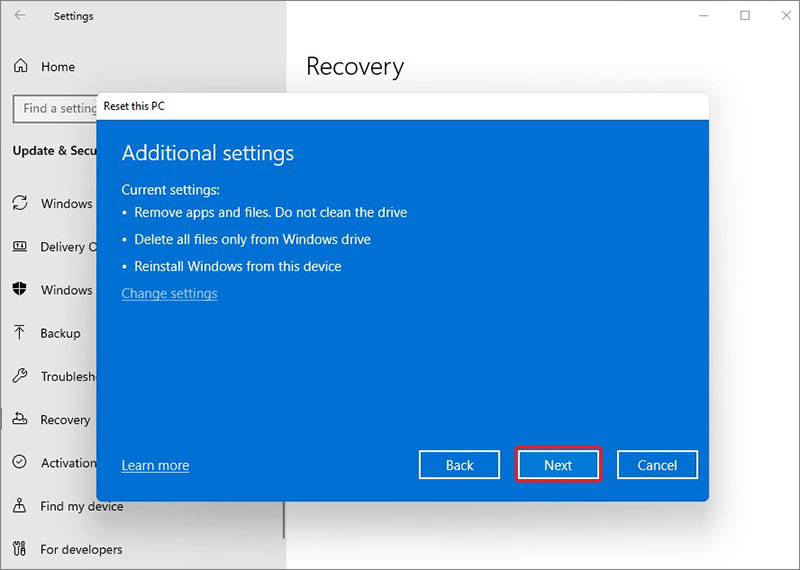
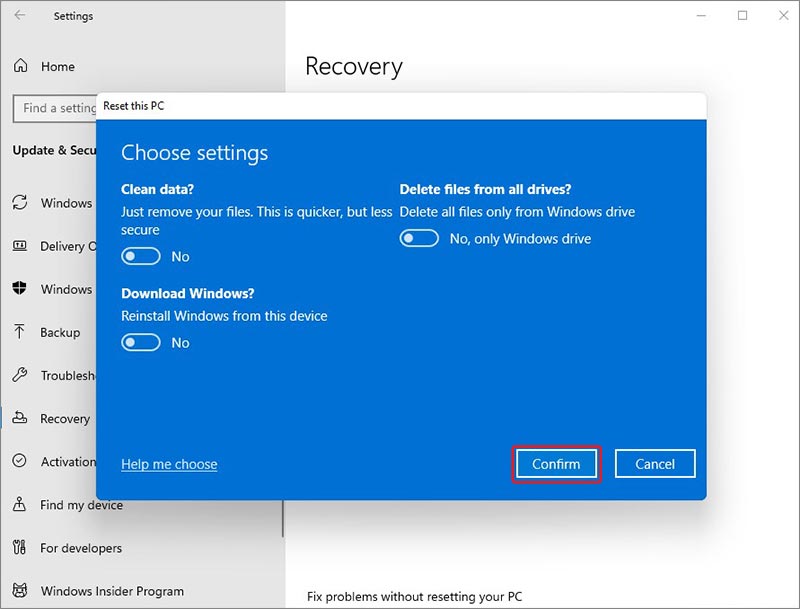
- Toggle the settings as per your requirements and click on Confirm.
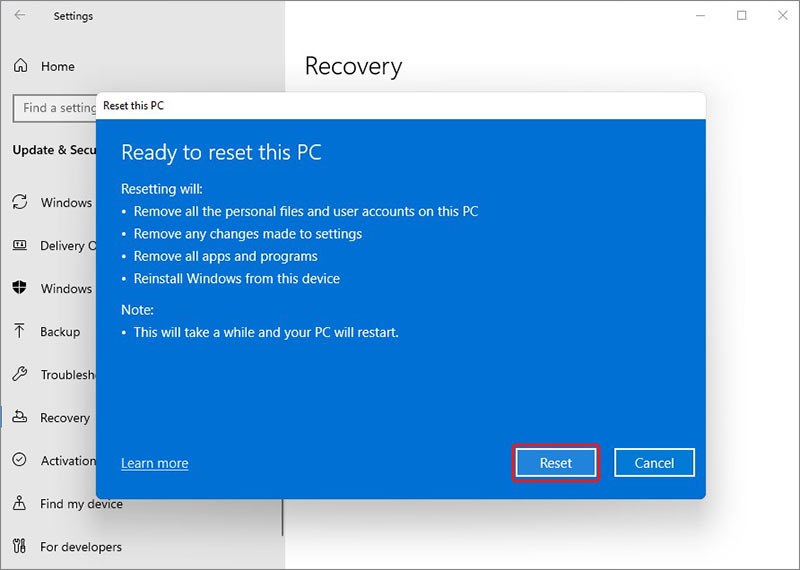
- In the last window, click on Reset after reviewing all the changes that will be made. This will begin resetting your PC and remove all the data present on it.
Method 3: Reset Windows 11 PC Using Installation Media
You can use this method to reset or perform a clean installation of Windows 11 on your computer. For this method, you would require a blank USB drive or a CD or DVD to create Windows 11 media creation tool. Follow the steps mentioned below–
- Connect the blank USB drive to your computer.
- Download Windows 11 Installation Media from Microsoft's Website.
- Once downloaded, follow the steps mentioned here to create the installation media.
Once the Windows 11 installation media is ready to be used, perform a clean installation of Windows 11 on your computer. Follow the steps given below –
- Connect the installation media drive to your computer.
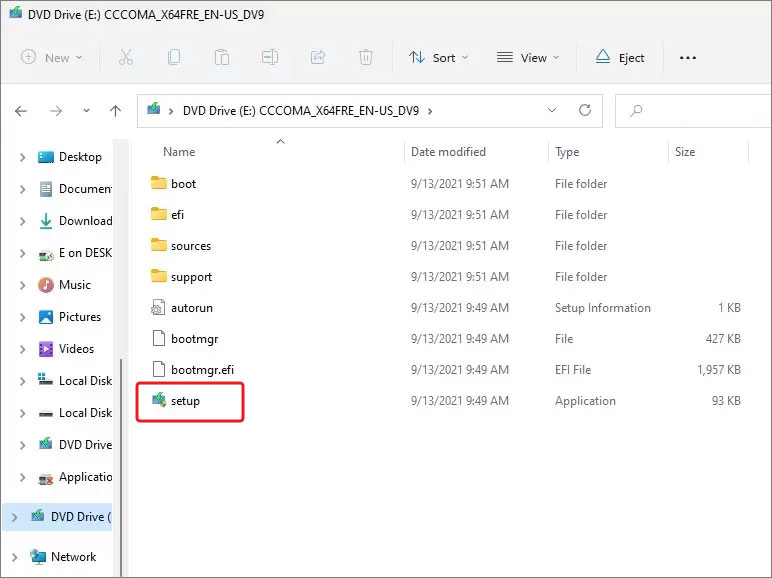
- Open File Explorer and open the USB drive.
- Double-click on the exe to launch Windows 11 installation media.
- Click on Next.
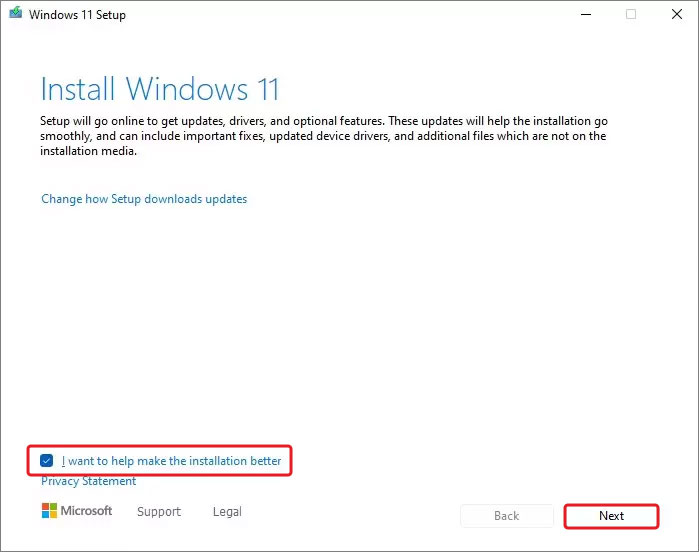
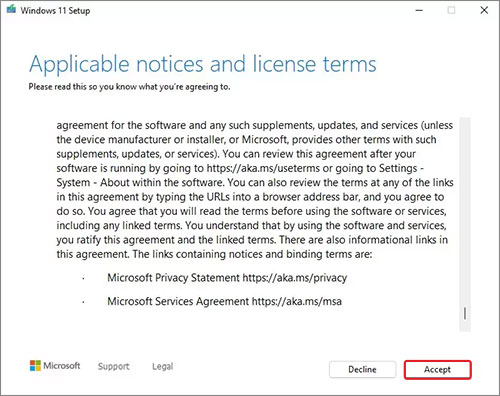
- Click on Accept in the next windows after reading the license terms to proceed further.
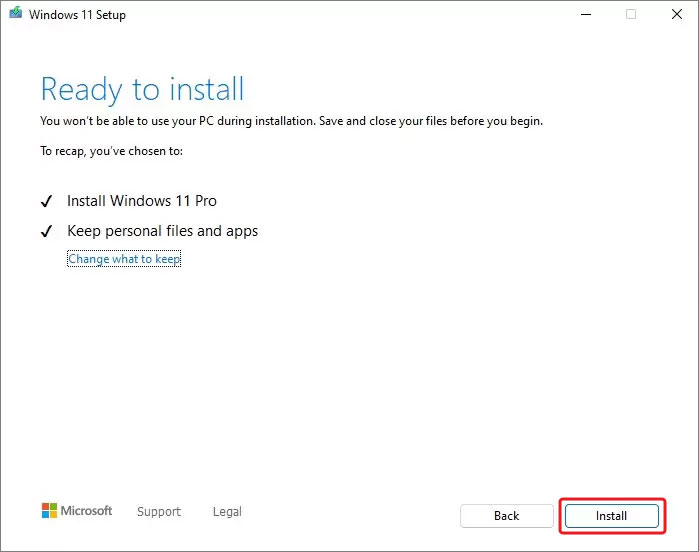
- Click on Change what to keep to choose from Keep personal files and apps or Keep personal files only or Keep nothing options as per your requirements.
- Click on Install to perform clean installation of Windows 11.
Method 4: Resetting Windows 11 Using Advanced Boot Options
In a typical scenario where your Windows 11 computer fails to boot, you can enter the advanced boot options and reset Windows 11 without losing the data or erasing the files, depending on your needs. This method can also be used for resetting and reinstalling Windows 11. For this, you will need a system recovery disk or Windows 11 installation media (in Method 3).
To use this method, follow the steps given below –
- Power ON your Windows 11 computer.
- Connect the Media tool that we created in Method 3.
- Press WIN + Q or WIN + S and type Reset this PC.
- Click on the result.
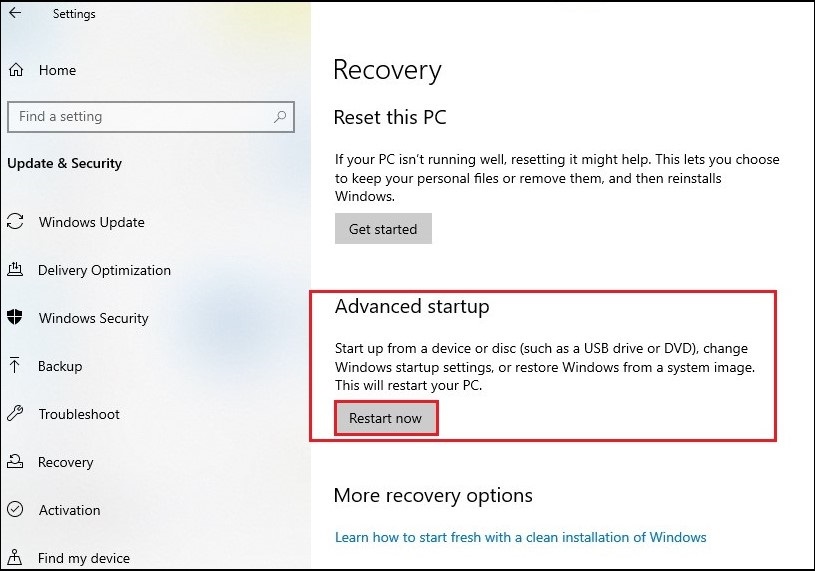
- In the Recovery section, click on Restart now button present under Advanced startup.
- Once in the Advanced options, click on Troubleshoot.
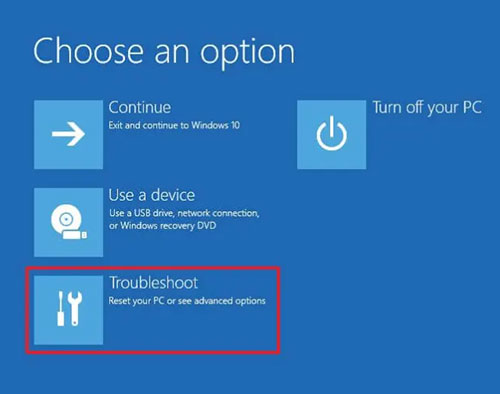
- Click on Reset this PC.
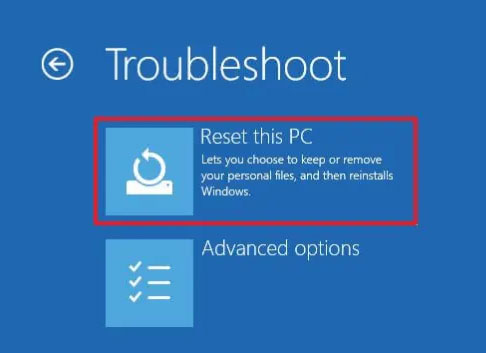
- In the next window, choose between Keep my files or Remove everything.
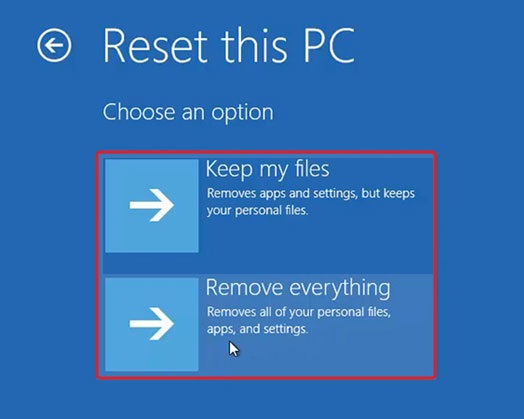
- Choose from either Cloud download or Local reinstall on the next screen.
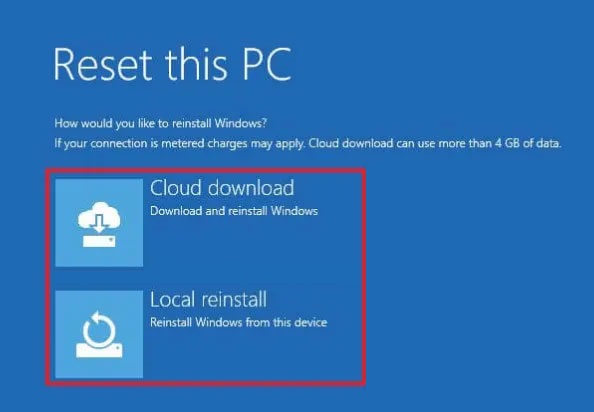
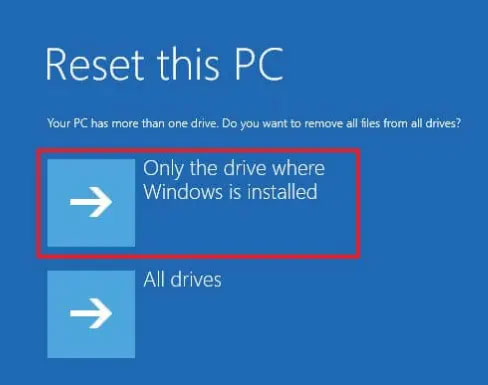
- On the next screen, choose the Only the drive where Windows is installed This will remove data only from the Windows installation drive. The All drives option will erase data present on all the drives. Choose the latter only when you are selling or discarding your computer.
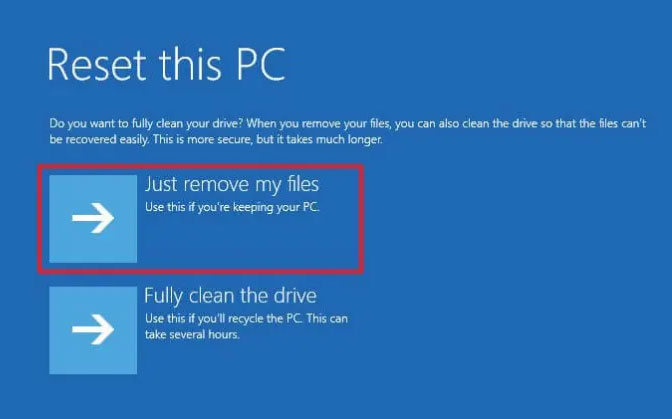
- On the next screen, you will see two options – Just remove my files or Full clean the drive. The former option will quickly erase the data from the selected drive, whereas the latter will perform a secure erasure of your data and might take hours. Choose the latter if you are planning on selling your computer.
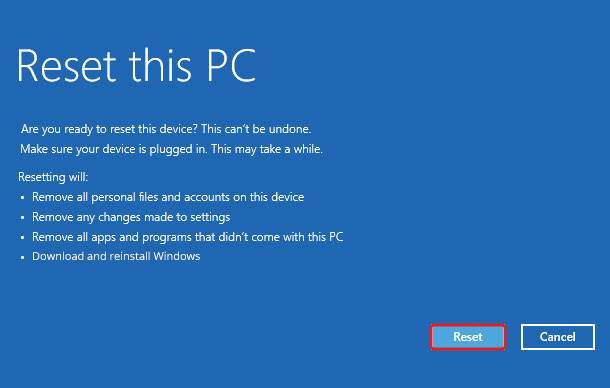
- On the last screen, review the changes to be made and then click on Reset. This will begin resetting your Windows 11 PC and will reinstall it according to the selected settings.
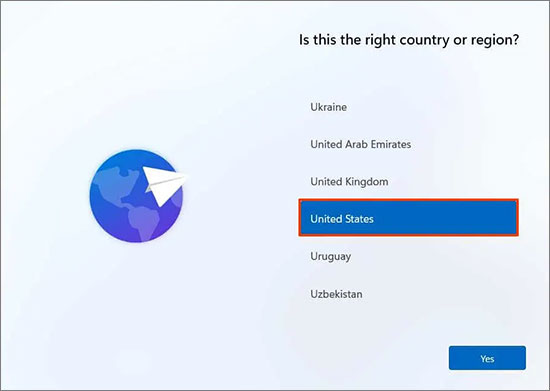
After resetting and reinstalling Windows 11, the wizard will show you the out-of-the-box experience screen. Follow the instructions as prompted on the screen to finalize the Windows 11 installation on your computer.
Lost Data After Performing Factory Reset on Windows 11? Recover it easily!
Ideally, choosing the 'Keep my files' option should keep your files and folders intact. However, in some cases, you may experience unexpected data loss. In such scenarios, you can use powerful Windows data recovery software Stellar Data Recovery, to recover your lost data in a matter of a few clicks.
- Download and install Stellar Data Recovery on your Windows 11 PC and launch it.
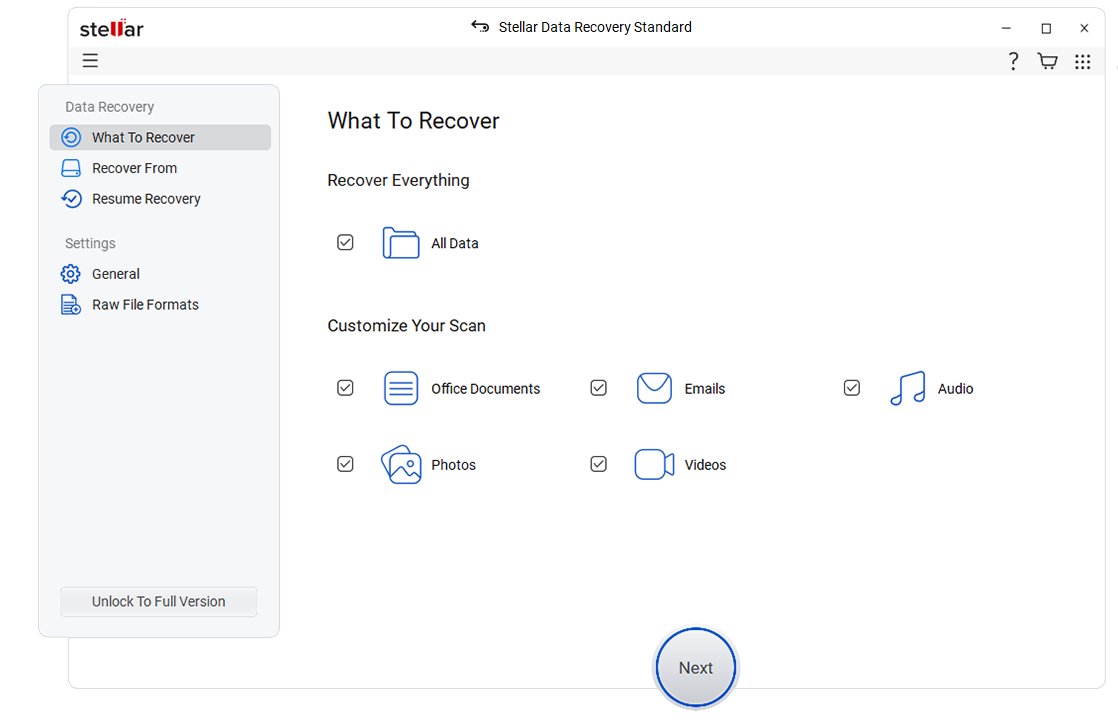
- On the first screen, select the type of data you wish to recover. By default, All Data is selected. Click on Next.
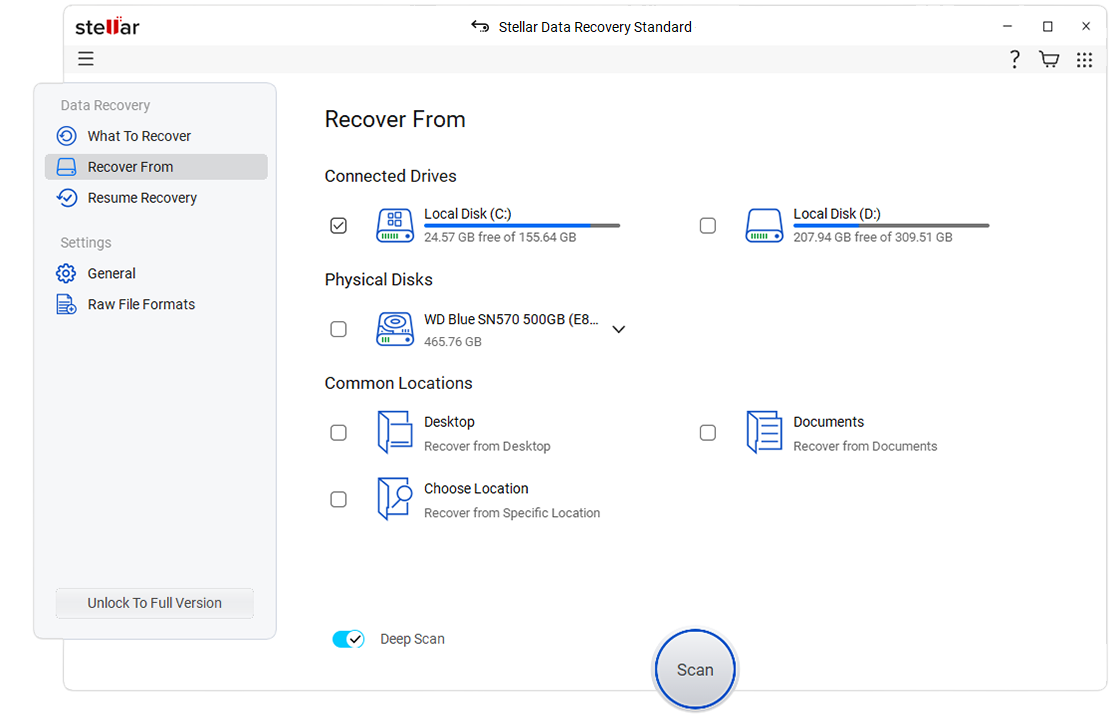
- On the next screen, select the drive or volume from which you wish to recover your lost data. Click on Recover to begin data recovery.
- Once the data recovery is complete, preview the files in the Preview window to check their integrity.
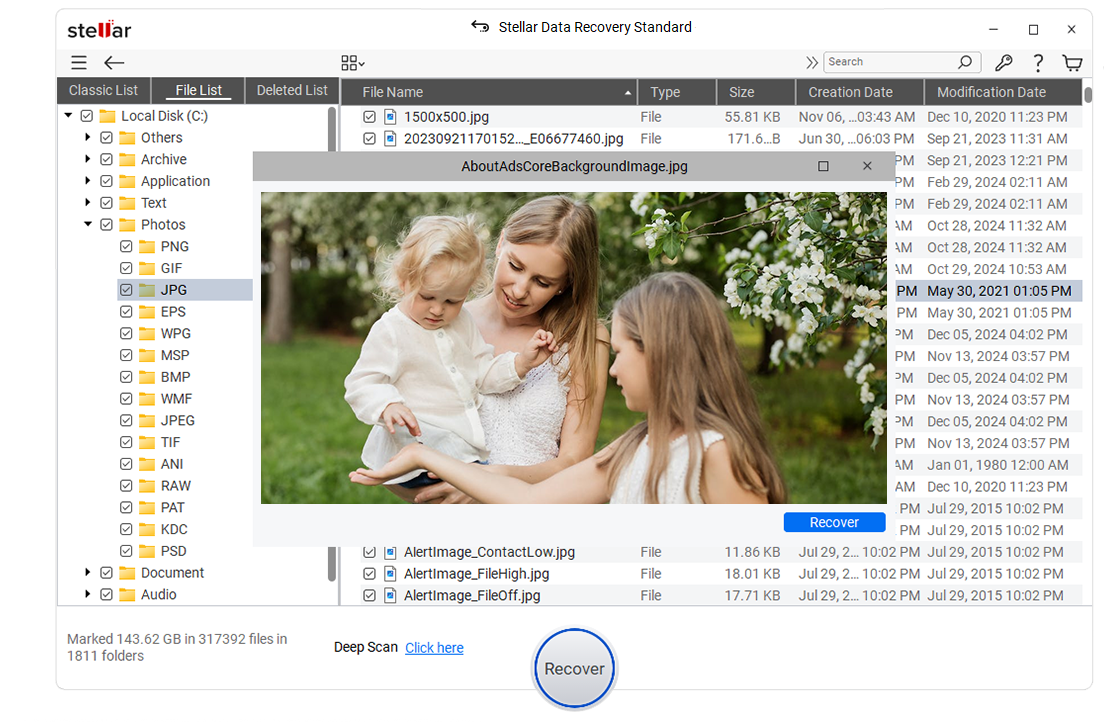
- If satisfied with the results, click on Recover and choose the location where you wish to save your recovered data.
Notes –
- For recovering data, you will need to purchase a license to save the recovered data.
- If you are unable to find the required files after following the above steps, you can perform a Deep Scan. This scan will perform a comprehensive, file signature-based scan of all sectors and find your lost data. Hence, this might take some time.
Reset Windows 11 without Losing Data
Resetting Windows 11 is the best way to resolve numerous pesky system issues and bugs. Be it a complete reset or resetting with data intact, this process refreshes the system and returns it back to its original state. However, you should be aware of various PC reset methods and their outcomes before proceeding, as any error in execution may cause data loss.
Q. Does Windows 11 reset delete everything?
A. The reset process will provide you with two options – to keep the files as it is or to erase them. So it depends upon your choice that you made during the Reset Windows 11 wizard. See Method 1 & Method 2 for more details.
Q. Does resetting Windows 11 require product key?
A. No, Resetting Windows 11 doesn’t require a product key.



 3 min read