When the MySQL database/tables get corrupted, you may encounter errors, like “Can’t find tablethatshouldbethere.MYI file, “Tablethatwasworking.frm is locked”, "Unexpected end of file," "Got error ### from table handler," etc. Sometimes, you’re not even able to open or access the database file. So, it is important to repair the corrupt MySQL database/tables as soon as possible. In this article, we will discuss how to repair and restore corrupt MySQL database/tables.
Reasons for Corruption in MySQL Database and Tables
When MySQL databases and tables get damaged or corrupt, the first thing you should do is determine the reasons behind MySQL database corruption. Following are some common reasons:
- Faulty hardware on the system hosting the MySQL database
- Bugs in MySQL software
- Abnormal/sudden termination of MySQL Service
- Server crashes due to insufficient memory or corrupted MySQL data files/index files
- MySQL Server instance restarts suddenly
- The database shuts down abruptly in the middle of writing data
How to Identify Corruption in MySQL Database and Tables?
Before moving to the solutions, let’s first see how to detect corruption in MySQL database tables. When corruption occurs in MySQL database and its tables, you can find information about different database issues in the MySQL error log. You can find the error log in the "data directory specified in my.ini file". The default location of the data directory on Windows is:
Or
You can also use the CHECK TABLE and mysqlcheck commands to check MySQL tables for corruption. Let’s learn more about these commands.
CHECK TABLE Command
The CHECK TABLE command in MySQL is used to check tables (created in InnoDB and MyISAM storage engines) for errors. It can check table views and their references. Here’ how to use the CHECK TABLE command in MySQL:
CHECK TABLE tbl_name [, tbl_name] ... [option] ...
option: {
FOR UPGRADE
| QUICK
| FAST
| MEDIUM
| EXTENDED
| CHANGED
}
If the above command detects any issue, it shows an error with the table name marked as corrupted and prevents you from accessing that table. However, if it does not find any issue with the table, it may remove the corruption mark.
Myisamchk Command
MySQL provides a built-in utility – myisamchk - to check, repair, and optimize the MyISAM tables. Here’s how to use the myisamchk command:
If the status of the table is fine, there is no need to fix the table. But, if the status is not fine, it means that the table is corrupted and needs to be repaired.
Methods to Repair MySQL Database Tables
Once you have identified the corrupted tables, the next step is to repair them. However, the methods used to repair MySQL database/tables are engine-specific. So, you must know the storage engine being used. You can determine the MySQL storage engine type for a table in the database by executing the following MySQL query:
SELECT TABLE_NAME, ENGINE
FROM information_schema.TABLES
where TABLE_SCHEMA = 'your_database_name';
Once you have determined the storage engine, follow the below methods to repair it.
Method 1: Restore Backup using mysqldump
If you have a readable backup (dump file), then you can easily restore the MySQL database from the backup. You can use the mysqldump utility to restore MySQL database from the dump file. Here’s how to do so:
- First, you need to drop and recreate the MySQL database. For this, use the following command:
- Next , execute the below command to restore the database:
- After successful execution of the above command, verify if the restored database contains all the data. To do so, execute the following command:
Mysql> use db_name;
Mysql>show tables;
Method 2: Use the REPAIR TABLE Command
You can use the REPAIR TABLE command to rebuild the table. This command supports MyISAM, ARCHIVE, and CSV tables. Here’s the syntax to repair a single table:
REPAIR TABLE tablename [options]
To repair all tables in a MySQL database, use the following command:
Method 3: Use Myisamchk Command
To repair MyISAM tables, you can use the myisamchk command. To use this command, you need to first stop the MySQL Server. When the server stops, execute the below command:
After that, restart the MySQL Server.
Method 4: Use InnoDB Crash Recovery Mode
You can use the ‘Dump and Reload’ method to rebuild corrupted tables. It helps in repairing the indexes within the InnoDB tables. Here are the steps to do so:
Step 1: Restart the MySQL Service
- In the Run window, type services.msc.
- In the Services window, find and right-click on the MySQL Service.
- Click Restart.
MySQL Server can crash and fail to start when it attempts to access the corrupt InnoDB tables. In such a case, you can use innodb_force_recovery settings of InnoDB to rebuild the database. These settings control MySQL behavior during startup. You can change the settings to allow the MySQL Server to start even when it detects corruption in tables.
Step 2: Use Innodb_force_recovery to Start MySQL Server
The Innodb_force_recovery option is not enabled by default. First, enable this option from the configuration file. Here’s how to do so:
- Search for the configuration file (my.cnf). The my.cnf file’s location varies based on the operating system. In Windows, the configuration file is located in ‘/etc’ directory. The default path is /etc/mysql/my.cnf.
- Once you found the my.cnf file, go to the [mysqld] section and then insert the below statements:
[mysqld]
Innodb_force_recovery=1
service mysql restart
The default value of innodb_force_recovery is 0. However, you can change its value to '1' to start the InnoDB engine and dump the tables. Dumping tables with "innodb_force_recovery value" of 4 or higher can lead to data loss. So, it is recommended to take database backup before proceeding.
- Once you have enabled the innodb_force_recovery, you can access the corrupt table. You can dump the table data by executing the mysqldump command as given below:
- Next, export all the databases to the dump.sql file using the following command:
- Now, restart the MySQL Server and then use the DROP DATABASE command to drop the database.
- If it fails to drop the database, then run the below commands to delete the database manually:
cd /var/lib/mysql
rm -rf db_name
- Next, disable the InnoDB recovery mode by commenting on the below line in [mysqld]:
- After that, save the applied changes to the my.cnf file and then restart the MySQL Server.
Method 5: Repair MySQL Database using phpMyAdmin Tool
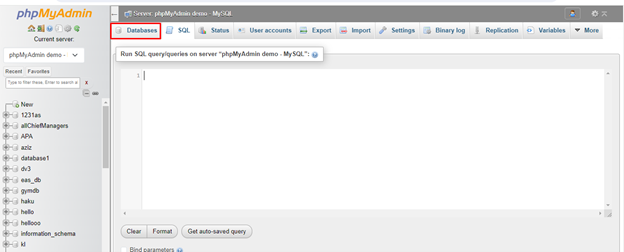
The phpMyAdmin is an open-source tool for managing MySQL database. You can use the tool to repair MySQL database. Here are the steps to repair MySQL database using the phpMyAdmin tool:
- Open the phpMyAdmin tool.
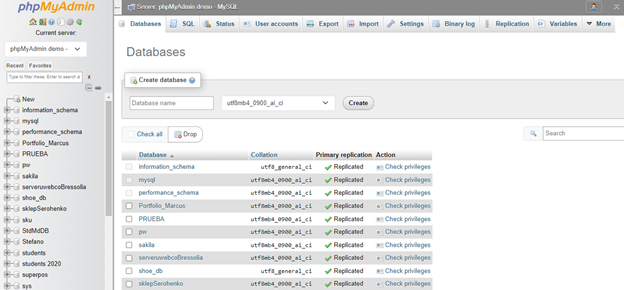
- Once the phpMyAdmin tool interface appears, click on the Databases.

- Under the Databases section, you will see a list of all the MySQL databases.

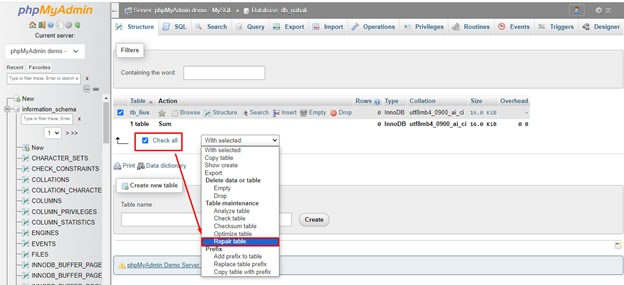
- Click on the corrupted database. This will open a list of all the tables in MySQL database. Select the Check All option to select and repair all the tables in the MySQL database.
- Click on the With selected dropdown button and then click on the Repair Table option.

- This will start repairing the MySQL database tables.
Once the repair process is completed, you will see a message indicating that the database tables have been repaired successfully.
Quick Solution to Repair Corrupt MySQL Database and Tables
To quickly repair your corrupt MySQL database, you can use Stellar Repair for MySQL software. It is an optimal software for repairing MySQL databases and their tables without any file-size limitations. The tool supports repairing tables created in InnoDB and MyISAM storage engines. It can restore all the objects from the corrupted database, including tables, partitioned tables, views, triggers, primary keys, unique keys, foreign keys, etc.
Some key features of this MySQL repair software are as follows:
- Repairs and recovers both MySQL InnoDB and MyISAM database tables with complete integrity.
- Repairs corrupt MySQL database on both Windows and Linux systems
- Recovers all database objects, including tables, keys, views, triggers, etc.
- Repairs multiple corrupt MySQL database files in a single process
- Previews all recoverable MySQL database objects before saving
Bottom Line
MySQL database or tables can get corrupted due to several reasons. You can follow the methods explained in this article to repair and recover the corrupted MySQL database and tables. However, the easiest and quickest way to repair corrupt MySQL database is by using Stellar Repair for MySQL. This advanced MySQL repair software can quickly repair corrupted MySQL database without any data loss and file-size limitations. The tool helps resolve all types of MySQL database corruption errors.


-in-MySQL-to-Restore-Corrupted-Databases-1746.jpg)
 5 min read


