-1507.jpg&url=https://www.stellarinfo.com/article/repair-interlaced-videos.php)


Have you ever noticed those annoying horizontal lines or "combing" artifacts when watching an old TV show or a poorly encoded video? These are the signs of an interlaced video, an artifact of the previous generation that can make your videos look blurry and messy. Sometimes, you may have tried to fix it and faced disappointment. But don't worry, we're here to help you fix the interlacing effect in videos.
In this easy-to-understand guide, we'll explain interlacing, how to spot it in a video, why it happens, and the difference between interlacing and progressive video. We'll also show you how to make your videos look crystal clear again using a special tool.
So, whether you're a content creator or want to enjoy your favorite old movies and shows without the distracting interlacing effects, this blog has all the answers.
What is Interlaced Video?
You must have noticed the weird lines going across the screen when watching an old movie or TV show. Those lines are called "interlacing artifacts", and they happen because of how the video was recorded and played back in the past.
.jpg)
Luckily, there are ways to fix these interlacing artifacts and make your videos look clear and smooth again. In the next sections, we'll explore the process of deinterlacing videos and show you step-by-step how to use popular tools to get rid of those interlacing artifacts.
Why Was Interlaced Video Used in the Past?
Back then, video editors had to deal with a technology called "interlaced video."
Interlacing is not a fault or error, but it is actually an older technology that was used in old TVs and video players.
So, instead of showing the full picture, all at once, the interlaced video would split the picture into two halves and show one after the other. This helped reduce the amount of information that needed to be sent, which was necessary when internet and storage space were limited.
However, splitting the picture can cause those distracting horizontal lines or "combing" effects, especially when the video is played back on modern, high-definition displays. These effects can make your videos look blurry and messy.
What is Deinterlacing?
Deinterlacing involves using tools and technology to convert the old interlaced video into a smooth, progressive format that works perfectly on modern displays. Instead of splitting the picture into two halves, deinterlacing combines the information from those two halves to create a complete and clear frame.
With deinterlacing, you can eliminate those distracting lines and enjoy your videos the way they were meant to be seen with clean visuals.
Key Differences Between Interlaced and Progressive Videos
To understand what an interlaced video is and how it actually looks, we need to understand the key pointers that differentiate an interlaced video from a progressive video. Here are some important points that will help you achieve this differentiation.
-
Interlaced videos split the picture into two halves and show them one after the other. Progressive videos show the whole picture at once.
-
Interlaced videos appear to have a higher frame rate by switching between the two halves quickly. Progressive videos have a consistent, smooth frame rate.
-
Progressive videos look cleaner and clearer, without the blurry or "combing" effect you get with interlaced videos, especially during playback.
-
Progressive videos are simpler to work with during editing since each frame contains the full picture. Interlaced videos can be trickier to edit.
-
Modern TVs, computers, and other devices work best with progressive video formats. Whereas interlaced videos may not display properly on these devices.
Different Deinterlacing Methods and How They Can Fix Interlacing Artifacts?
Now that you know what deinterlacing is, let's take a look at the different deinterlacing methods. Knowing about each will help you choose the best method for your videos.
- The most basic deinterlacing methods are "bob" and "weave". Bob deinterlacing simply takes each field (the two halves of the interlaced picture) and converts them into a full frame by guessing what the missing lines should be. This can help reduce the flickering, but it might not completely eliminate the “combing” effect.
- The other is called Weave deinterlacing; it combines the two fields into one frame. This method preserves the original frame rate but can sometimes lead to more visible artifacts, especially in scenes with a lot of movement.
Other more advanced deinterlacing methods available that use "motion-adaptive" and "motion-compensated" techniques. These methods analyze the movement in the video and apply different deinterlacing approaches to plain, static, and moving areas. Although, this can produce much cleaner results, it also requires more processing power.
.jpg)
Some tools even let you combine different techniques to get the optimal balance of quality and performance and fix the deinterlacing videos.
How to Deinterlace Videos with Stellar Repair for Video?
Stellar Repair for Video is a powerful tool that can help you deinterlace or repair all kinds of interlaced or corrupted video files. Unlike other tools and software that may require technical guidance and a lot of time, this free to download video repair tool can easily repair and fix videos with interlaced artifacts in a few simple steps. The tool supports various video formats and codecs, so that you can fix issues with MP4, MOV, AVI, MKV, and many other file formats.
The great thing about Stellar Repair for Video is its easy-to-use interface, which makes the process very user-friendly and fast. Here is a simple step-by-step workflow to guide you through the tool’s repair process.
-
Transfer the interlaced video file to your Windows or Mac System via a USB cable.
-
Download the Stellar Repair for Video software.
-
Now, install and run the Stellar Repair for Video software on your PC.
Note: Both Mac and Windows devices support Stellar Repair for Video.
-
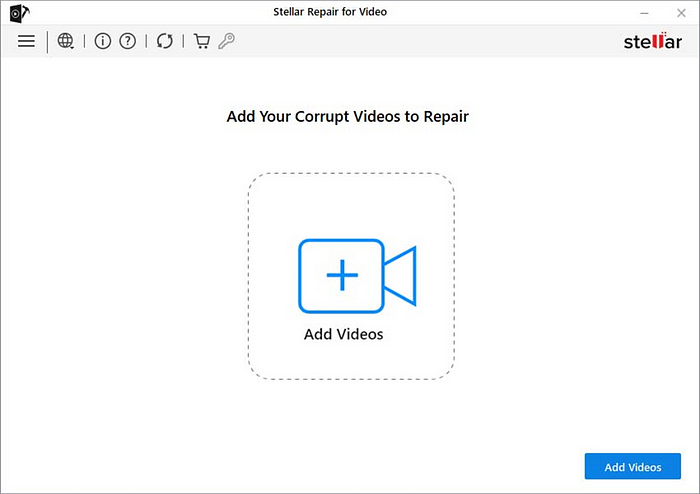
Click on “Add Videos” to upload the interlaced or corrupt video files.
Note: Stellar Repair for Video supports all major video formats, be it MP4, MOV, AVI, MKV, AVCHD, MJPEG, WEBM, ASF, WMV, FLV, DIVX, MPEG, MTS, M4V, 3G2, 3GP, and F4V files.

-
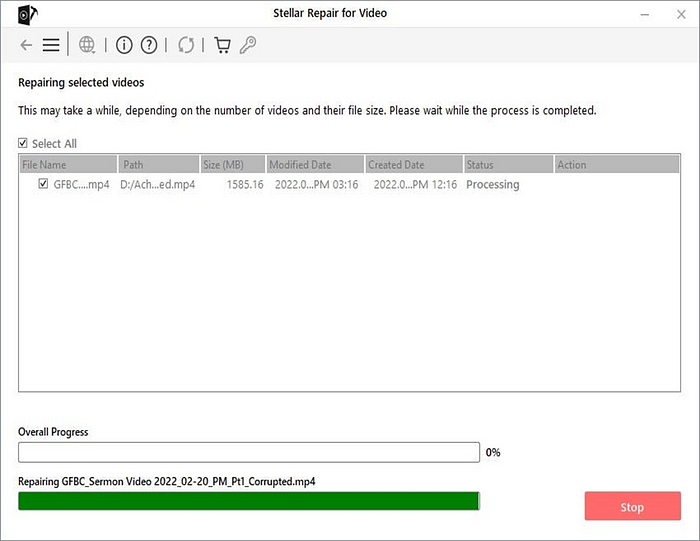
Then, click on Repair to start the repair process. The repair progress will be shown below on your screen.
-
Once the repair process is completed, you can preview the deinterlaced or repaired video.

-
Now select “Save repaired files at source location” or “Save repaired files at custom location” to save the videos to your preferred location.

Following the above steps, you can easily fix videos with interlaced artifacts using the Stellar Video for Repair tool.
Wrapping Up
These flickering issues or interlaced artifacts in videos can ruin the viewing experience in modern displays. However, deinterlacing is the key to transforming these choppy videos with a combing effect, into smooth, high-quality content. This is necessary for modern displays that work best with progressive video. Stellar Repair for Video, with its advanced algorithms, can help you fix interlaced videos and restore your corrupt videos to ensure they play back smoothly and clearly on any device.


A tech enthusiast cum writer, transforming complex tech challenges into accessible guides for everyday users.

 9 min read