In many cases, a failed Microsoft Exchange Server Cumulative Update (CU) can render the server unusable. Although it may appear that all services are running, databases are mounted, and web resources are working normally, the email flow goes dead. As a result, Outlook clients fail to connect to the server and the ActiveSync protocol stops working.
In such a situation, you need to act immediately and repair the failed Exchange server or recover the server by setting up a new server on another virtual or physical machine.
Steps to Repair Exchange 2016 Server after a Failed CU Installation
If the issue occurred due to failed hardware, you can replace it and check if the server reboots. However, even if the server reboots, you may still need to repair and recover the server due to failed update installation.
Follow these steps to repair and recover your stalled Exchange Server 2016 after failed CU installation.
Step 1: Check Status
After a failed CU installation, many Exchange Server components enter the ‘inactive’ state. This not only stops critical Exchange services but can also prevent you from restoring the backups.
If your Exchange server rebooted and running, open the Exchange Management Shell and use Get-ServerComponentState PowerShell cmdlet to check the status of all components on the server.
Get-ServerComponentState –Identity
For instance,
Get-ServerComponentState –Identity Exchange19
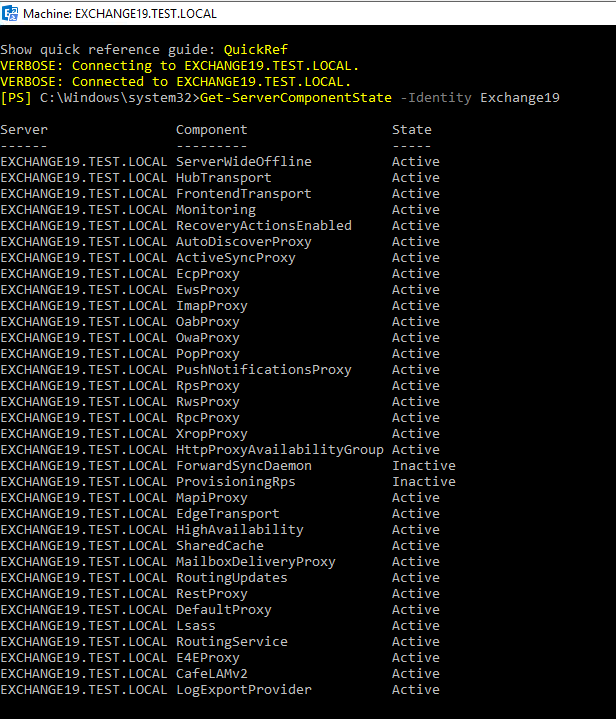
It will list the ‘active’ and ‘inactive’ Exchange Server components.
Step 2: Restore Components to Active State
You need to bring the components from ‘inactive’ state to ‘active’ state. For this, you can use the Set-ServerComponentState PowerShell cmdlet in EMS to configure, update, and restore the components and their services.
However, you need to assign the following permissions to the user or administrator for running the cmdlet. Use EAC to grant these roles and permissions or use New-ManagementRoleAssignment PowerShell cmdlet.

Set-ServerComponentState -Identity -Component ServerWideOffline -State Active -Requester Functional
For instance,
Set-ServerComponentState -Identity Exchange19 -Component ForwardSynDaemon -State Active -Requester Functional
Then run Get-ServerComponentState –Identity < > command to check if the component is active now.<>
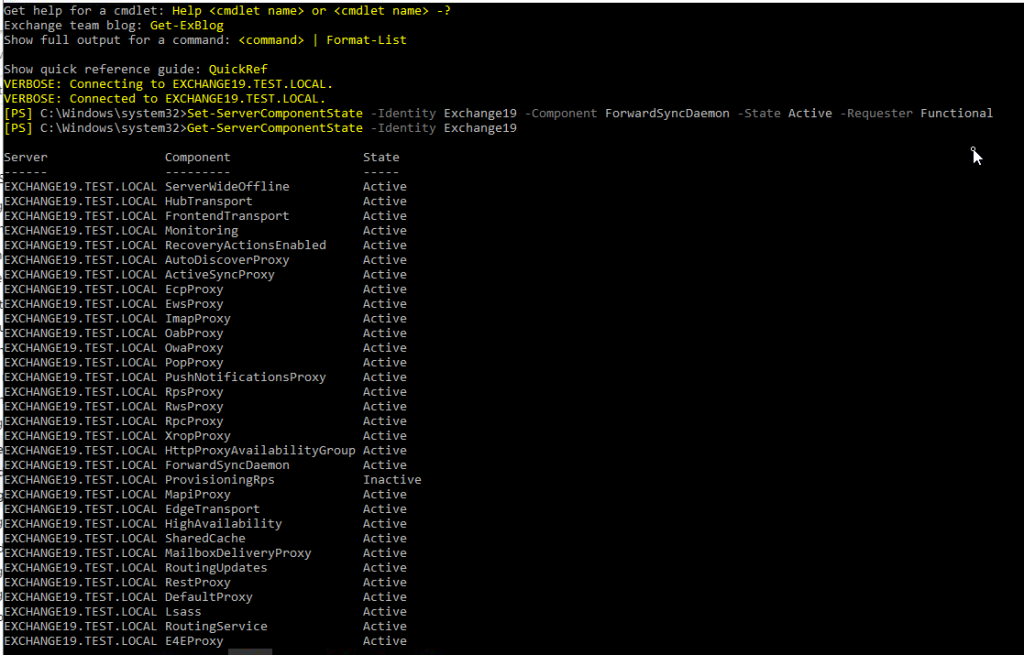
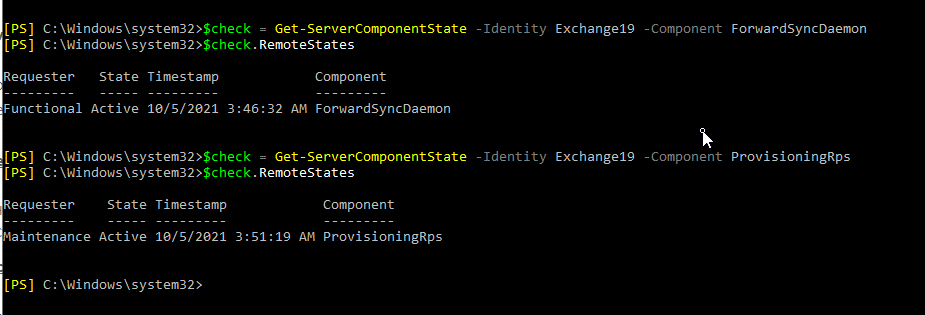
You can also check which requester lead to inactive status of components by running following command,
= Get-ServerComponentState –Identity -Component ServerWideOffline
.RemoteStates
For instance,
$check = Get-ServerComponentState –Identity Exchange19 -Component ProvisioningRps
$check.RemoteStates
Steps to Recover Exchange Server 2016 after a Failed CU Installation
You may try to recover the server by running the /prepareAD command to reset the permissions and recreate containers and security groups that may have broke due to the failed CU installation.
drive letter :\Setup.exe /IAcceptExchangeServerLicenseTerms /PrepareAD /OrganizationName:"yourorganizationname"
For instance,
D:\Setup.exe /IAcceptExchangeServerLicenseTerms /PrepareAD /OrganizationName:"StellarInfo"
Restart the server and check if it’s working by sending emails.
If repair didn’t help, you need to create a new identical server on a different VM or physical machine and use /Mode:RecoverServer switch to recover the Exchange server 2016. The steps are as follow,
Prepare Exchange Server 2016
To recover the server, you need to run the Exchange Server 2016 setup in unattended mode using the /Mode:RecoverServer or /m:RecoverServer switch on a new machine with identical hardware and Windows Server version. For instance, if the old server is running on Windows Server 2016, you can’t use a different Windows Server version.
Also, create drive volumes with the same drive letters same as on the lost or failed server.
The /Mode:RecoverServer switch uses the information and settings stored in the Active Directory of the failed Exchange Server 2016 during the installation of the new Exchange Server 2016 with the same name. You must use the same CU installed on your failed Exchange Server for recovery. However, if the CU installed on your failed server is unavailable, you may use the latest CU to recover the server.
For detailed instructions, refer to our guide on recovering an Exchange 2007/ 2010/2013/2016/2019 Server using the /Mode:RecoverServer switch.
After the Exchange setup is completed, you can go ahead and restore the mailboxes and database from a lost or failed server to your new Exchange Server 2016.
Restore Mailboxes and Database
If the database and log files are not missing, the database will automatically mount. However, if the database is corrupt, you can replay log files using EseUtil soft recovery to fix it.
But if log files are lost or missing due to server failure, you need to use your last backup. This may cause data loss as it may not have the latest data accumulated from the last backup date.
In such a case, when a backup is obsolete or unavailable, you can use Stellar Repair for Exchange to recover mailboxes from the damaged or corrupt database without log files.
The software repairs the damaged database and extracts mailboxes from the database. You can then save them as individual PSTs and manually import them into your new recovered server. You may also export the recovered mailboxes directly to Exchange 2016 recovered server using the software.
Conclusion
Microsoft releases cumulative and security updates more frequently due to recent attacks on on-premises Exchange servers by various financially motivated and state-sponsored threat actors worldwide. Although it is necessary to update the Exchange Server as soon as possible, you need to keep in mind that it takes time to finish. And sometimes, you may encounter issues with the CU installations that could result in a non-responsive or failed Exchange Server. If you have also encountered a problem where Exchange Server 2016 failed after CU installation, follow this guide to repair and recover your Exchange Server 2016.
For more help, you can leave a comment or reach us via the Self Help & Support page.


 5 min read