MS SQL Server offers different features, like database mirroring, failover clusters, etc. to restore database in case of server failure or disaster. However, database mirroring does not support automatic failover and disaster recovery solutions. On the other hand, failover clusters require shared storage resource.
To overcome the limitations of database mirroring and failover clusters, you can use the Always on Availability groups feature in SQL Server. This feature is a combination of data mirroring and failover clustering. It provides both high availability and disaster recovery solutions on an enterprise-level. An Always on availability group supports a failover environment. It contains a set of databases known as availability groups that can failover together and replicate. In this, a discrete set of user databases is deployed in different standalone SQL server instances. It uses a local disk instead of the shared disk as a resource.
In availability group, changes made to the primary database are replicated to the secondary databases (replicas) using the log shipping feature. If any database in the group is corrupted or damaged, the corrupted data is replicated to the secondary databases. In such a case, you can face failover issues or failed synchronization, and may impact availability of the entire group.
In this article, we will discuss how to repair corrupt SQL databases in Always on Availability Groups.
Methods to Repair and Restore Corrupt SQL Databases in Always on Availability Groups
You can't restore or repair the database, which is an active part of an availability group. To repair the damaged database, you are required to first remove that database from the group, repair it, and then restore it on primary and secondary databases. After this, add the repaired database to the Availability Group. Here's how to do so:
Step 1: Remove Corrupt Database from Availability Group
To remove database from the Availability Group, follow the below steps:
- Open the SQL Server Management Studio (SSMS) and connect to the SQL Server instance hosting the primary replica of the database that you want to remove from the Availability Group.
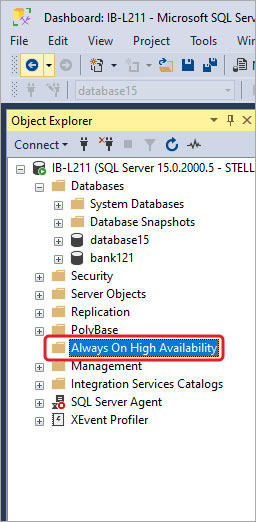
- Next, expand the Always On High Availability node and select the Availability Groups.

- Under Availability Groups, click Availability Databases.
- Right-click on the database that you want to remove and then click Remove Database from Availability Group.
- In the Remove Databases from Availability Group window, click OK.
Alternatively, you can use the ALTER AVAILABILITY Group statement to remove the database (see the below example).
ALTER AVAILABILITY GROUP availabilitygroupname REMOVE DATABASE Databasename;
Step 2: Restore the Backup or Repair the Corrupt Database
After removing the corrupted database from the Availability Group, you can either restore the backup copy (if available) or repair the database.
1. Restore the Database from Backup
Here are the steps to restore the database from backup using the SSMS:
- Open SSMS and connect to the SQL Server instance.
- Go to Object Explorer and click the Server Name to expand the server tree.
- Navigate to Databases and open the database you want to restore.
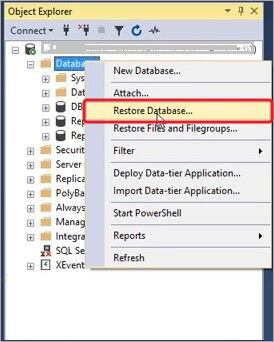
- Right-click the Database and then click Restore Database.

- The Restore Database window is displayed. On the General page, under the Source section, choose the Device option and then click on ellipses (...) to find your backup file.
- From the 'Select backup devices' window, choose File as backup media, and then click Add.
- Locate and select the .BAK file you want to restore and then click OK.
- When the “Restore of database completed successfully’’ message pops up, click OK.
Alternatively, you can also use T-SQL queries to restore the database from the .bak file. For this,
- In SSMS, click the New Query option.
- Then, type the below command:
USE [master]
RESTORE DATABASE [bank121] FROM DISK = N'D:\Internal\BackupfileRD.BAK'
WITH FILE = 1, MOVE N'bank121' TO N'C:\Program Files\Microsoft SQL Server\MSSQL15.MSSQLSERVER\MSSQL\DATA\bank121.mdf',
MOVE N'bank121_log' TO N'C:\Program Files\Microsoft SQL Server\MSSQL15.MSSQLSERVER\MSSQL\DATA\bank121_log.ldf',
NOUNLOAD, STATS = 5
GO
- Click Execute.
Now, restore the database on secondary replicas. Before restoring the backup make sure your backup is readable by using the RESTORE VERIFYONLY statement as given below.
RESTORE VERIFYONLY FROM DISK = C:\YourDatabase.BAK GO
The above command will help you verify that your backup file is not corrupted and can be restored without any problem.
After that, manually prepare your secondary database for an availability group.
2. Repair the Corrupt Database
If the backup is not readable or not available, then you can try to repair the corrupt database by using the DBCC CHECKDB command. You can use the REPAIR_ALLOW_DATA_LOSS option with the command. Here are the steps:
Note: Before running the command, make sure you have all the permissions and privileges on the database.
Step 1: Set the Database to SINGLE_USER Mode
First, you need to set the database to SINGLE_USER mode. This will prevent other users from changing the data during the repair process. Here’s the command:
Step 2: Run DBCC CHECKDB Command
After setting the database to SINGLE_USER mode, run the DBCC CHECKDB command with the REPAIR_ALLOW_DATA_LOSS option as given below:
DBCC CHECKDB (N ’Dbtesting11’, REPAIR_ALLOW_DATA_LOSS) WITH ALL_ERRORMSGS, NO_INFOMSGS;
GO
Note: The REPAIR_ALLOW_DATA_LOSS option can lead to data loss as it may deallocate data, such as rows, pages, or series of pages, while resolving the issues
Step 3: Set the Database to MULTI-USER Mode
When the database is repaired, set the database again to MULTI-USER mode. Here’s how:
- In SSMS, in Object Explorer, connect to an instance of the SQL Server Database Engine and then expand that instance.
- Right-click on the database whose mode you want to change and click Properties.
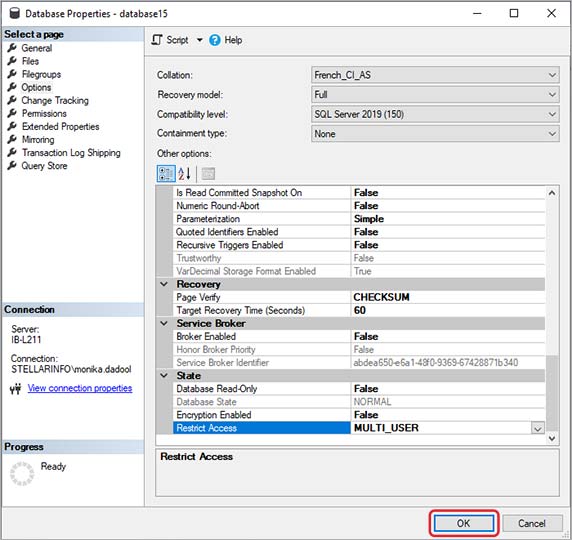
- In the Database Properties dialog box, click Options.
- Under Options, scroll down to State.
- Under State, click the Restrict Access option, select MULTI_USER, and click OK.

The DBCC CHECKDB command can fix database consistency issues, but it may not guarantee complete data recovery and can leave your database in a logically inconsistent state. To prevent such downsides, you can use the Stellar Repair for MS SQL. This tool can repair corrupt MS SQL database quickly and recover all the objects with complete integrity and precision. The tool can also recover deleted records from the corrupted/damaged SQL database file
Features of Stellar Repair for MS SQL
- Repairs both MDF and NDF files with complete precision.
- Intuitive and user-friendly GUI.
- Supports recovery of all database objects, including tables, indexes, stored procedures, keys, and triggers.
- Restores deleted records from corrupt database.
- Supports selective recovery of database objects.
- Saves recovered SQL database data in a new database, live database, or other formats, including HTML, XLS, and CSV.
- Supports MS SQL Server 2022, 2019, 2017, and earlier versions.
- Supports recovery of compressed SQL database.
- Compatible with both Windows and Linux operating systems.
Step 3: Add the Database to Availability Group
After restoring or repairing the database, you can now add it to Always on Availability Group. Here are the steps:
- In SSMS, in Object Explorer, connect to the server instance hosting the primary replica and expand the server tree.
- Next, expand the Always on High Availability node and then Availability Groups.
- Right-click on the Availability group and then click Add Database. This will open the Add Database to Availability Group window.
- In the Availability Databases pane, click the Add button.
- Enter the name of a database that meets the prerequisites for availability databases.
- Once you are done, click OK.
Next, use the Availability Group Properties window and configure the corresponding secondary database on each server instance. For detailed information, read Start Data Movement on an Always On Secondary Database (SQL Server)
To Conclude
If any of the databases in Availability Group gets corrupted or damaged, you need to remove the database from the group and repair it. To quickly and easily repairing the database, you can use Stellar Repair for MS SQL. It can repair the database and restore all the data from corrupt SQL database files with complete integrity and precision. It allows you to save the repaired data to a new database file, which you can easily add to the Availability Group.


 8 min read


