Summary: Ndis.sys error is a BSOD error that occurs due to corrupt system files, registry errors, hardware issues, and malware attacks. The error may cause data loss, if not resolved on time. Learn how to fix ndis.sys error in Windows with the help of some DIY methods described in this post. Also check out an easy-to-use yet powerful Windows Data Recovery tool to recover data lost due to this error.
NDIS or Network Driver Interface Specification is a legitimate system driver, used for Network Interface Controllers. It helps Windows to communicate with other hardware and connected devices on the system network. Ndis.sys is a system file, which is usually located in C:\Windows\System32\drivers folder. However, malware has been disguised using the name of this file very often. Not only this, due to corrupt network drivers, corrupt or missing system files, registry error, and faulty hard disk, you may encounter Ndis.sys Blue Screen Error on your Windows PC. This error may lead your system from malfunctioning to crash resulting in complete data loss. Don't Panic! Read on to know how to recover lost data caused by this error.
Method to Recover Data Lost Due Ndis.Sys BSOD Error
To restore lost data caused by this blue screen error, you may try using an easy-to-use and powerful Windows Data Recovery tool such as Stellar Data Recovery Professional. This DIY software can recover all kinds of data from formatted or corrupted Windows PCs and storage media devices. It also features a 'Create Recovery Drive' utility, which helps you develop a bootable media drive to retrieve data from BSOD affected, crashed or non-bootable the system. Watch video to learn more!
How to Fix Ndis.sys Blue Screen Error?
- Update Network Drivers
- Scan Your PC for Malware
- Run BSOD Troubleshooter
- Rollback Network Drivers
- Run CHKDSK Command
- Run DISM Command
- Run SFC/Scannow Command
- Perform System Restore
Ndis.sys is a system file related to Network drivers in Windows PC. If the error occurs due to faulty or corrupt network drivers, you may fix it by updating them with the help of the following steps:
-
Open Device Manager, double-click on Network Adapters, and expand it.
-
Choose and right-click the corrupt driver, and select Update Driver. (See Image 1)
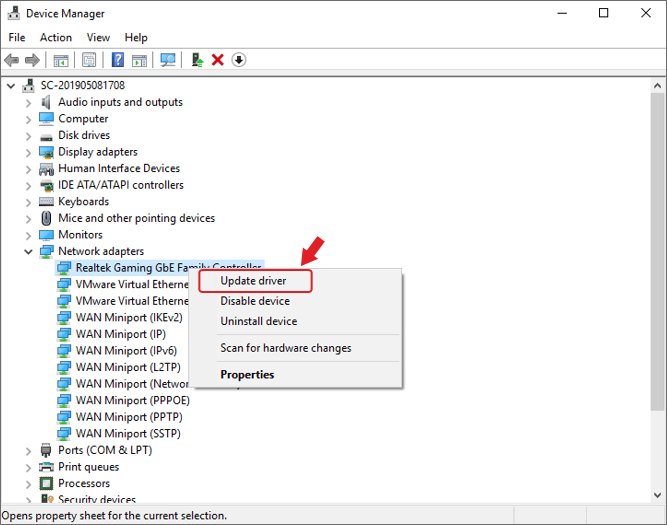
Image 1: Choose corrupt Network Adapter and 'Update driver'
-
On next prompt, choose Search automatically for updated driver software. (See Image 2)

Image 2: Search automatically for updated driver software
-
Now reboot your system and check if the issue has been fixed.
Method 2: Scan Your PC for Malware
-
Open Settings by pressing Windows + I.
Follow Update & Security > Windows Security (See Image 3)
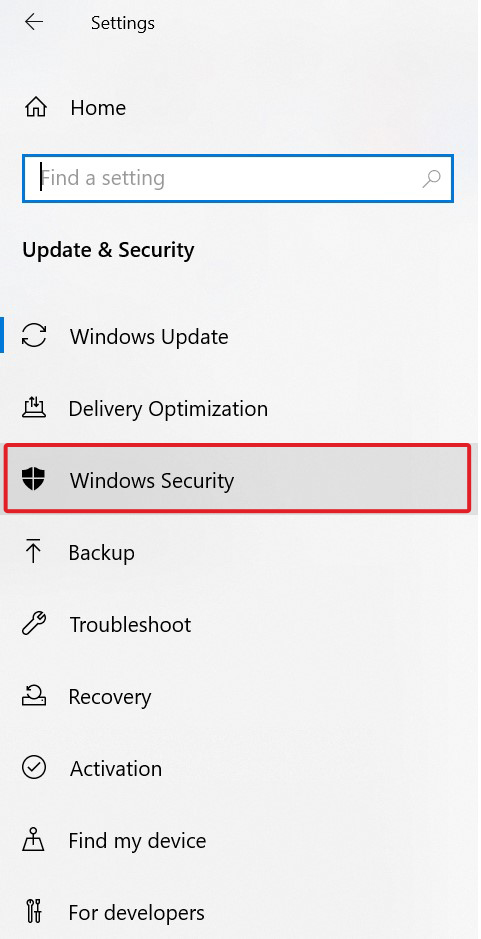
Image 3: Go to Windows Security
-
Go to Virus & Threat Protection and double-click on it. (See Image 4)
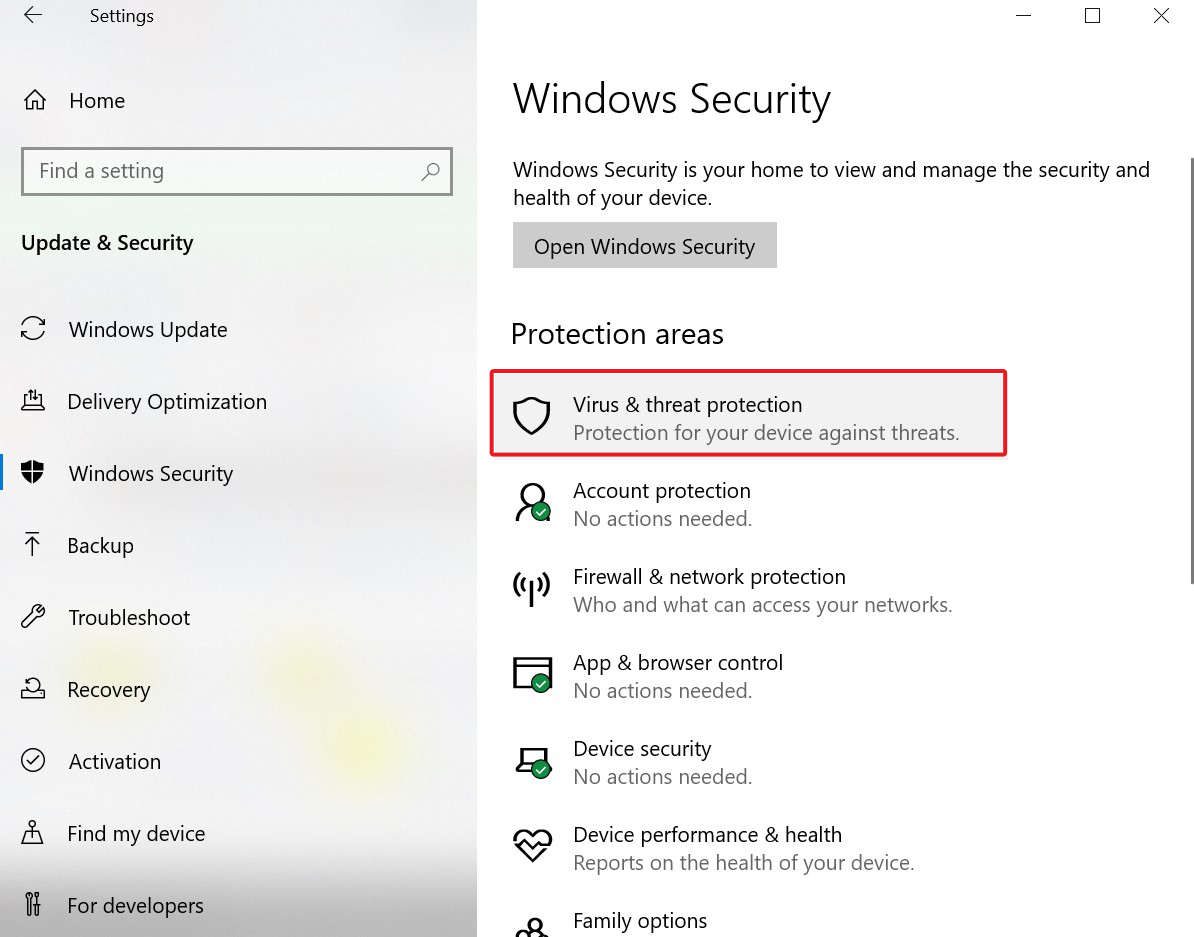
Image 4: Go to Virus & Threat Protection
-
When you enter Windows Defender Security Center, follow Run a new advanced scan > Full scan > Scan now.
If any threat is detected, follow the on-screen suggestions to remove these threats. After completing the process, you may reboot the process.
Due to multiple malicious entities, the Ndis.sys error may occur. In such a situation, your entire system and data stored on it becomes at risk. However, you may get your data back with a professional data recovery tool. To fix this error, you may use Windows Defender by following the given steps:
Method 3: Run BSOD Troubleshooter
You may try fixing this BSOD (blue screen of death) using the Windows 10 built-in troubleshooting utility. Run the BSOD troubleshooter with the help of the following steps to fix this error:
-
Open Settings and go to Update & Security.
Go to Troubleshoot given at the left corner.
Select BSOD error (Blue Screen) under Find and fix other problems, and click Run the troubleshooter. (See Image 5)
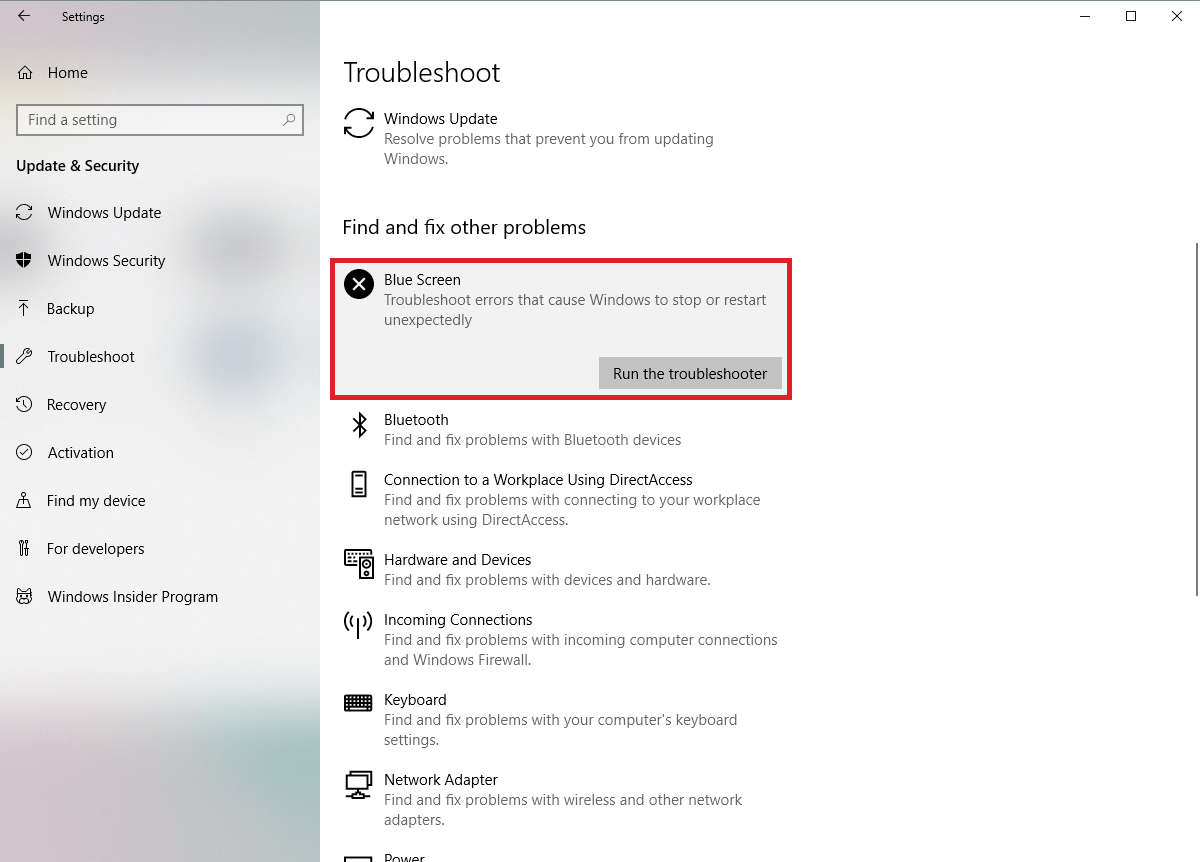
Image 5: Run BSOD Troubleshoot to fix the error
-
Follow the instructions on screen to fix the error.
Once the process is completed, restart the system.
Method 4: Rollback Network Drivers
If the error has occurred due to network drivers, you may try to fix it by rolling back the recently-installed network drivers. Follow the below-said steps to get rid of this issue:
-
Open Device Manager, select the network driver you recently updated and right-click on it to open Properties. (See Image 6)
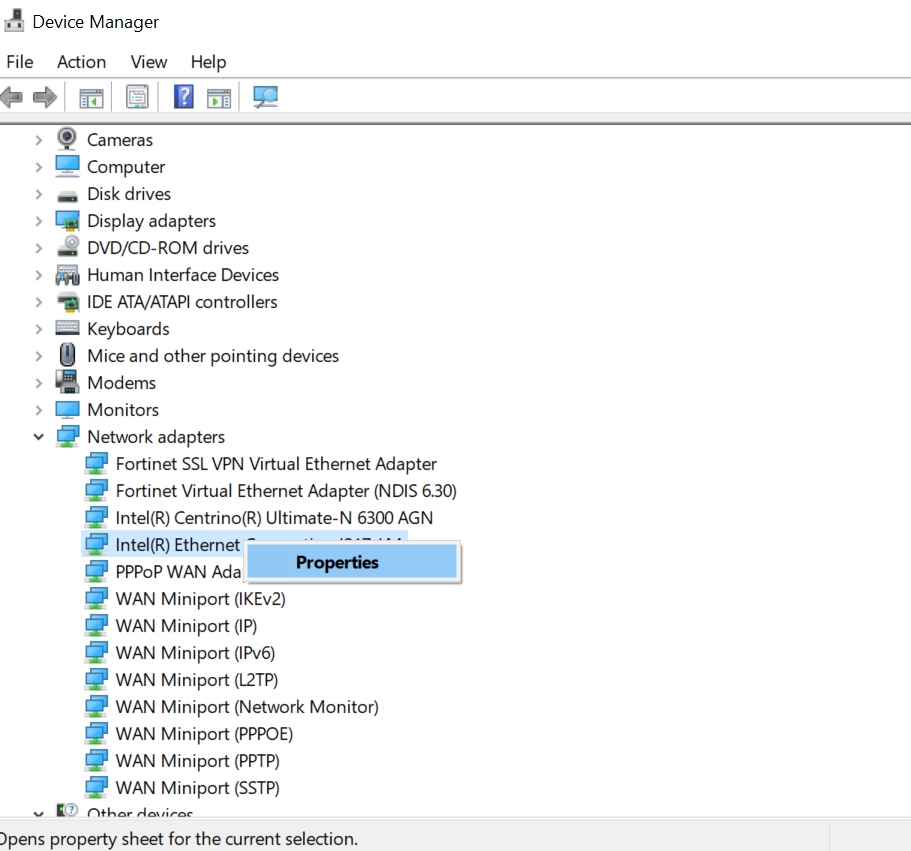
Image 6: Open Network Driver Properties
-
Go to Driver tab and select Roll Back Driver > OK. (See Image 7)
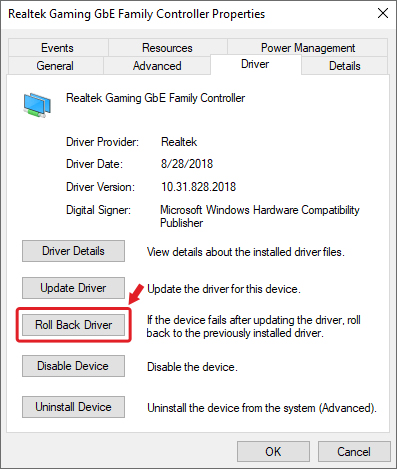
Image 7: Select Roll Back Driver under Driver tab
-
A confirmation window will open, select a reason to roll back driver and click Yes. (See Image 8)
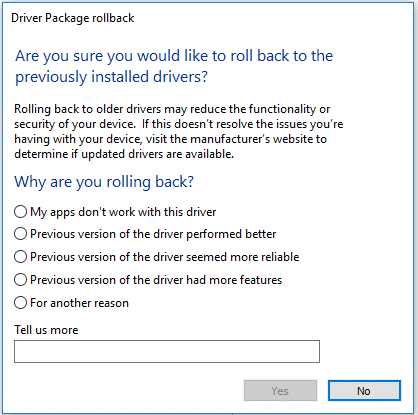
Image 8: Select a reason and click yes to roll back driver
Once done, restart the PC and check now if the problem is fixed.
Method 5: Run CHKDSK Command
This blue screen error may also occur due to corrupt or faulty hard disk. To check for the hard disk errors, you may run CHKDSK command. It fixes the file system errors with the hard disk.
-
Open Command Prompt and select Run as administrator.
In the command prompt window, type chkdsk /r /r D: and hit Enter. (See Image 9)

Image 9: Run CHKDSK /r /r D command to fix hard disk issues
-
This will take some time as this utility will search for the error and fix them.
Once the process is done, close the command prompt window, and reboot your system.
Caution:
CHKDSK command marks the bad sectors on the device. Due to this, Windows doesn't store or read data from the bad sectors, which leads to data loss. Thus, using a powerful Windows Data Recovery Software to recover your data from the device.
Method 6: RUN DISM Command
DISM (Deployment Image Servicing and Management) command can be used to fix corrupt or damaged system files. The missing files, or corrupt system files which may lead your Windows PC to malfunction or even crash. In such a condition, your data is at stake. You may recover it with a data recovery tool. To fix this error, follow the given steps:
-
Open Command Prompt by typing cmd in Windows search box and select Run as administrator.
Type the following command and hit Enter. (See Image 10)
-
Once the process is completed, close it and restart the system. Check now.
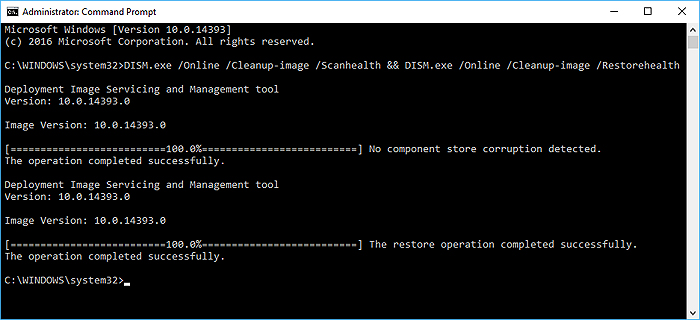
Image 10: Run DISM Restore Health Command as given in screen
Method 7: Run SFC/Scannow Command
You may run System File Checker or SFC, another Windows' built-in troubleshooting utility to fix the corrupt or damaged system files. Follow the given troubleshooting steps:
-
Run Command Prompt as an administrator
Type sfc/scannow and hit Enter. (See Image 11)
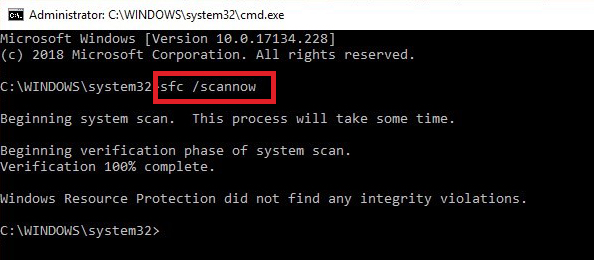
Image 11: Run SFC/Scannow command
Method 8: Perform System Restore
You may perform system restore for fixing Ndis.sys Blue Screen Error by performing System Restore. However, while performing this method, you may end up losing your system data. Thus, it is recommended to restore your data with a professional Windows Data Recovery Software. To perform this issue, follow the given troubleshooting steps:
-
Turn on your PC with USB Installer and click Repair your computer.
Once you reach the Automatic Repair environment, click Advanced Options.
Go to Troubleshoot and click Advanced options.
Select System Restore from the available options. (See Image 12)
-
Click Next and select a restore point to use on the system.
Select Scan for affected programs and follow Next > Finish. (See Image 13)
-
Restart the system and check if it is free from this error.
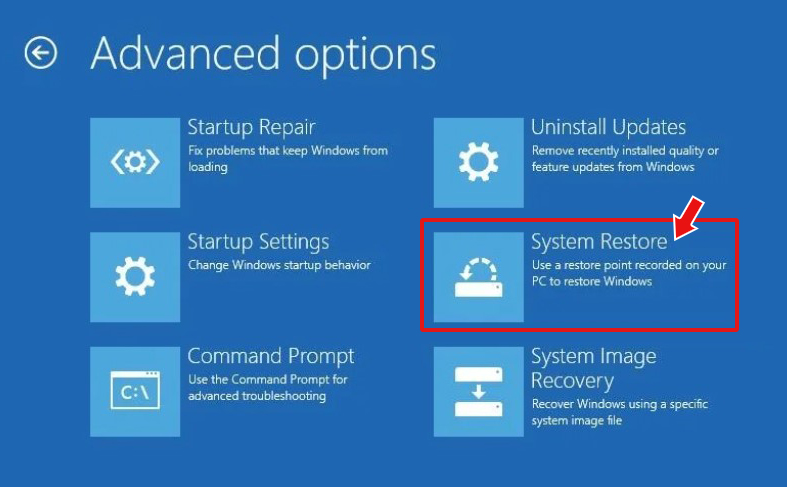
Image 12: select System Restore

Image 13: Finish the process of confirming the restore point
Conclusion
The Nsid.sys blue screen error may occur due to several reasons such as corrupt system files, registry errors, hardware issues, malware attacks, etc. This error may lead your system to malfunction as well as crash completely. You may recover data lost due to this error with the help of an efficient Windows Data Recovery tool such as Stellar Data Recovery Professional. Once you securely retrieve your data, you may fix the Ndis.sys BSOD error with the aforesaid methods.


 9 min read
-1505.jpg)
