Office 365 (Microsoft 365) is a cloud-based subscription service that includes Office applications. It allows users to access the data from any internet-enabled device and has advanced security measures. These and various other benefits compel the users to move their mailbox data (PST file) to Office 365. If you’re one such user and want to import your PST files into Office 365, then you’ve landed on the right page. This article discusses different methods to import Outlook PST into Office 365 Mailboxes.
Methods to Import Outlook PST into Office 365 Mailboxes
There are three manual methods to import Outlook PST files into Office 365 mailboxes. Let’s discuss them in detail.
Method 1: Import Outlook PST via Outlook Import Export Wizard
You can configure Outlook to access your Office 365 account and then can use the Outlook Import/Export wizard to import PST files into Office 365. Here are the steps you need to follow to import PST via Outlook Import Export Wizard:
- First, click File at the top of your Outlook ribbon.
- Next, select the Open & Export option and click Import/Export.

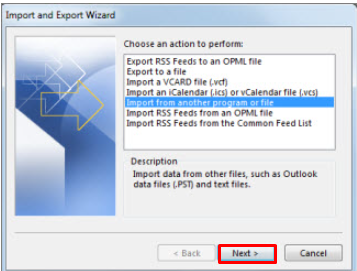
- The Import/Export wizard is displayed. Choose Import from another program/file option and click on the Next button.

- Click Outlook Data file (.pst) and then click Next.
- Click Browse to select the .pst file you want to import.
- Click Replace duplicates with items imported under Options and then click
- If it prompts for a password, enter the password assigned to the Outlook Data file and click OK.
- Choose the Microsoft 365 mailbox folder in which you want to import the content of your .pst File.
- Click Finish.
Method 2: Network Upload
You can upload the PST files to a temporary Azure storage on the Microsoft cloud. Then, use the import service of Microsoft 365 to import the uploaded PST files into the target mailboxes. Here are the steps:
- First, you have to create a PST import job using the Microsoft Purview compliance portal after assigning the Import Export role. By default, this role is not set to anyone.
- Then, you need to upload the PST files from your system's local drive to Microsoft 365 by copying the SAS URL and using AzCopy (a command line based tool).
- Next, you have to create a CSV file to map the PST files with the Office 365 user mailboxes.
- Create a PST Import Job on the Import PST files page to submit the previously created PST import mapping file.
- After creating the import job, you can start importing the PST files into user mailboxes on Office 365.
Note: It is recommended to use this method to import PST files up to 20 GB containing mail items no larger than 35 MB to prevent performance issues during PST import.
Method 3: Drive Shipping
Instead of uploading the PST files to Azure storage, you can also copy the PST files to a BitLocker-encrypted drive and then ship it to one of the Microsoft data centers. They will then upload your PST files to the Microsoft cloud's Azure storage. However, you have to pay $2/GB or $2000 for 1 TB of PST files.
Once your PST files are uploaded by Microsoft, you can create a PST import job in Office 365 and import the PST files into the specified user mailboxes.
Limitations of the Manual Methods
The above methods include multiple steps that increase the chances of discrepancies. Besides, there are a few notable limitations of these methods, such as:
- You need admin permissions and specific roles assigned to upload and import PST files into the Office 365. For example, you must have "Mailbox Import Export Role" to import PST files into the Office 365 mailbox.
- You cannot upload PST files larger than 20 GB and mail items larger than 35 MB. You have to manually increase the limit if your PST contains large mail items. You can increase this limit to 150 MB.
- The shipping method supports only 5-inch solid-state drives (SSDs) or 2.5-inch or 3.5-inch SATA II/III hard drives.
- When you ship drive, you must pay Microsoft $2 per GB of data.
- In Network Upload, you can’t upload or import more than 24 GB PST files in a day.
Recommended Solution: Outlook PST to Office 365 Migration Tool
You can use an Outlook PST to Office 365 migration tool, such as Stellar Migrator for Outlook to directly migrate single or multiple PST files to Office 365, without any risk of data loss. There is no need to create import jobs, assign import roles, upload the mapping file, or send a hard drive to Microsoft. It requires only a few steps to import the PST files into Office 365. All you need is Office 365 mailbox credentials. This software uses Microsoft Modern Authentication to import PST into Microsoft 365. Most importantly, it can import larger PST files (50 GB or more) with no capping on mail item size. It comes with pay per use plan where you only have to pay based on the number of PST files you want to import into Office 365.
Conclusion
The article discusses manual methods to import PST files into Office 365, including Import PST via Outlook Import Export Wizard, Network Upload, and Drive Shipping. However, these methods are time-consuming as they involve multiple steps. Besides, you cannot upload PST files larger than 20 GB and mail items larger than 35 MB.
It also mentions a PST to Office 365 migration tool that can import PST into Office 365 with a few clicks. It is the easiest and fastest way to import PST into Office 365 without data loss.


-1193.jpg)
 5 min read


