Microsoft has certainly made some improvements with the release of Windows 11 OS. However, some common issues users face with Windows 10 aren't fully optimized. Like the previous versions, the new-gen OS – Windows 11, is not immune to sluggishness or slowdowns. Thankfully, one can easily fix this problem. This article covers the proven and Microsoft-recommended ways to fix Windows 11 slow issue. However, before that, let's consider the factors contributing to system sluggishness.
What Makes Windows 11 Slow?
Multiple factors can cause Windows 11 to be laggy or slow. These factors can range from malfunctioning hardware/software to a virus attack on your system. Here, we've listed the most common ones as follows:
- Windows 11 is set to the best visuals
- Unwanted startup services
- Use of HDD instead of SSD
- Outdated device drivers
- Faulty or aging hard drive
- Lack of space on system drives
- Temporary files available on the system in bulk
- Outdated OS
- Buggy software installed
- Insufficient RAM
How to Fix Windows 11 Slow Issue?
Since there could be many possible reasons behind Windows 11 slow issue, we've crafted the DIY (Do-it-yourself) methods accordingly. You can follow the instructions to speed up Windows 11 quickly. Let's begin!
Caution: Be careful of those 'Speed up your PC' advertisements that make you install third-party registry cleaners. These programs can expose your system to malware, causing further damage to your already slow PC. Moreover, backup your system regularly and keep data recovery software handy to prevent data loss if any mishap occurs.
#1 Restart your system
Sometimes, when your system becomes sluggish or hangs, try rebooting your PC or laptop. It will help you terminate the programs running in the background that may slow down your Windows 11. Go to Start, right-click on it, and choose Shut down or Sign out > Restart.
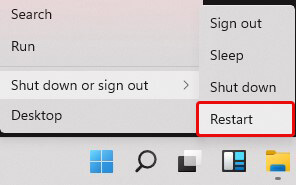
The system will reboot, and hopefully, it will run alright. After restarting your system, proceed with the below methods.
#2 Run Program Compatibility Troubleshooter
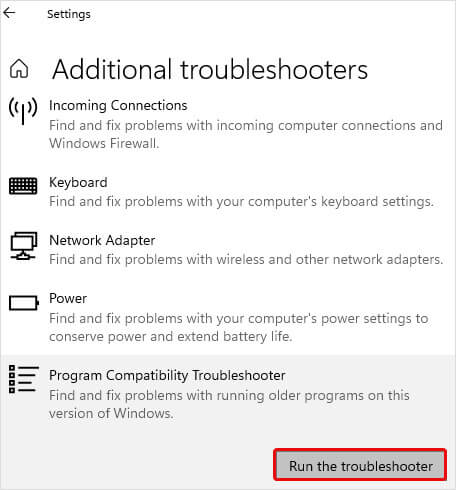
Sometimes, some incompatible programs may cause the system to run slowly. Fortunately, Windows comes with a built-in Program Compatibility Troubleshooter. This tool checks the program's compatibility with your system and fixes the issues to help your system run smoothly. Here are the steps to run the program compatibility troubleshooter:
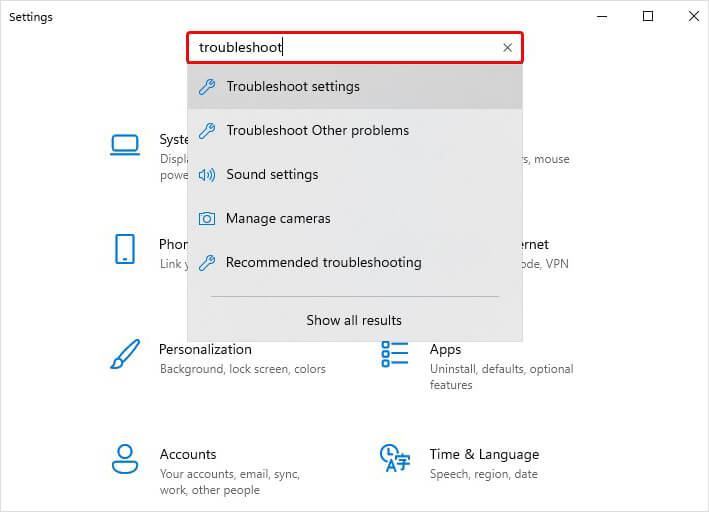
- Open Settings by pressing Windows + I and then type Troubleshoot in the Search bar.
- Select Troubleshoot settings from the visible options.
- Next, click Additional troubleshooters.
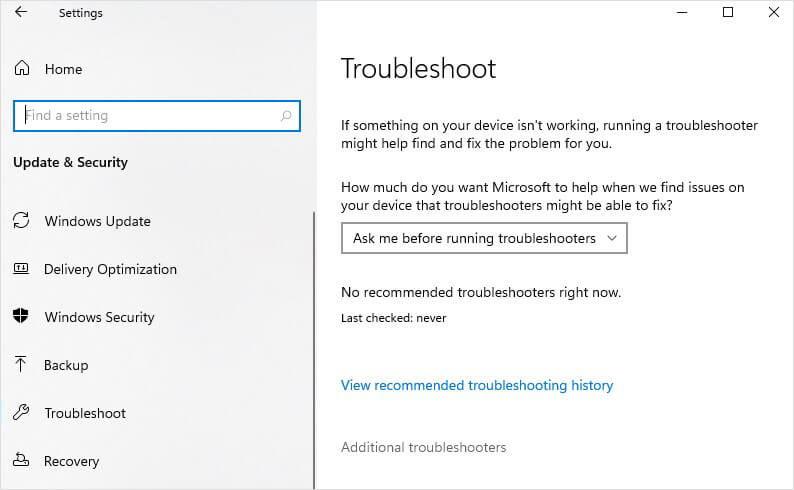
- On the next prompt, scroll down, and under Find and fix other problems, search for Program Compatibility Troubleshooter > Run the troubleshooter.
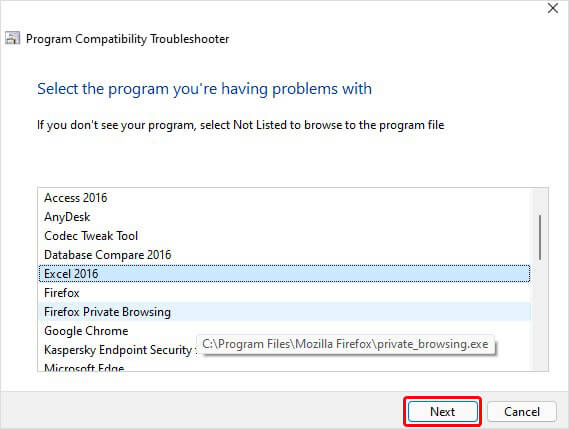
- You'll see the list of programs. Select the one with which you're facing issues and click Next.
- Afterward, you can choose 'Try recommended settings' or 'Troubleshoot Program.'
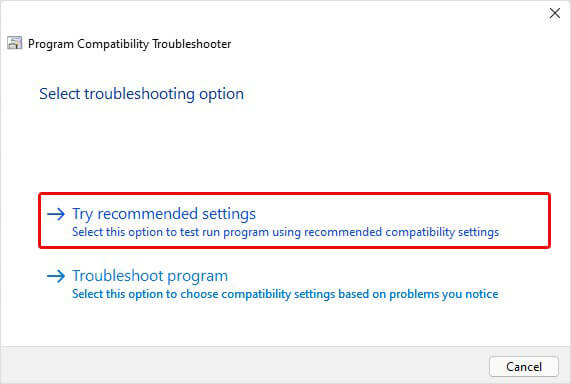
- Based on your selection, you'll see further instructions; follow them to complete the process.
#3 Ensure you have the latest Windows Updates Installed
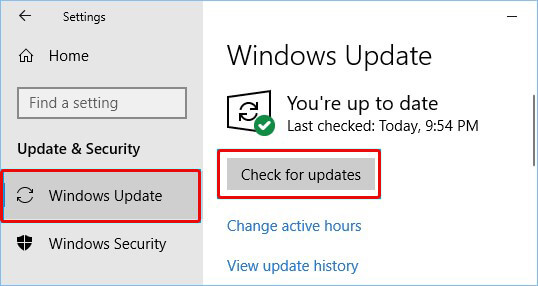
Missing important Windows updates or broken files may cause several system errors and affect system performance. To speed up Windows 11, you must ensure that you have the latest Windows updates installed for Windows and device drivers. To do so, follow the given steps:
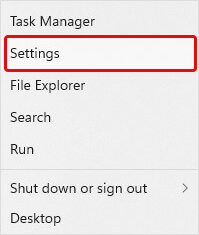
- Go to Start, right-click on it, and select Settings.
- Next, follow Update & Security > Windows Update > Check for updates.
#4 Disable/Remove Unnecessary Startup Apps/Services
Several programs run automatically in the background when you boot your system, causing your system to respond slowly. You can remove or disable the programs you don't often use from Startup to solve Windows 11 laggy issue. Follow the given steps:
- Open Settings with the above-stated instructions and then follow Apps > Startup.
- Select the program you don't want to run automatically on boot and turn it off.
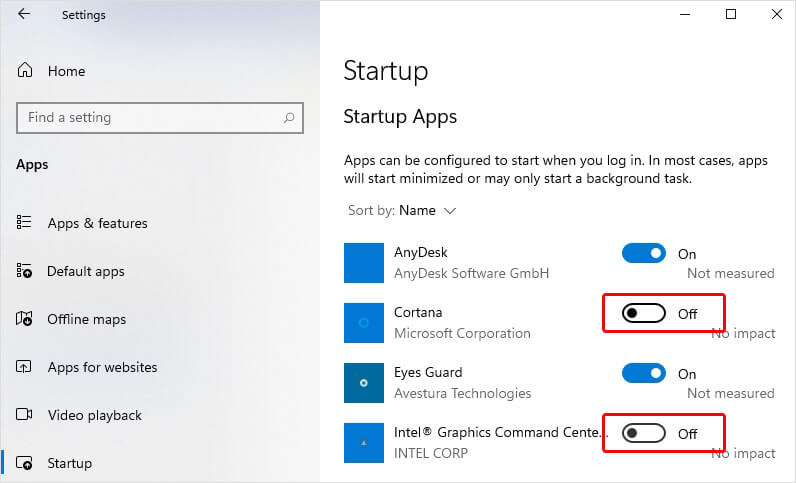
- Once done, reboot your system and check if Windows 11 slow startup issues are resolved and the system loads quickly.
#5 Free your system from junk files
Your system may have junk files or temporary files in a lot. They are quite easy to overlook as something that may consume a lot of space on your disk. But if too many junk files are available, they may contribute to Windows 11 slow performance. So you can remove them and boost your system performance. To delete junk or temporary files from your system, follow the given steps:
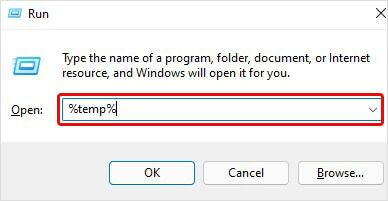
- Press Windows + R; it will open the Run dialog box.
- In the box, type %temp% and hit Enter.
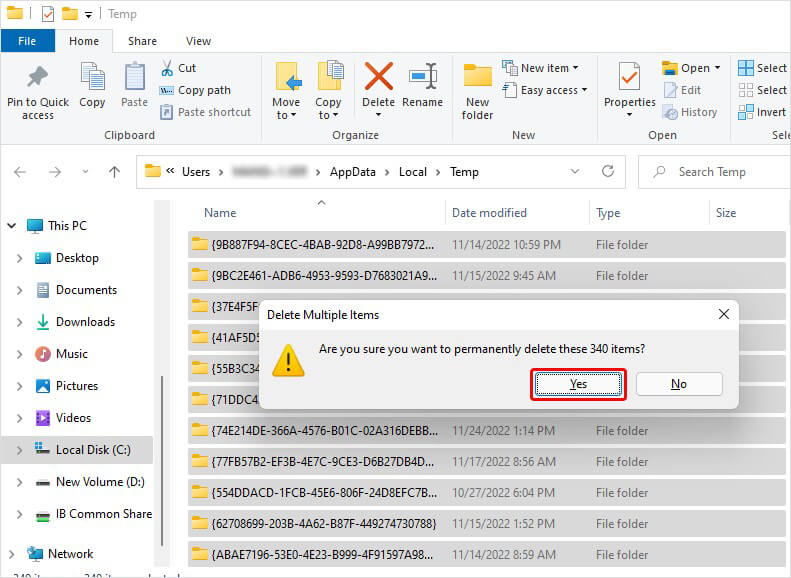
- It will open the Temporary Files Folder. Select all the files and type Shift + Del to delete these files from your system. Click Yes to confirm.
- Once done, close the window.
#6 Ensure your System is managing the page file size
A paging file is an area in a hard disk that acts as a memory for Windows. You can manage the page file size to speed up Windows 11. Follow the given steps:
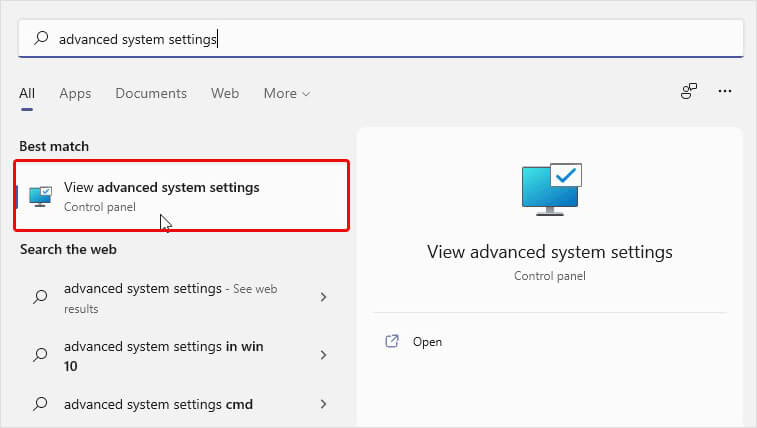
- Go to Windows Search, type Advanced System and select View Advanced system settings.
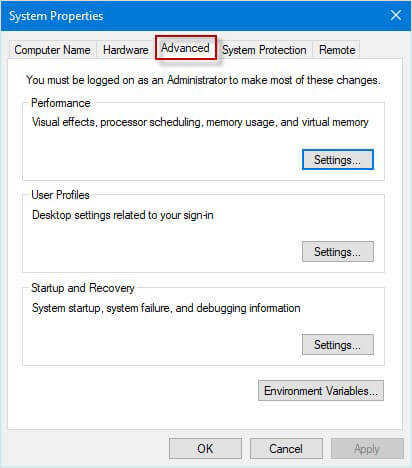
- On the next prompt, move to the Advanced tab and click Settings in the Performance area.
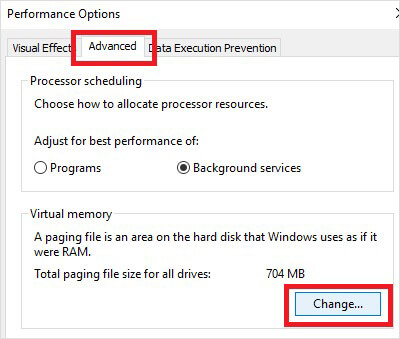
- Afterward, select the Advanced tab in Performance Options and click on Change in the Virtual memory area.
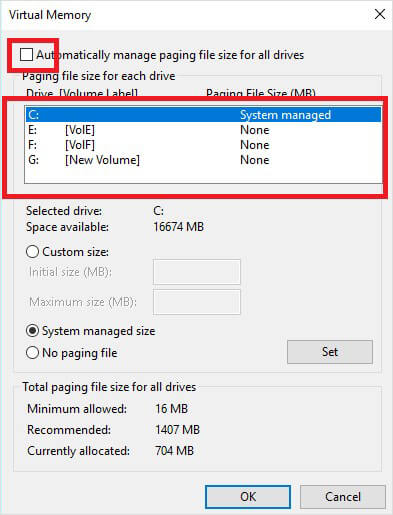
- Now, check the box beside Automatically manage paging file size for all drives > OK.
- Reboot your system and see if it is working fine now.
#7 Check for Available Space on your Disk
Windows 11 slow issue can also occur if you don’t have enough disk space available on your system. To resolve this, you need to remove unnecessary data to boost your system performance. Follow the given steps:
Run Disk Cleanup:
- Go to Windows Search, type Disk Cleanup, and open it.
- Select the boxes against the options/files you want to delete, and then click OK.
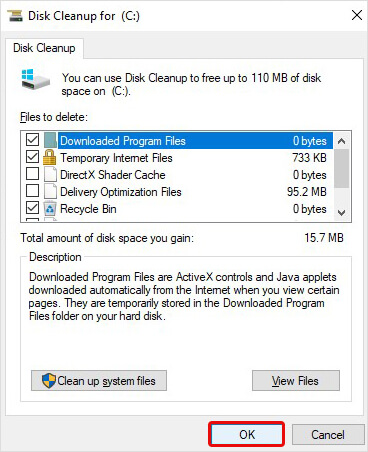
- You can also click the Cleanup system files option and select the files to remove.
Uninstall Unwanted Apps:
- Open Settings by pressing Windows + I and then follow Apps > Apps & features.
- Select the application you hardly use or don't use at all. Click Uninstall.
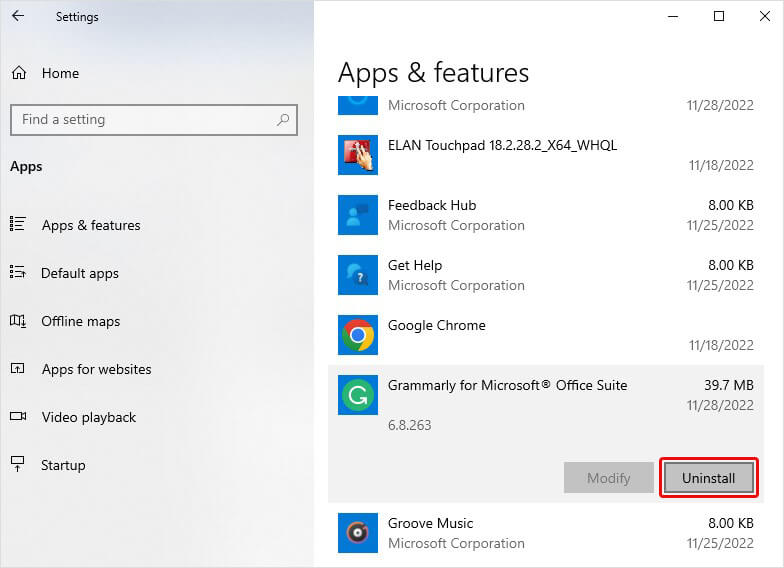
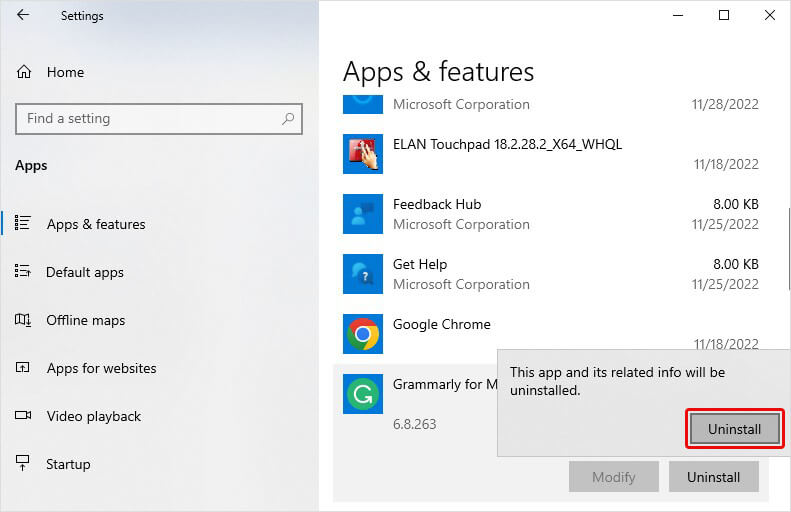
- A pop-up will appear; click Uninstall to proceed.
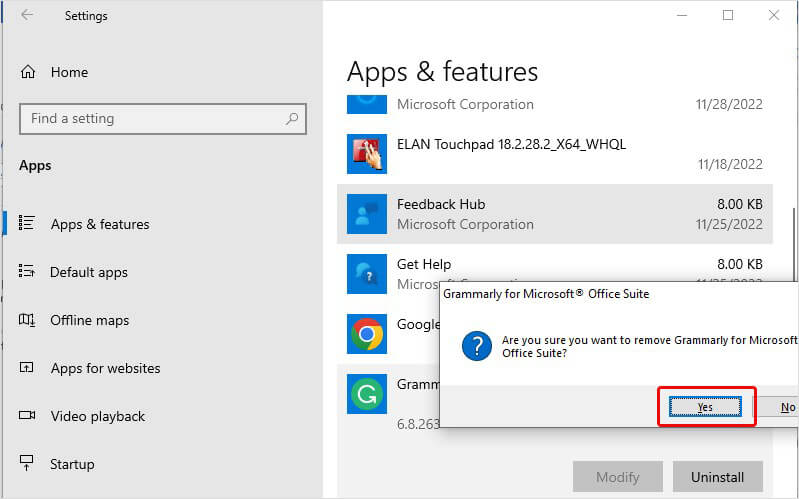
- Click Yes to confirm the uninstallation.
#8 Disable unnecessary Visual effects
Windows 11 contains many visual effects, including shadow effects and animations while opening and closing the system, but they can be disabled or turned off. To do so, follow the given steps:
Disable Visual Effects:
- Open Windows Search, type Adjust the appearance and then click Adjust the appearance and performance of Windows.
- On the next prompt, follow Visual effects > Custom.
- Select the options you don't want to keep running and click Apply.
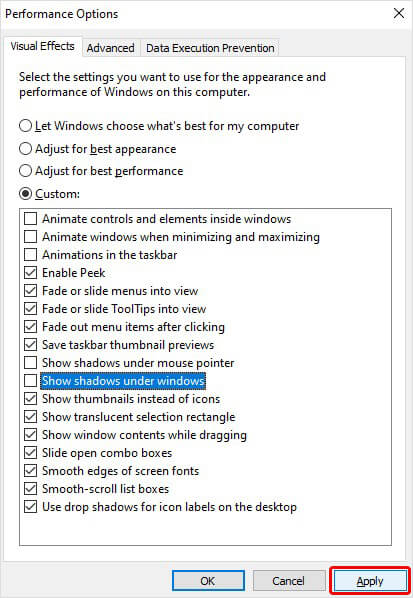
- Restart the system and check if it helps fix the “Windows 11 very slow” issue.
Adjust the Performance:
- Go to Windows Search, type Performance, and then click Adjust the appearance and performance of Windows.
- Next, under the Visual Effects tab, select Adjust for best performance > Apply.
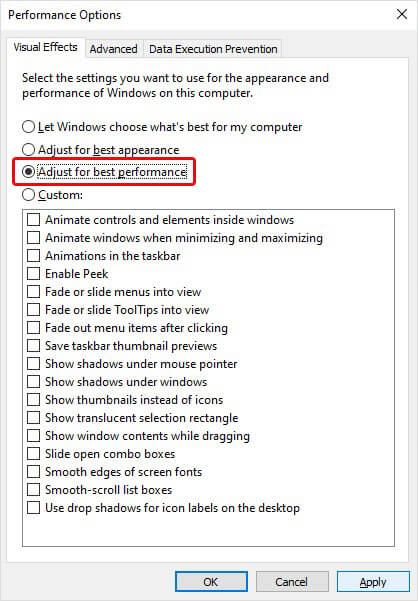
- Reboot your system and check if it boosts your system performance.
#9 Pause OneDrive Syncing
When you set up your system, you can choose where your files should be saved by default. You can save them on your system or OneDrive and sync files between locations. If you choose to sync files to OneDrive, it will let you access your files on a machine or device and let you be sure that your files are backed up. Unfortunately, syncing your files between the system and OneDrive can slow down your system. Hence, try giving OneDrive syncing a pause and see if it helps. To do so, follow the given steps:
- On Taskbar, look for OneDrive and open it.
- Go for Help & Settings > Pause syncing and then choose the pause duration.
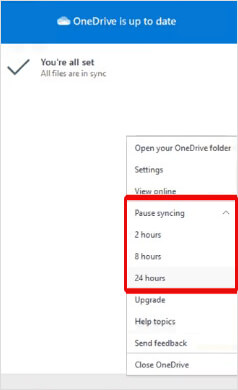
Reboot your system and notice if your system performance is better.
#10 Scan your PC for malware
One possible reason for your Windows 11 running very slow is malware or virus attacks on the system. If your system is infected or has malicious software installed, it could run slowly or lag. Additionally, you may experience unusual activities on your system, like several programs running or closing automatically, files disappearing, etc. You can scan your system for malware infection using Windows Security feature. Follow the steps mentioned below:
- Open Settings by pressing Windows + I and then follow Update & Security > Windows Security > Virus & threat Protection > Quick scan.
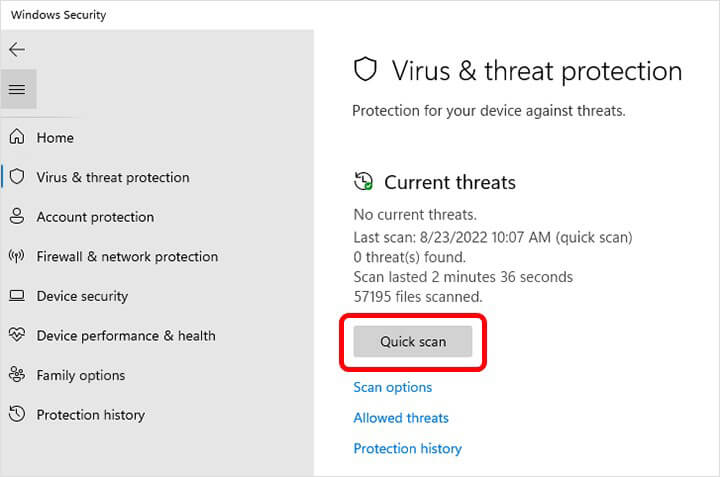
- Once the scanning is done, run an advanced scan or contact Microsoft Support as per the results & recommendations of the scan.
#11 Perform System Restore
You can perform a system restore if the Windows 11 slow issue isn't solved after all the above methods. Running System Restore helps restore your system to a previous working or default state. However, returning to an older or default configuration will remove all the changes related to the device manager, such as drivers, settings, files, apps, updates, and more. Therefore, you can back up your system data and other important stuff before proceeding with this method. To perform System Restore, follow the given steps:
- Open Windows Search, type Create a restore point and click Open.
- On the System Properties window, move to the System Protection tab and click System Restore.

- Click Next on the Restore files and settings window by selecting the recommended restore point or choosing a different one.
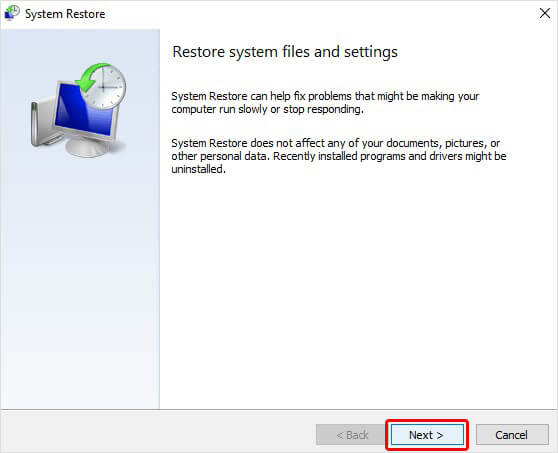
- After that, select the restore point and click Scan for affected programs.
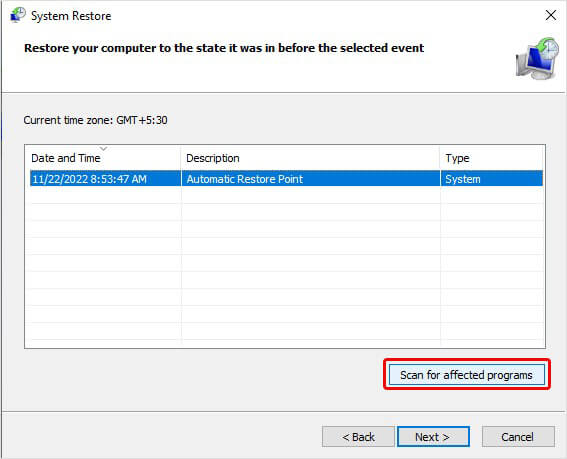
- It will show you the list of programs affected during the process.
- Click Close > Next > Finish to complete the process.
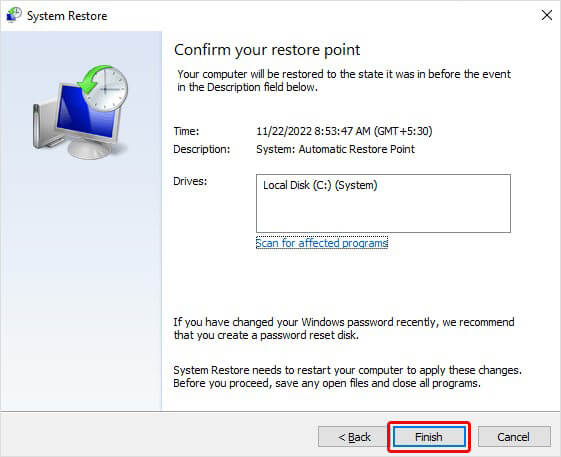
- Once the process is completed, reboot your system and check if your system performance is better now.
#12 Reinstall Windows 11
If your Windows 11 is running slow due to some software issue or OS problem, you may reinstall the Windows. It will help you fix slowness issues and speed up Windows 11. However, reinstalling Windows may cause data loss. Therefore, it's advised to back up your data stored on the system and reinstall Windows 11.
Speeding up Windows 11 is easy when you follow the right tactics and practices. All the methods discussed above will certainly help you fix Windows 11 slow issue. You can try them out and see what works best for you.


 9 min read
-1505.jpg)
