Your Windows system and the data in it may mean the world to you. However, it is still a device that can run into various problems. Here, we're talking about the 'no display on boot' issue. Several users have posted queries stating that they can turn on the computer but can't see anything on the screen. The display appears blank. Even the GPU fan spins at full speed, but there is no display. So, why is it happening? How can it be fixed?
We dug deeper into the matter and found some tips and tricks that may help. However, before that, let's understand the different states of no display on boot problems.
No Display on Boot: Possible Causes
The primary reason you get no display on your PC could be damaged or loosely connected cables. Other reasons may include incorrect display configuration, faulty or problematic GPU or RAM, incorrect BIOS configuration, faulty peripheral devices, or damaged PSU (Power Supply Unit).
Let's catch up on the best possible fixes for the "no display on PC" problem.
How to Fix No Display on Boot?
Follow the given troubleshooting steps and check your hardware and software to fix the blank screen error on your system.
#1 Check all Connections
You should check your power connections if you face the "no display on boot" error. There might be some connection errors between the power sockets and the PC/monitor.
If you're using Desktop:
- Check if all the wires, ports, and adapters are connected properly. In addition, check if the video and power cables are firmly attached at both ends.
- Now check if the power light on your monitor is on. If the light is ON, reboot your system and press Windows key sequence (Windows + Ctrl + Shift + B command) to wake the screen. It will restart your Graphics driver.
- If there is no light on the monitor, check if the cables connected are damaged. Try the cables on another PC or attach other cable cords to your system.
- If the cables work fine, check if you're using the correct input source.
- If everything seems fine, there may be some issues with your monitor. First, try connecting another monitor to your system.
If you're using a Laptop:
- Remove your laptop from the docking station if it has docked, and ensure that the lid of your laptop is open after undocking.
- Connect an external monitor and check if it is properly connected and turned on.
- Check for loose connections, damaged cables (VGA, HDMI, DVI, Thunderbolt, etc.), or faulty adapters (for example, DVI to VGA)
#2 Reset BIOS
If the above diagnosis doesn't help you overcome the 'no display on PC' issue, try resetting your BIOS settings. This method will help you check if the RAM is at fault here. When you power on your PC, it runs POST (Power-on-self-test), verifying if all hardware is identified before BIOS initiation. It also displays on-screen if the RAM is working fine. As long as your monitor receives power, you may access the BIOS utility and reset it to fix multiple issues.
Follow the given steps to reset BIOS via the BIOS utility
- Turn on your system with the Power button and press the BIOS key (usually F2/F8/F10/F11/F12/Del). You can also check for the BIOS key online by visiting your device manufacturer's site.
- Next, search for Restore Defaults, Reset, Load Optimized Defaults or a similar option given on the screen.
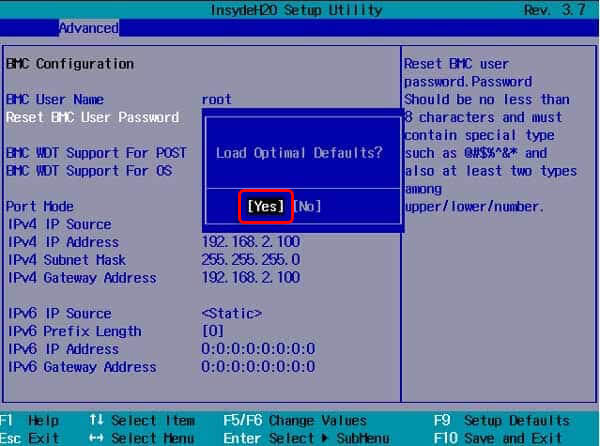
- Click Yes if prompted and click Save and Exit or a similar option.
#3 Check the Voltage Selector Switch
The Voltage Selector Switch may be set to the correct switch, but it's worth checking. It is a physical button given at the back of the PC. The switch lets you balance your device's internal circuit with the input voltage. If it is set improperly, it may affect your system's boot function.
Usually, the default value set by the Voltage Switch doesn't need any changes as it matches your country's requirements. But if you bought it from an overseas dealer or just moved to a new country, you would need to adjust the Voltage Selector Switch considering the country's requirements. For example, your system may happily work for 110 volts. You can also refer Foreign Electricity Outlet Guide.
#4 Disconnect Peripherals
Sometimes, there may be a conflict between the peripheral devices, causing a black (blank) screen or no display on your screen. It includes your Bluetooth, speakers, mouse, webcams, external storage drivers, keyboard to cameras, scanners, etc.
- Turn off your computer and disconnect all the peripheral devices.
- Now, turn it on again and see if the issue resolves.
- If there is no issue, figure out which peripheral device might be causing the issue by plugging those devices into your system.
- Once you find out the problem, replace it with a new one.
#5 Roll Back or Update Display Adapter Driver
An outdated, corrupt, or incompatible device driver may cause no display on a PC or laptop. Rolling back or updating these drivers may fix the problem. For this, you would need to boot your PC into Safe Mode.
Next, follow the given steps:
Roll Back Driver:
If you've recently installed the driver updates, and the issue started occurring after that update, rolling back the driver may fix the problem.
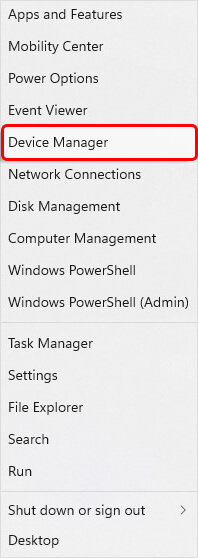
- Press Windows + X and click Device Manager.
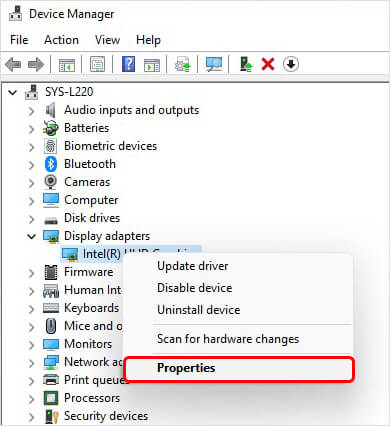
- Next, expand the Display adapters category. Then, right-click on the device and open its Properties.
- Navigate to the Driver tab and click Roll Back Driver > Yes.
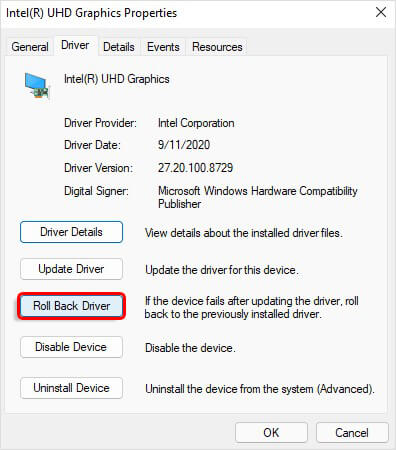
Now, turn off your PC and reboot it to see if the problem resolves.
Update Display Driver
If your device is missing the latest driver software, try to install them with the following steps:
- Open Device Manager from the Search panel in your system.
- In Device Manager, expand the Display adapters category.
- Right-click on the device and click Update driver.
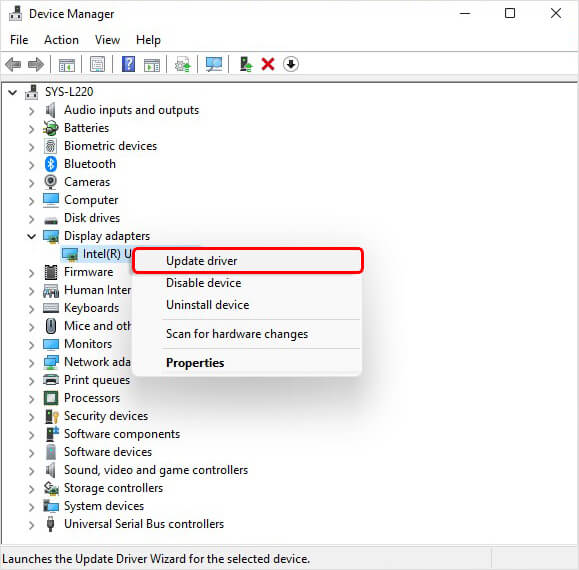
- Next, click Search automatically for drivers.
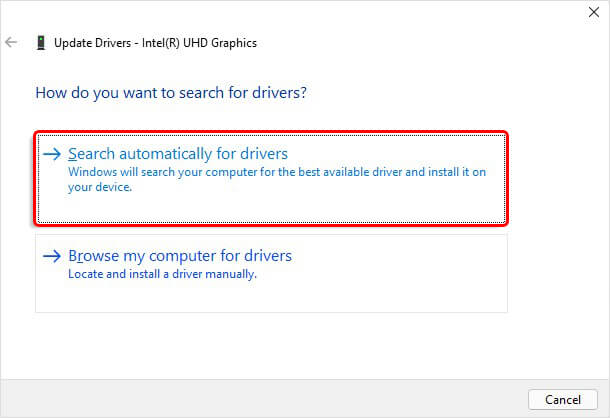
- You'll be prompted with the latest driver software available. Install it and reboot your system to check if the issue is fixed.
#6 Check Temperature
You can also check your CPU performance in BIOS to determine if no display on boot issues occurs due to PC overheating. However, this method will only work if you can access your system in Safe Mode. Follow the given steps:
- If you're in Safe Mode, open Settings and navigate to Update & Security.
- Next, go to Recovery and then click Advanced Startup > Restart now.
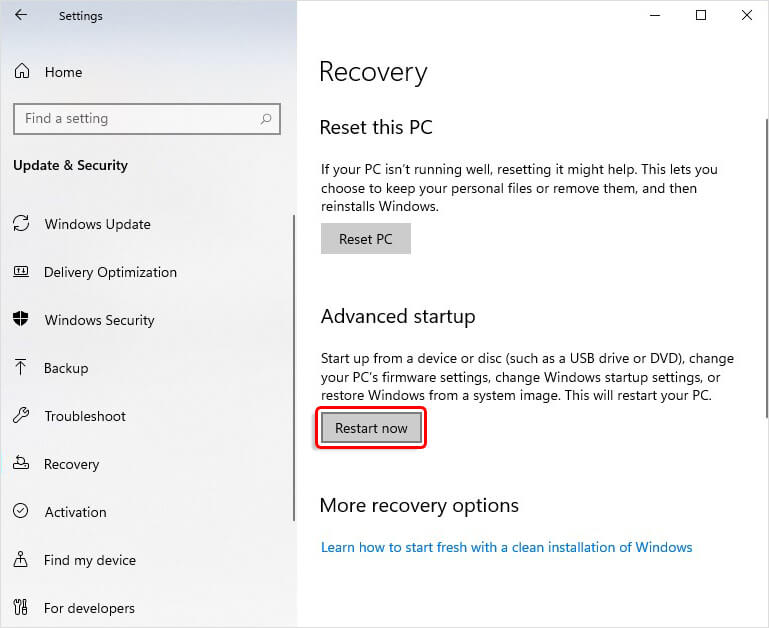
- Later, you'll see the 'Choose an Option' screen.
- There, click Troubleshoot and further follow Advanced Options > UEFI Firmware Settings.
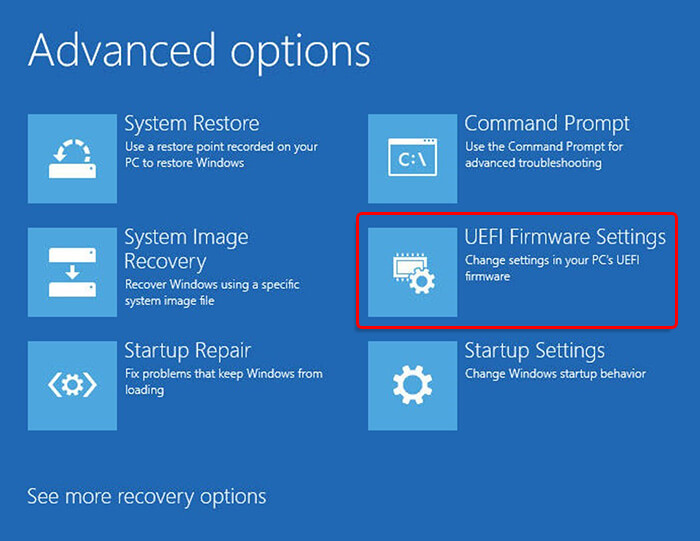
- When you see the BIOS page emerging, click PC Health Status, System Hardware Monitor, or similar options. (The category name may vary depending on your system brand.)
- There, check if the CPU temperature is under 70°C or 158°F.
If the problem persists, this may indicate physical damage to your system. You must submit the system to a service center for further diagnosis.


 9 min read
-1505.jpg)
