Sometimes, you need to export the calendar from Exchange mailbox due to various reasons. In this article, we will discuss different methods with stepwise instructions to export calendar from a user mailbox, shared mailbox, or public folder in an on-premises Exchange Server.
Why you need to Export Calendar from Mailbox?
There are various reasons why you need to export the calendar. Here is a list of some common ones:
Data Backup: Although you would have the server backup, the restore process can take considerate amount of time when restoring the entire backup. You can take backup of only important calendars for quick and easy restore.
Migration to Another System: When you need to move to another platform, like Exchange Online or a newer Exchange Server, you would need to export the calendar information separately.
Merging the Calendars: You have a number of shared mailboxes and need to merge the calendars into one shared mailbox or group.
Methods to Export Calendar from Exchange Mailbox
You can follow the below methods to export calendar from mailbox in Exchange Server.
Method 1: Export Calendar via PowerShell Commands
You can use PowerShell commands in the Exchange Management Shell (EMS) to export the calendar from mailbox. For this, you would need administrative access to the server and scripting experience. You also need to configure the right roles and permissions to execute the commands. Below are the required roles and permissions:
- Organization Management Role
- Recipient Management Role
- Mailbox Export Role
To assign these roles, you can run the PowerShell commands given below in the Exchange Management Shell.

The above command will create the Import Export role. You can use the below command to assign the role to the specific user.

Once the commands are complete, you can check the user’s permissions to ensure that these are applied. In some cases, it might take some time for the changes to take effect.

Once this is done, the user will have the right permissions to export from a mailbox. Now, you need to setup the share to be used as a destination for the export. Exporting via PowerShell must always have a network share destination with the right permissions. After creating a folder, follow the below steps:
- Right-click on the folder and click on Properties.
- Click on the Sharing tab and click on Advanced Sharing.
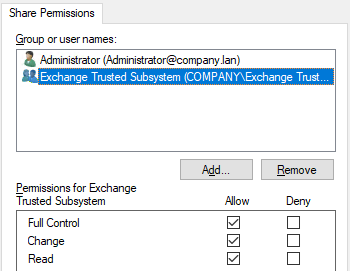
- Enable Share this folder and click on Permissions.
- Remove everyone from the list and add the following Active Directory group, along with the user who will be exporting the calendar.
- Exchange Trusted Subsystem

- In the permissions underneath, make sure that the Full Control permission is ticked.
- Click OK > OK.
- Then, click Close.
Now, you can go ahead and export the calendar. For this, open the Exchange Management Shell (EMS) and run the following command:

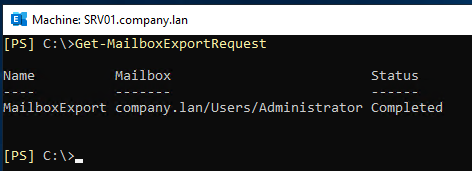
Depending on the size of calendar, it may take some time to complete. However, you can see the progress by running the Get-MailboxExportRequest command in the Exchange Management Shell (EMS).

You can also create scripts to export multiple calendars and from different sources.
Method 2: Export Calendar via Outlook Application
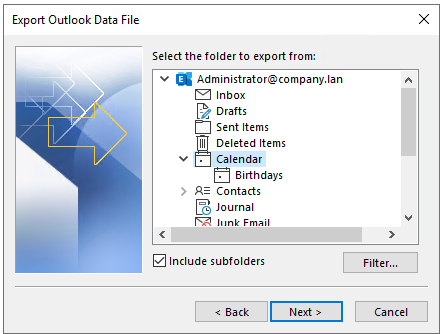
You can also export calendar to a PST file using the Outlook application. For this, you (the user) must have full access to the mailbox or resources and the profile of Microsoft Outlook will be configured on the computer. After this is done, open Microsoft Outlook and follow the below instructions:
- Click on File > Open & Export and click on Import/Export.
- Click on Export to a file and click Next.
- Select the Outlook Data File (.pst) option and click Next.
- Select the Calendar from the list and click Next.

- Select the destination of the file, click Next, and then click Finish. This will export the file to the selected destination.
Challenges of the Above Methods
There are some challenges that you may face when using the above methods. Below are the pros and cons of each method.
Exporting via PowerShell
- Pros
- Can be configured to export multiple calendars at once.
- Native to Exchange Server.
- Cons
- Can only export to PST.
- Need to configure special export permissions.
- Can only work with a mounted database or online Exchange Server.
- Scripting skills are needed.
- Limited functionality.
Exporting via Outlook
- Pros
- Easy to export with no skills needed.
- Native to the application.
- Cons
- Can only export to PST.
- Need to setup Outlook profile.
- Lengthy process to export from multiple mailboxes.
Method 3: Export using Third-Party Tools
- User-friendly interface for easier browsing.
- Minimal skillset needed.
- Easily handle multiple versions of databases.
- No need to have the Exchange Server online.
- Can export to multiple file formats, such as PST, EML, MSG, PDF, etc.
- Option to export to another Exchange Server or Microsoft 365 tenant.
- Can export/migrate user mailboxes, shared mailboxes, disabled mailboxes, user archives, public folders, and deleted and purged items from the database.
- Reduces the export/migration efforts to a minimum.
Conclusion
In this article, we have discussed the native in-built methods that are available in the Exchange Server and in Microsoft Outlook to export calendar from mailbox. We have also explored the pros and cons of the native methods. We have also mentioned a specialized EDB to PST converter tool that can simplify the export process as well as ensure consistency and validity of the data.


-to-Office-365-1733.jpg)
 4 min read


