In a hybrid model, both the local Exchange Server and the Exchange Online act as one. This allows to migrate mailboxes from local server to online and vice-versa. Although the hybrid is the smoothest method, it is also the slowest one.
After a successful migration from local Exchange Server to Exchange Online (Office 365), you can use the local server as the test machine for mailboxes. But this would involve having a server running for nothing. Therefore, you need to decommission the local server to complete the migration process.
Decommissioning the local Exchange Server after the migration helps you to,
- Reduce capital cost of the hardware and operational cost to maintain the servers and network.
- Follow the cloud-first strategy and go full cloud.
- Simplify the local setup by removing services and servers to benefit from the Service Level Agreement (SLA) that the cloud offers with collaboration and availability.
However, you cannot just decommission the server. There is a proper process you need to follow to smoothly decommission the server and the services. Below, we will go through the process of decommissioning the Exchange Server in a hybrid setup.
Process to Decommission the Exchange Hybrid Server
Below, we will discuss the step-by-step procedure to smoothly decommission the local Exchange Server after a successful migration in a hybrid setup.
1. Clear Off all the Mailboxes
First, you need to remove all mailboxes from the local server. To confirm that all the mailboxes have been migrated to the Exchange Online, you can use the Get-Recipient command as given below.

If the above command shows the Recipient Type as MailUser, then the mailbox is in the Exchange Online. But if the Recipient Type is UserMailbox, then the mailbox is on the local Exchange Server.
2. Remove the Hybrid Configuration
Next, you need to remove the hybrid configuration. You can uninstall the Hybrid Configuration Wizard (HCW) and also remove the hybrid connection from the local Exchange Server to the Exchange Online. For this, you can use the Remove-HybridConfiguration PowerShell command in the Exchange Management Shell (EMS).
.png)
This command will delete the hybrid configuration and the Active Directory object associated with it.
3. Remove Arbitration or System Mailboxes
If there are still some arbitration or system mailboxes, you need to remove or disable them. To remove arbitration mailbox, use the below command in the Exchange Management Shell (EMS).
.png)
To remove the mailbox database, use the below command:

As a best practice, you can also clear off any pending messages, which could either be stuck or not delivered. For this, use the below command:

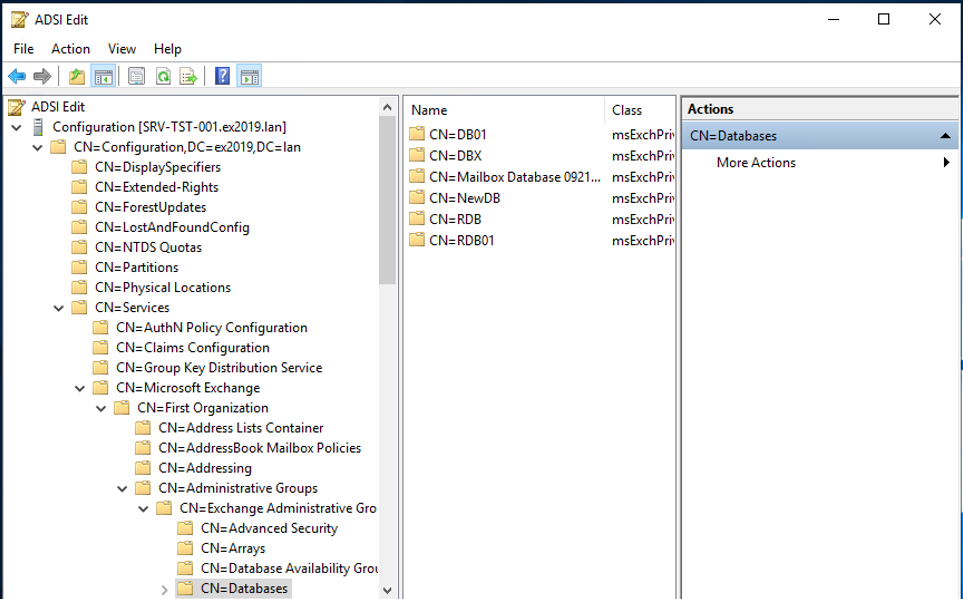
If, for some reason, you’re not be able to remove the mailbox role, you can remove the mailbox databases using the ADSIEdit. Here are the steps:
- Right-click on Start and click on Run. Type ADSIEdit.msc.
- Open Configuration/Configuration Services.
- Open Microsoft Exchange/
. - Open Administrative Groups and Exchange Administrative Groups.
- Open Databases and delete the desired databases from the list.

4. Uninstall the Exchange Server
After performing the above steps, you can now go ahead and uninstall the Exchange Server. For this, go to the Control Panel > Add and Remove Programs.
This way, you can smoothly uninstall the Exchange Server, along with any Active Directory configuration.To Conclude
As you have seen, removing and decommissioning the local Exchange Server after successful migration to Exchange Online need a proper procedure. You can follow the above-given step-by-step procedure to smoothly uninstall the Exchange Server in a hybrid setup. However, after the server is decommissioned, you may face a situation where some data has not been migrated or there are items in the litigation hold. Recovering such data is a big challenge as you need to restore the entire infrastructure from scratch, which would consume a lot of resources and administrative efforts.
In such cases, you can take the help of specialized EDB to PST Converter applications, such as Stellar Converter for EDB. This application allows you to open the Exchange Server database of any size, even without a running Exchange Server. You can then granularly export the data from the database file directly to Exchange Online or live Exchange Server database. You can also export the EDB data to PST and other file formats. The application can process user mailboxes, user archives, disabled mailboxes, and even public folders. With this application, you can also retrieve purged/deleted items.


 5 min read


