There may be several scenarios where you may find your Windows 10 PC stuck on a booting loop or showing a blue screen error. Reasons could be anything like software corruption, faulty device driver, hardware failure, or malware attack. Irrespective of the reason, you need to fix a non-booting PC or at least restore the data in it. And that's where Windows Recovery Media can help you out.
Using Windows 10 Recovery Media, you can boot into your system quickly and fix your non-bootable PC. However, the downside is that when you use recovery drive to fix crashed or unbootable PC, it brings your system to its default configurations. The files, software/apps or programs installed later will be gone forever. Therefore, make sure you always take backup of your recovery media’s data before using it to boot a non-bootable PC.
What is a Windows Recovery Media?
Windows Recovery Media is a bootable media drive that keeps a backup of the system's original factory condition as configured by its user. It can be created using a DVD or USB drive. Windows 8 provides you a feature to create a system repair disk (CD or DVD), Windows 10 enables creating a recovery media (USB/DVD). Both can be used to troubleshoot and reset your system.
The Advantages of a Windows Recovery Media
Windows Recovery Media helps you reinstall Windows on your PC when System Restore fails. It saves you the trouble of contacting the system manufacturer and bear the repair cost or pay Microsoft a hundred bucks for a new Windows license.
Another benefit of creating recovery media for Windows 10 PC is that it takes a lot less time to install Windows and system drivers.
The Disadvantages of a Windows Recovery Media
The recovery media can help you fix your unbootable or crashed Windows 10 PC, but it brings your system back to the default factory settings, and does not retain your files, settings, programs, etc. Reinstalling Windows 10 with a recovery media overwrites the system partition on which it’s installed. The other drive partitions may remain untouched, but to be on the safe side, we’d recommend you recover data from the non-bootable PC using a powerful Windows data recovery software.
Also Read: How to recover data from an Unbootable system/ Crashed OS?Pro Tip: As a best practice, you must keep a recovery disk ready so that when your system fails to boot or load Windows, you'd be all set to troubleshoot on your own.
What do you need to Create Recovery Media?
To create a recovery media on Windows 10, you need to have:
- A USB thumb drive of at least 32 GB
- Or, a DVD of at least 12GB,
How to Create Recovery Media for Windows 10 PC?
Here, we share two effective methods to create a bootable media recovery drive for Windows 10 PC.
Method 1: Create Recovery Media Using Windows Media Creation Tool
The most popular way to create recovery media is by using the Windows Media Creation tool. Microsoft has a dedicated service page from where you can download the Windows Media Creation tool. Follow the given steps to create recovery media on Windows 10:
- Connect a new or formatted USB drive to your system.
- Go to Microsoft's official site to download the Windows Media Creation tool.
- Click 'Download tool now' button under the 'Create Windows 10 Installation media' section. (See Image 1)
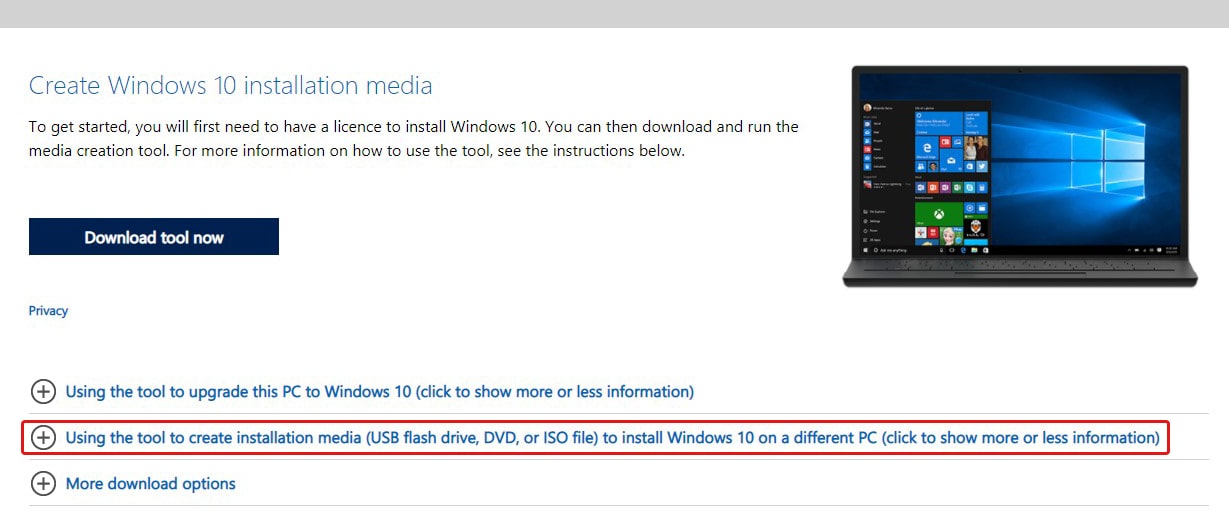
Image 1: Download media creation tool
- Windows 10 Disc Image (ISO File) will be downloaded. Open this file and accept the license terms that appear on the screen.
- Next, choose to 'Create installation media.' (See Image 2)
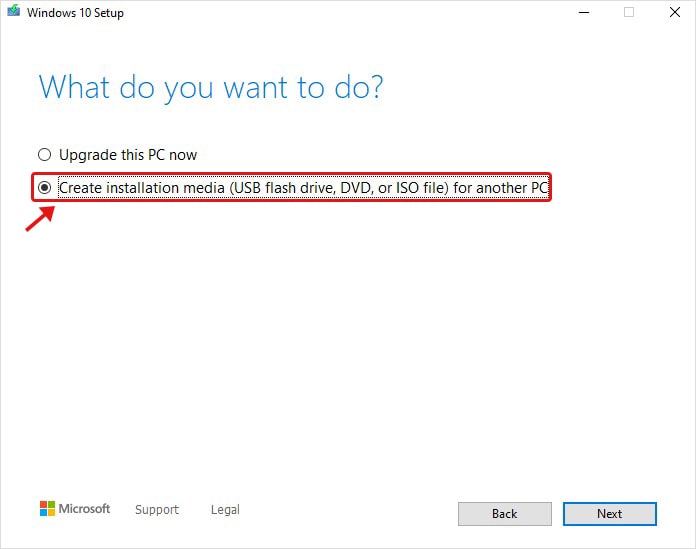
Image 2: Select 'Create installation media
- Now, choose Language, Architecture, and Edition of Windows 10 and click 'Next.' (See Image 3)
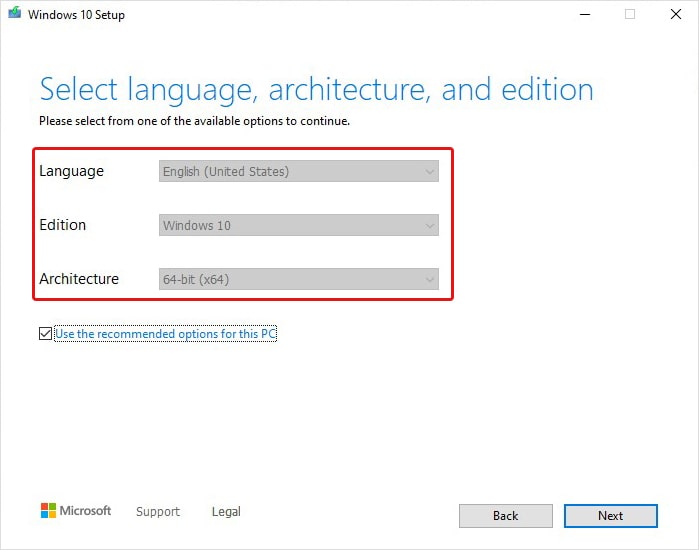
Image 3: Select language, architecture, and Windows 10 edition
- Once done, the program will apply the settings matching your current system automatically. (You can change these settings anytime)
- Choose which media you want to use and click Next. (See Image 4)
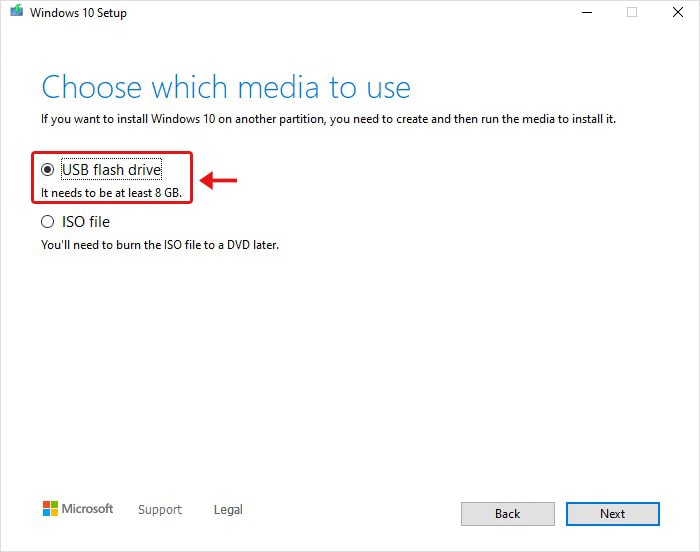
Image 4: Select media from the available options
- Select the USB with at least 8 GB of space for the latest Windows 10 version.
- It will delete everything on the drive.
Caution: Don't use a USB drive that contains your essential data, as this method will erase everything on the drive. Also, don't use your backup USB drive to create recovery media.
- Once you choose the USB drive, the creation of recovery media will start. Let the process end, and then click Finish to complete the process.
Also read: How to create a recovery media using DVD for Windows 10?
Method 2: Use the "Create a recovery drive' feature
If the PC is fully functional, you can follow this existing method in Windows 10. This feature helps you build a recovery media consisting of the OS (operating system), and programs come packed with the original installation. So, you can use this recovery drive as a backup in case your system fails.
Follow the given steps to create recovery media on Windows 10:
- Connect a new or formatted thumb drive to your system. (Read more to create recovery media using DVD.)
- Go to Start, type 'Create a recovery,' and press Enter to open this utility. (See Image 5)
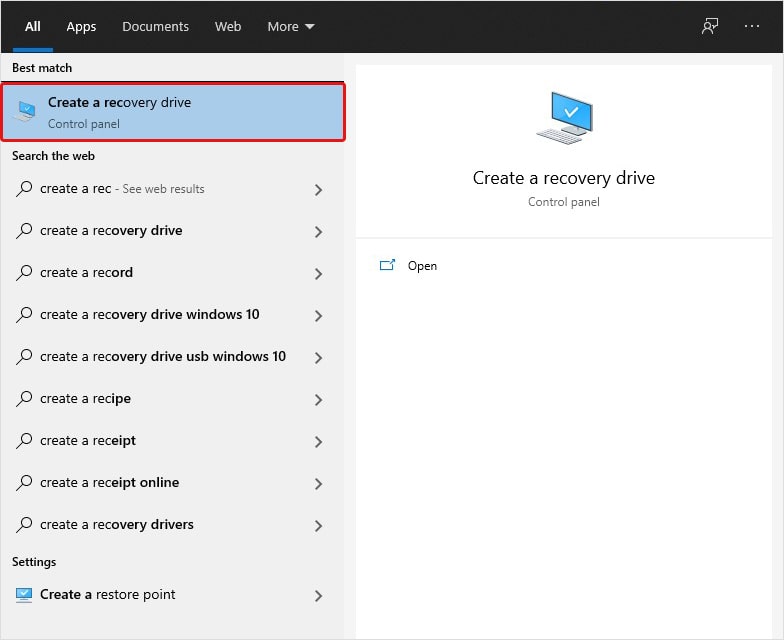
Image 5: Open Create a recovery drive utility
- Now, on the 'Create a recovery drive' wizard, click Next. (See Image 6)
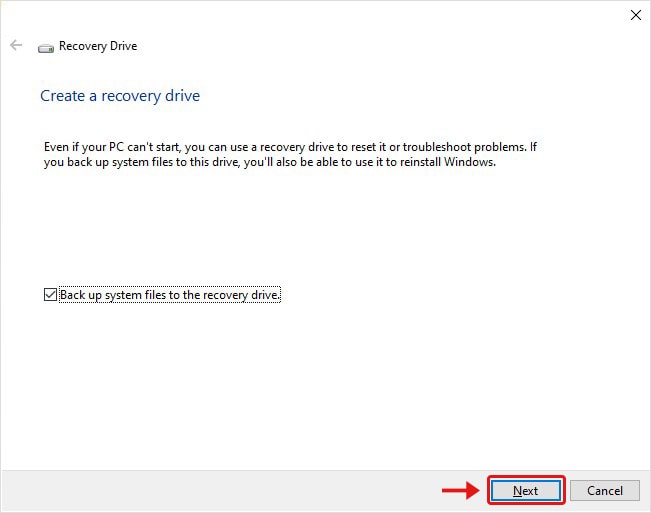
Image 6: Click Next on the 'Create a recovery driver' window
- Wait until the wizard gets ready to copy files to your thumb drive.
- Select the USB drive and click Next. (See Image 7)
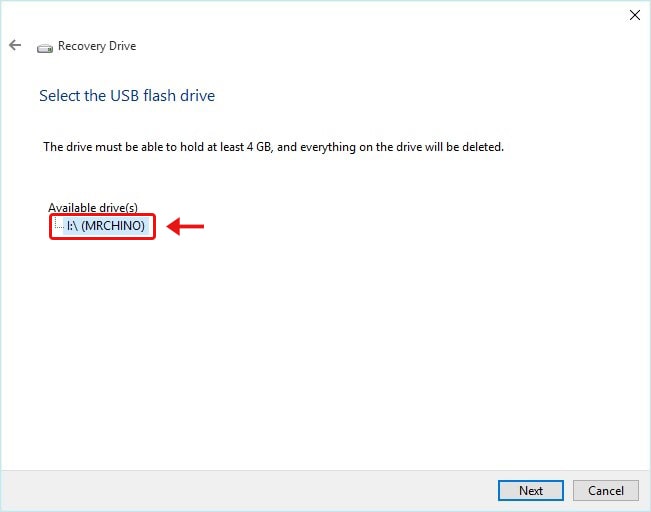
Image 7: Ensure the thumb drive is connected to the system should be at least 4 GB in size.
- The wizard will show a warning message about deleting everything on the connected thumb drive. Click 'Create' to proceed. (See Image 8)
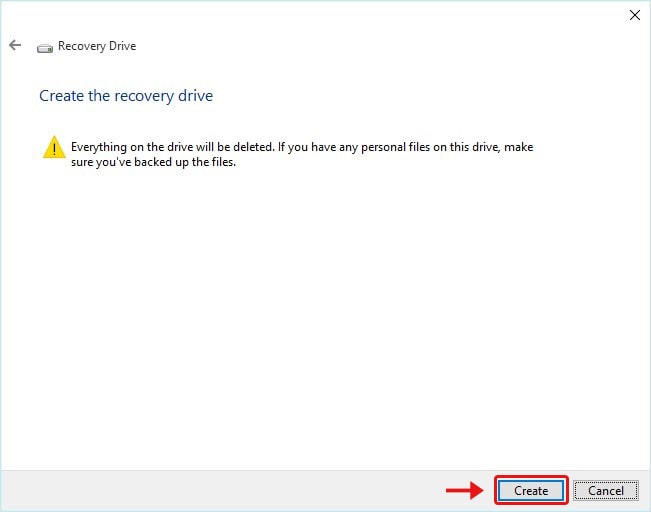
Image 8: Warning message will appear on the wizard
- The process to create a recovery media drive will initiate. Wait until the process is completed.
- Once your recovery media is ready, click 'Finish' to complete the process. (See Image 9)
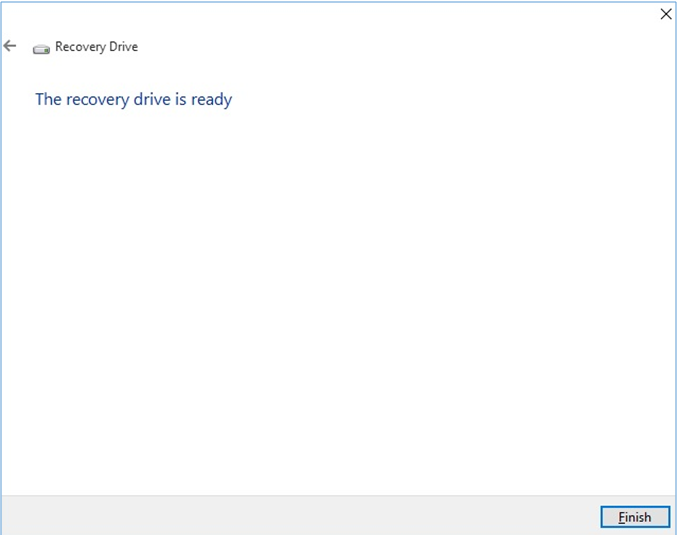
Image 9: Click Finish to complete the recovery media creation process
Method 3: Opt for Powerful Windows Data Recovery tool
Both the above methods are the easiest ways to create a recovery media; however, not ideal for everyone. Sometimes, you may find difficulty creating a bootable recovery drive. The reasons could be anything such as corrupt software, or outdated device drivers installed on your system. In such scenarios, you can opt for a powerful data recovery software, such as Stellar Data Recovery Professional. This DIY software features a 'Create Recovery Drive' utility, which helps you build bootable media. To do so, follow the given instructions:
- Connect a new or formatted USB drive to a functional PC.
- Download, Install, and run Stellar Data Recovery Professional on the system.
- Click the Waffle icon on the top-right of the 'Select What to Recover' screen.
- Then select 'Create Recovery Drive.' (See Image 10)
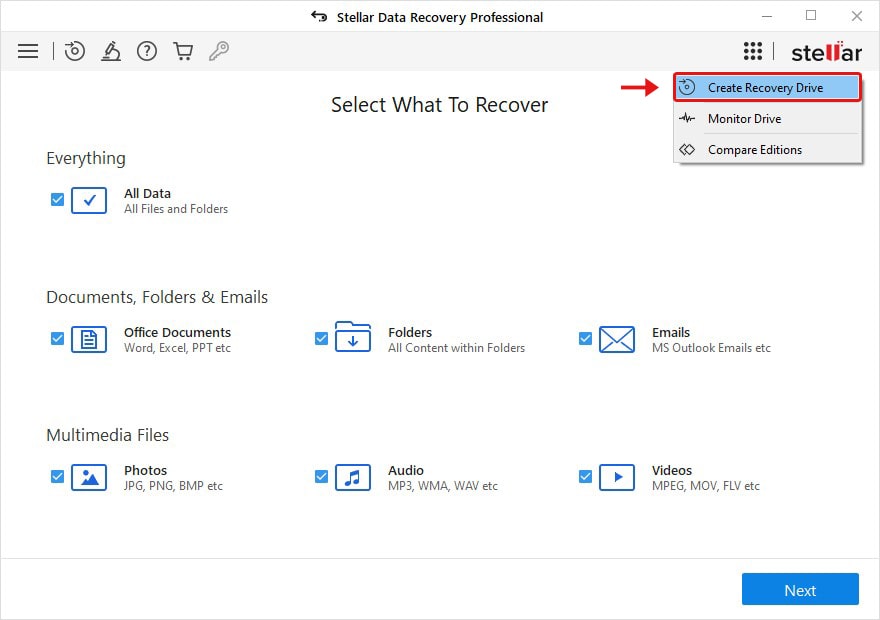
Image 10: Choose 'Create Recovery Drive' on the Select What to Recovery Screen
- The 'Create Recovery Drive' dialog box will open. Select the USB drive connected to your system and proceed. (See Image 11)
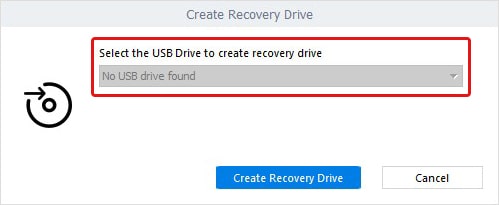
Image 11: Select USB drive to create a recovery drive
- Once the process is completed, your bootable media drive will be ready.
Important Note: The bootable recovery media created with Stellar Data Recovery Professional will not help you fix the unbootable PC. However, it can efficiently recover data from a non-bootable or crashed Windows 10 PC.
You may also check: What to do if you are unable to create and activate bootable USB media through Stellar software?EndNote:
Conclusively, the recovery media drive keeps a copy of the Windows environment on an external source, such as a USB drive or DVD. It helps you reinstall Windows 10 on your PC to repair your system when System Restore can't resolve the problem. In this post, we've shared the most effective methods to create recovery media, including using Windows Media Creation Tool, and 'Create a Recovery Media' utility' on Windows, and a powerful data recovery tool, Stellar Data Recovery Professional. However, the recovery media created using the professional data recovery software will help you recover your data but won't fix a crashed or non-bootable PC.


 3 min read


