In Microsoft Exchange Server, a Recovery Database or RDB is used to extract mailboxes or mailbox items from a restored database as a part of disaster recovery operation. The extracted data from RDB can be merged into an existing mailbox or exported to a folder. It also allows to recover data from copy of the mailbox database or database backup, without disrupting the users’ access to the database.
Unlike standard mailbox database, RDB is only accessible by Exchange administrators. It cannot be accessed by end-users through any application, email client (such as Outlook), or device. The admins can also mount the recovered data as recovery database to recover individual mailboxes or items in a mailbox.
An RDB can only be used for Exchange Server version 2016 and higher. Also, the target mailbox that will be used for merging and extracting data must belong to the same Active Directory (AD) forest as the mounted database in RDB. In addition, the logical information related to original mailbox database and mailboxes in the database must be intact in AD.
Now, let’s see how to create a Recovery Database (RDB) in Exchange Server.
Steps to Create a Recovery Database in Exchange Server
You can use the New-MailboxDatabase PowerShell cmdlet to create a recovery database (RDB) in Exchange Server. Follow the steps given below to create a Recovery Database:
Step 1: Restore Database from Backup
First, you need to restore the database from the backup. Here, we will be using the Windows Server Backup to restore the most recent database backup. If you have created a database backup by using Windows Server Backup, follow these steps to restore the backup version stored on the same server or another location.
- Open Windows Server Backup and click on Recovery.
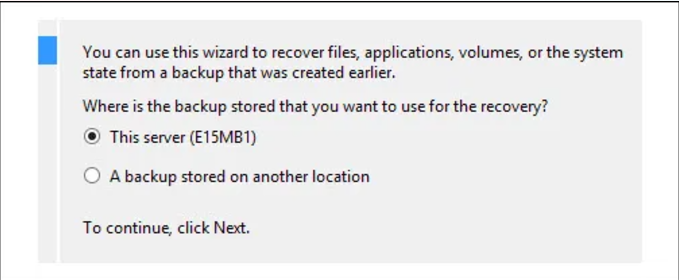
- Then, choose the location where database backup is stored. If the backup is stored on the same server as the database, choose ‘This server (SERVERNAME)’ option. If it is on another server or storage location, choose ‘A backup stored on another location’ and click Next.
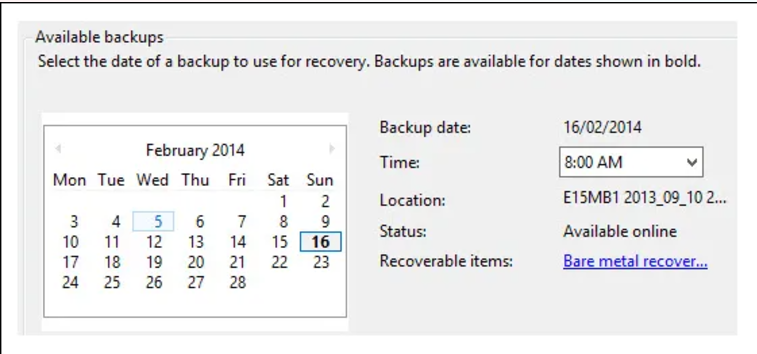
- Select the most recent backup date and time. The backup date should be highlighted in bold.
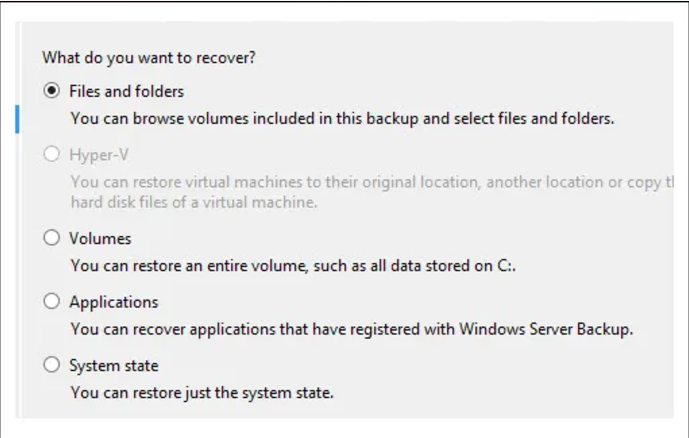
- Now, choose the Files and Folders option to restore the database and log files.
- From the list, choose the database and log files that you want to restore for RDB.
- Select a location where you want to restore the database and log files backup. You may choose the original location or save it at another location.
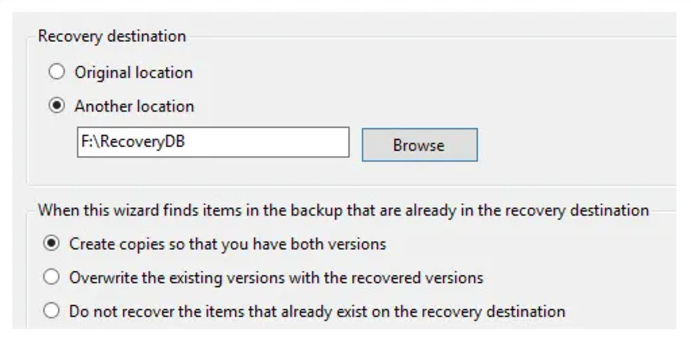
- Confirm and then enter required admin credentials. Then, click on the Recover button to start the database restore process. Go to the selected location and confirm if the database is restored successfully.
Step 2: Check Database State
After restoring the database from backup, check the database status by using the following command.
If the output of the cmdlet displays Dirty Shutdown in the state field, you can’t mount the database. You need to bring the database to the Clean Shutdown state. For this, you can perform the Soft Recovery. The command is as follows:
After Soft Recovery, check the state of the database again by using the Eseutil /mh command.
If the Soft Recovery fails to bring the database to consistent or Clean Shutdown state, you can perform the Hard Recovery process. However, this process can lead to data loss as it will purge the data that is deemed as corrupted. The command for performing Hard Recovery is as follows:
The hard recovery process will bring the database to clean shutdown state.
Step 3: Create a Recovery Database
Now that the database is restored from backup and is in the Clean Shutdown state, you can use the New-MailboxDatabase cmdlet to create a recovery database (RDB). The syntax is as follows:
In the above command, replace the locations of EDB file and Log file with the locations where your files are located.
To verify that recovery database is successfully created, run the following command:
The command output should display the Recovery Database in the list.
Step 4: Mount the RDB on Server
Now, you can mount the Recovery Database on the server by using the following command:
To check if the Recovery Database is successfully mounted, run the following command:

How to Restore Exchange Mailboxes using the Recovery Database?
Once you have created a recovery database and mounted it on the server, you can use it to restore Exchange mailboxes. Here’s how:
First, you need to check if the database contains the mailboxes you want to restore by using the following command:
From the command output, find and note the GUID name of mailboxes you want to restore.
Now, you can use the New-MailboxRestoreRequest command as given below to restore the mailbox or mailbox items (using the GUID name of the mailbox) from RDB to production (target) mailbox:
You can also restore the mailbox to the Archive mailbox by using the -TargetIsArchive parameter with the command (see the below example).
If you want to extract a specific folder, you can use the -IncludeFolders parameter with the command (see the below example).
If you want to exclude any specific folders from the mailbox, then you can run the command with the ExcludeFolders parameter.
After creating the mailbox restore requests, you can check the status of the requests by using the Get-MailboxRestoreRequest cmdlet.
Once the mailboxes are successfully restored, you can manually remove the requests by using the following command:
Difference between Standard Database and Recovery Database
|
Standard Database |
Recovery Database |
|
It stores user mailboxes and mailbox items. |
It restores recovered mailboxes and mailbox items. |
|
Users can access their mailboxes stored in the standard database. |
End-users cannot access their mailboxes in Recovery Database unless they are restored. |
|
Mailboxes in the standard database are used to send/receive messages. |
Mailboxes in the RDB cannot send/receive messages. |
|
This database can be created using Exchange Admin Center (EAC) and Exchange Management Shell (EMS). |
This database can be created using Exchange Management Shell (EMS). |
|
Online maintenance can be performed on standard database. |
Online maintenance is not performed for RDBs. |
|
Copies of a standard database can be created. |
Copies of RDB cannot be created. |
Conclusion
A Recovery Database in Exchange Server helps to mount a restored database and recover missing mailboxes and mailbox items after the retention period is elapsed. Above, we have explained the process to create a Recovery Database and to restore mailboxes using the recovery database. However, it requires database backup and multiple steps to complete. In addition, you cannot use it to recover mailboxes from a damaged Exchange database (EDB) or multiple databases.
For such cases and in the absence of backup, you can rely on Stellar Repair for Exchange. This Exchange recovery tool helps you extract mailboxes from damaged, corrupt, or inaccessible Exchange mailbox database (EDB) file and saves them in PST. It does not require any database backup, log files, or additional permissions to work. You can also export the extracted mailboxes and mailbox data, including Public Folders, directly to mailboxes on a live Exchange server.


 6 min read