A bootable installer for macOS refers to an external drive that contains an installable version of the macOS operating system. It allows users to install or upgrade macOS on one or multiple Macs by booting directly from this external media.
Additionally, a bootable USB installer lets you set up the latest macOS beta, install macOS across multiple devices, or have an emergency disk ready in case your Mac runs into issues.
If you want to create a bootable USB to install macOS Sonoma, Ventura, Monterey, Big Sur, Catalina, Mojave, and High Sierra, this post is for you. This article will guide you through the process of creating a bootable installer for the Mac operating system.
What You Need to Create a Bootable USB macOS Installer?
Before you start, you need to keep the following things handy:
- A working Mac to create the macOS USB installer.
- A USB flash drive or any other external drive formatted as macOS Extended, with storage capacity of at least 16 GB.
- Downloaded installation file of the macOS version for which you want to create the bootable USB installer.
- A stable internet connection for downloading and installing the OS files.
Downloading the macOS Installer File
The quickest way to get a macOS installation file is through Apple's App Store. You can typically get these files from the Software Update section in System Preferences or the App Store.
However, depending on the current version of your Mac, the availability of older macOS versions for download may be limited based on the current version of your Mac.
For macOS Sonoma, Ventura, Monterey, Big Sur, Catalina, Mojave and High Sierra
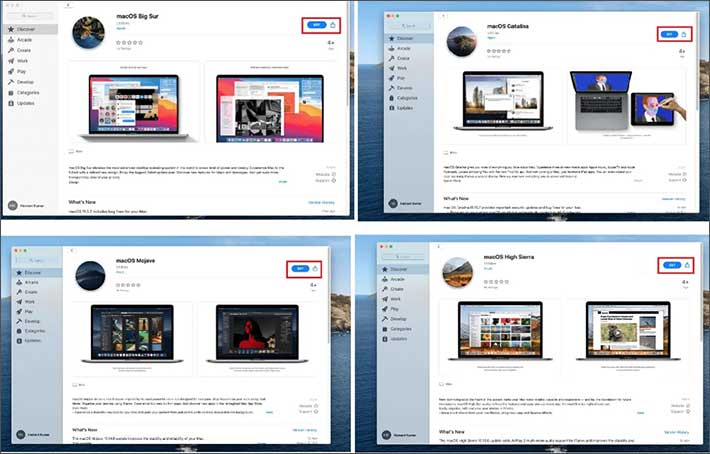
To get the installer for specific macOS versions, simply navigate to the Apple App store and download it from there. Follow the below steps to get the installer file for macOS Sonoma, Ventura, Monterey, Big Sur, Catalina, Mojave and High Sierra:
Step 1: Launch the App Store on your Mac.
Step 2: In the search field, type the specific OS installer version you want and hit Return.
Step 3: Next, click on Get and wait for the pop-up window to appear.
Step 4: Finally, click Download to confirm.
For Older macOS Versions
Apple offers downloadable dmg files for older macOS versions, which must be accessed through Safari. Upon downloading, a disk image file titled InstallOS.dmg will appear. Your next step is to find the pkg installer contained within this disk image to proceed with the installation.
If you prefer a previous version of macOS, the necessary installation files are accessible via the App Store. For your convenience, macOS Mojave and macOS High Sierra can be downloaded using the following links:
Simply select the desired link to go to the App Store. Proceed with the download by clicking Get, and after the confirmation pop-up, click Download. The installer will be moved to your Applications folder once the download is complete.
Creating a Bootable USB Installer Using Terminal
You can use the Terminal to create a bootable USB installer for Mac. Post Maverick, creating a bootable USB installer for macOS requires a single command: createinstallmedia.
Note: The createinstallmedia command erases everything on your external USB drive. So, make sure you have nothing stored on the USB.
Here’s the list of createinstallmedia commands for different macOS versions:
Sonoma
sudo /Applications/Install\ macOS\ Sonoma.app/Contents/Resources/createinstallmedia –volume /Volumes/MyVolume
Ventura
sudo /Applications/Install\ macOS\ Ventura.app/Contents/Resources/createinstallmedia –volume /Volumes/MyVolume
Monterey
sudo /Applications/Install\ macOS\ Monterey.app/Contents/Resources/createinstallmedia –volume /Volumes/MyVolume
Big Sur
sudo /Applications/Install\ macOS\ Big\ Sur.app/Contents/Resources/createinstallmedia –volume /Volumes/MyVolume
Catalina
sudo /Applications/Install\ macOS\ Catalina.app/Contents/Resources/createinstallmedia –volume /Volumes/MyVolume
Mojave
sudo /Applications/Install\ macOS\ Mojave.app/Contents/Resources/createinstallmedia –volume /Volumes/MyVolume
High Sierra
sudo /Applications/Install\ macOS\ High\ Sierra.app/Contents/Resources/createinstallmedia –volume /Volumes/MyVolume
After downloading the required macOS version and chosing the specific createinstallmedia command, proceed as follows:
Step 1: Connect the USB flash drive to your Mac.
Step 2: Launch Finder and from the left bar, click Applications, and select Disk Utility.
,
Note: If you are using High Sierra or later macOS versions other than Big Sur, click the View button on the top-left corner and select the Show All Devices option from the drop-down menu.

Step 3: Select the USB drive or external drive in the Sidebar (Select the root drive and not the volume).
Step 4: Click Erase.
Step 5: Select Mac OS Extended (Journaled) as the Format and GUID Partition Map as the Scheme.

Note: Your drive will be shown as ‘Untitled’ by default, rename it for convenience (You’ll need to replace ‘MyVolume’ in the createinstallmedia command with your drive name).
Step 6: Again, click Erase and wait while Disk Utility creates the partition and prepares the USB drive.
Step 7: Click Done when finished. Now you’re ready to create your bootable installer.

Step 8: Launch Terminal (Press Command + Spacebar and type Terminal in the search bar).

Step 9: Copy the createinstallmedia command for the respective macOS version you are installing into Terminal.
Step 10: Replace MyVoume in the createinstallmedia command with your drive name and hit Return.
Step 11: When prompted, type the Admin Password of your Mac and press Return.

Step 12: Before proceeding, the terminal will caution you that it's going to clear the drive. Ensure that the drive doesn't contain any vital data, which should be the case if you've already formatted it following the previous steps. To proceed with erasing the drive, press Y followed by Return. Be patient as the process progresses; you will observe the status displayed as "Erasing Disk: 0%... 10%... 20%... 30%...100%..."

Step 13: Once the erasing is done, Terminal will start copying the macOS installer file to your USB drive.
Step 14: Once the process completes and you see the Copy Complete and Done message appear on your screen, close the Terminal.
Now you’re USB bootable installer is ready!
How to Use the Bootable USB Installer?
To use a bootable USB drive on a Mac, first identify if your Mac is equipped with an M1 chip or an Intel processor. Ensure your Mac is connected to the internet and supports the macOS version you intend to install.
Now, follow the instructions below:
For M1 or Apple Silicon Chip
- Plugin the bootable USB installer drive into your Mac system.
- Switch on your Mac and hold the power button till the Startup Options window appears, showing bootable volumes.
- Select the bootable USB drive and click Continue.
- Follow the instructions on the screen in the macOS installer window.
For Intel Chip Powered Mac
- Plugin the bootable USB drive in your Mac system.
- Press and hold the Option key (⌥) immediately, once you have turned on or restarted your Mac.
- Release the Option key once a dark screen showing bootable volumes appears.
Note: Before you proceed, make sure that the external Boot setting in Startup Security Utility is selected to allow booting from external media.
- Choose the volume you created as bootable USB installer drive and click Return.
- From the Utilities window, choose Install macOS or OS X.
- Click Continue and follow the instructions that appear on your Mac’s screen.
Bottom Line
Creating a bootable USB drive is helpful when installing macOS on multiple systems or on separate hard drive partitions. You only need a USB drive, with at least 16 GB of free storage space and some technical know-how.
It's important to note that executing the Terminal command to create the bootable drive will erase any existing data on the USB. If data is lost or deleted, it can be retrieved from your device or any external drive using Stellar Data Recovery Professional for Mac.


Rishabh is a senior content specialist at Stellar Information Technology, where he writes about comprehensive data care solutions.
 5 min read