“I have two outdoor cameras and a video doorbell in my front yard, an outdoor camera in my backyard, and an indoor camera. I have been very pleased with the cameras and the security they provide until they all stopped recording motion detection today.”
Blink cameras are security cameras widely used for indoor and outdoor surveillance. They are known for their motion recording features, which immediately scan movement within their field of view, save the clips to either local or Cloud storage, and send real-time notifications on your tablets, smartphones, or PC. However, Blink camera users often complain about problems like 'blink camera not detecting motion or failing to record,' which results in a compromised security system.
Let’s read this article to learn more about this issue. Learn why the 'Blink camera is not detecting motion' and how to fix it.
Why Blink Camera is Not Recording?
The above scenario is only one of many where users witness a 'Blink camera not recording' Error. Sometimes, this issue occurs due to a weak Wi-Fi signal or a low battery. Here are some potential causes of a blink camera not detecting motion.
1. Insufficient Power
When turned on, the motion recording and Live View features of Blink cameras consume significant power. Since Blink devices are battery-powered and last up to 2 years, keeping these features continuously turned on can lead to battery depletion, affecting the camera's ability to detect motion.
2. Network Connectivity Problems
A weak Wi-Fi connection prevents Blink camera from recording properly, resulting in poor video quality.
3. Motion Detection & Sensitivity Settings
An incorrect motion detection setting can be why the motion detection feature in the Blink camera is not working. Low motion sensitivity settings cause the Blink camera to miss motion events, whereas high motion sensitivity settings lead to false alarms.
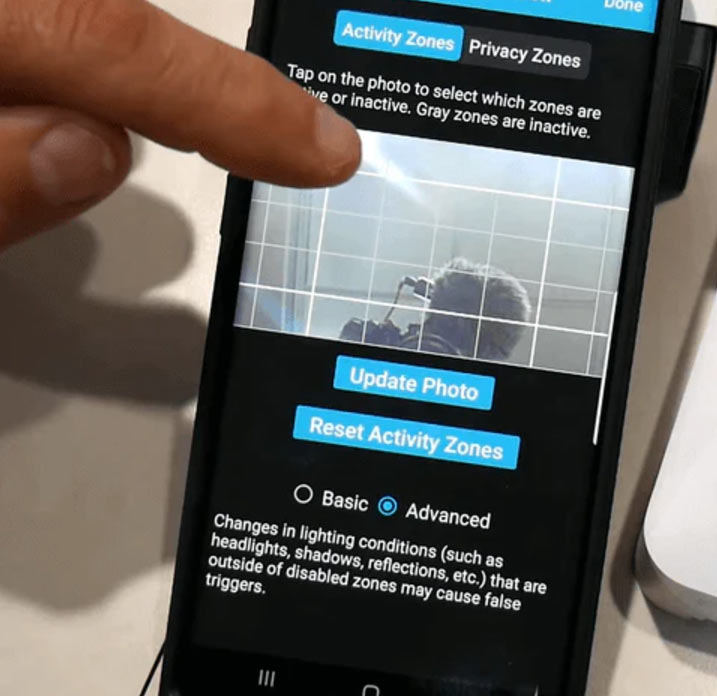
4. Misconfigured Activity Zones
Activity zones in a Blink camera allow you to define certain areas within the camera's field of view where motion detection should be focused. However, misconfigured activity zones can result in missed or irrelevant alerts.
5. Disarmed Camera
'Armed' means the state where Blink camera actively monitors and records motion events. When the camera is 'disarmed,' it will not detect motion, even if the motion detection is turned on in the Settings.
6. Issue with Sync Module Connectivity
The Sync Module connects Blink cameras to the Blink app on your phone and cloud storage. When this Sync Module is not connected properly, your Blink camera will not record motion.
7. Camera Firmware Update
If you are using an outdated Blink app or outdated camera firmware, it causes recording malfunction in the Blink cameras.
8. Storage Limitation
If your cloud storage subscription is full, new footage from the Blink camera will not be uploaded to cloud. Moreover, if the cloud subscription expires, Blink will stop recording motion. Also, a lack of available storage on the USB drive can prevent camera recordings from being saved.
9. Camera Placement
The placement of the Blink camera determines how well it detects motion. Improper camera placement or obstruction in the camera’s path can result in missed motion detection.
How to Fix Blink Camera Not Recording Error?
If your Blink camera is not recording or detecting motion, here's what you can do to resolve this issue.
A. Replace the Blink Camera Battery
Low or depleted batteries may be responsible for the 'Blink camera not recording issue.' So, check the battery level of your Blink camera and if it is low, replace it. Here's how:
- Open the Blink app on your smartphone. Tap on Settings > Device Settings > select the desired camera.
- Scroll down to the Battery section to see the current status. If the battery level is low, replace it.
To replace the battery, open the battery compartment, remove the old batteries, and dispose of them. Next, insert the new batteries and close the battery compartment.
Moreover, limiting the use of the Live View feature, shortening the motion clip length, and repositioning the camera can help save battery life.
B. Check Wi-Fi Connection
Blink cameras rely on internet connectivity to send recorded footage to the Cloud, so an unstable and fluctuating Wi-Fi connection can prevent it from recording. Here’s how to address this problem:
- Use a stable and strong Wi-Fi connection to ensure your Blink camera is working smoothly.
- Place the camera near your Wi-Fi router.
- Ensure your Wi-Fi is working fine and devices connected to it are also working.
- Often, rebooting the Wi-Fi can fix connectivity issues.
- Since Blink camera supports 2.4 GHz frequency band for connectivity, make sure your Wi-Fi works on this band only.
C. Check Motion Detection and Sensitivity Settings
Adjusting motion detection and sensitivity settings are essential for Blink camera to accurately detect motion. Here's how to activate motion detection settings:
- Open the Blink app on your smartphone and select the desired Blink camera.
- Go to Camera Settings > Motion Settings > Motion Detection
- Toggle on the Enable option to activate the motion detection feature.
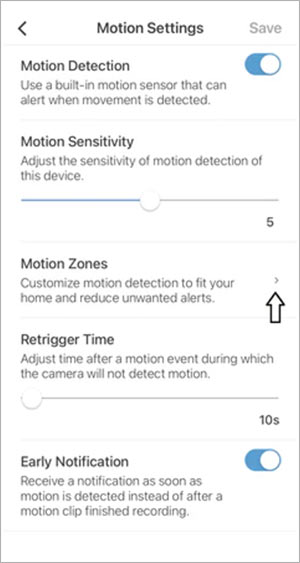
Here’s how to configure sensitivity settings:
- Open the Blink app and select the desired camera.
- Go to Camera Settings > Motion Settings.
- Move the Motion Sensitivity slider to adjust the sensitivity of motion detection of the camera. Tap Save to save this setting.
D. Check Activity Zones
Ensure the activity zones in the Blink cameras focus on movement in the right areas.
E. Arm Your Camera
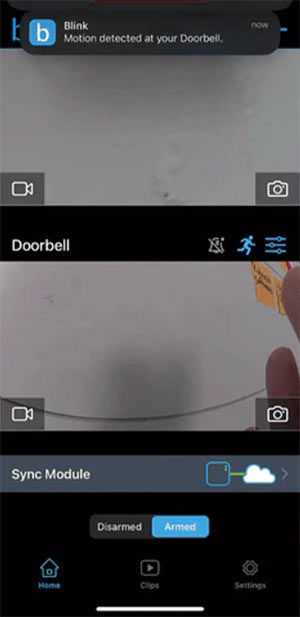
An Armed Blink camera will recognize the movement and notifies you. Here’s how to arm your Blink camera:
- Open the Blink app and go to the camera view.
- At the bottom of the screen, you will see Disarmed and Armed toggle.
- Move the toggle from ‘disarmed’ to ‘armed’ to activate the motion detection.
F. Ensure your Sync Module is working properly
Troubleshooting the Sync Module connectivity issue can help you solve the problem where the Blink camera is not recording; however, it involves a few steps:
- Check Internet Connection: Ensure your Sync Module is connected to a stable internet connection.
- Reboot the Sync Module: Unplug the Sync Module, wait 30 seconds, and then plug it back in; this simple reboot can solve any connectivity issue.
- Placement of the Sync Module: Make sure that the Sync Module is placed close to the camera and Wi-Fi router. If it is too far, internet connectivity may not be stable.
- Remove and Reconnect: Try removing and reconnecting the Sync module to refresh the Blink camera communication.
- Open the Blink app and select the Sync module to access the settings page.
- Tap on the Delete Sync Module button and click OK when the pop appears to confirm your choice.
- Next, select how you want to add the serial number: either manually or by scanning it from the Sync Module’s back to confirm ownership.
- When a pop-up window appears, tap Delete to confirm.
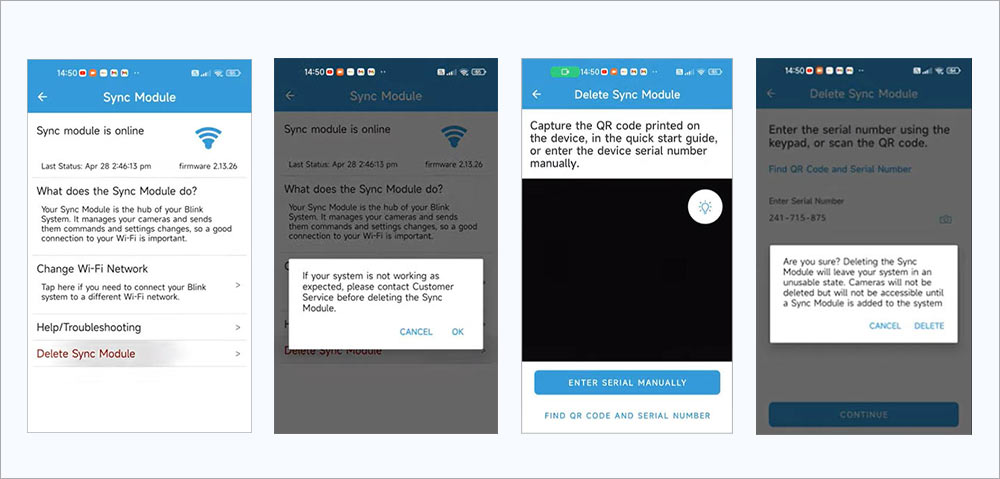
- Reconnect the Sync Module to the Wi-Fi network, arm your system, and check if the Blink camera is recording motion events.
G. Update the Firmware
Outdated firmware on the Blink camera can also cause recording issues. This is why you should always install the latest firmware upgrade on your camera. Here’s how to upgrade firmware in a Blink camera:
- Open the Blink app and tap on the Settings icon.
- Go to Device Settings and select the camera you want to update.
- Scroll down to the Device Info. Here, check the current firmware version.
- A message will prompt you to update the firmware if an update is available.
- Tap the update button and wait. Your camera will restart several times during the update and will not record anything.
Moreover, ensure your Blink app on your smartphone is up-to-date. Go to the App Store on iOS or Google Play Store on Android to check for updates for the Blink app.
H. Check the Storage
Verify if the cloud and local storage usage has any space left to resolve the Blink camera not recording issue.
- Check Cloud Subscription: If the Blink cloud storage subscription has expired, renew it. Also, if the Cloud storage is full, try deleting old videos from Cloud to free up space.
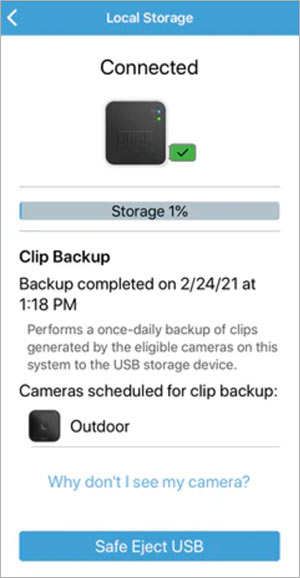
- Check Local Storage: If you're using a Blink camera with USB drive as a local storage, make sure your USB drive should has a minimum 375 MB available space to continue saving the motion recording. Try deleting old Blink videos from the USB drive if the storage is full.
When deleting old footage, if you accidentally delete any important video, you can easily restore it from the Cloud. However, in the absence of backup, you can use efficient video recovery software like Stellar Photo Recovery to recover deleted Blink videos from its USB.
Read the blog on how to recover deleted videos from Blink camera.
I. Ensure Optimal Camera Placement
The placement of the Blink camera affects how well it detects the motion. Here’s what you should consider while placing the blink camera:
- Avoid blind spots: Don’t place the camera facing a wall or in areas with limited movement.
- Identify critical areas: Place cameras to cover key areas without obstruction, such as doorways, driveways, or pathways.
- Lightning conditions: Don't place the camera directly in sunlight or bright lights, as it could interfere with the recording quality.
- Consider the field of view: Place the blink camera within 5 to 20 feet from the area of focus. If the camera is too close or far, it will reduce the Blink camera’s ability to capture the footage.
- Height and Angle: Mount the camera so that it monitors the desired area without distortion or glare. Ensure the camera’s angle is adjusted to capture both high and low zones, depending on the area you are monitoring.
Conclusion
So, now you know all the possible reasons and solutions for fixing the Blink camera not recording issue. Sometimes, replacing the battery, checking the Wi-Fi connection, or updating the firmware can solve the problem. Other times, checking motion detection and sensitivity settings or arming your system might help. If none of the troubleshooting methods help you resolve the recording error, get assistance from the manufacturer.


 5 min read