Microsoft Word for Mac is a useful word processing application that is used as an alternative to Pages, which is the native app with similar functionality. Word for Mac saves your working files in your Mac hard drive that can be opened, edited, or emailed. But, sometimes, Microsoft Word Freezes in the middle of the work. This freezing can happen due to some issue with the app, hard drive, or macOS. And, you may lose the unsaved Word file on macOS.
Don't worry. Read on to know how to unfreeze your Microsoft Word application. And, learn different ways to resolve the freezing issue entirely on your Mac. In case you lose your Word files, you can quickly recover them using the free data recovery software for Mac that you've downloaded in the beginning.
Unfreeze Word for Mac
When your Microsoft Word for Mac freezes, it will become normal after a few seconds; so, stop doing any further activity on your Mac and let macOS resolve the issue automatically. You won't lose any data if you be a little patient. But, if you want to unfreeze Word for Mac immediately, you need to force quit the application.
Caution: When you force-quit Word for Mac, the application won't prompt you to save the unsaved Word file. So, you'll suffer data loss. However, you can use the auto-recovery feature of the Word or a data recovery software to salvage your files.
Use any one of the following force-quit methods to unfreeze Word for Mac:
- If your MS Word for Mac is active, you can use Option + Shift + Command + Esc to force quit your Word application immediately.
- Or, go to Dock, press the Option key, and secondary-click the freezing Word for Mac icon. The Quit menu option will change to Force Quit. Select it to force quit Word.
- Or, go to Apple menu > Force Quit. Alternatively, use the keyboard shortcut Option + Command + Esc to launch Force Quit Applications window. Select the unresponsive Word application and click the Force Quit button.
- Or, press Command + Spacebar to open Spotlight. Type Activity Monitor and hit Return to launch it. Note down the process ID (PID) of Word for Mac. Now, go to Applications > Utilities > Terminal to launch Terminal. In the command prompt, type kill PID and hit Return. Here, replace PID with the process ID of your Word.
In case you've opened several applications apart from Word, and your Mac is unresponsive to mouse or trackpad, you should take a break and come back after sometimes. Your Mac will complete the demanding piled up task and will function properly. And you won't lose your data.
But if you want to force quit unresponsive applications, use any one of the methods explained before. Or else, you can force shutdown your Mac by pressing the power button for few seconds.
This unresponsiveness of your Mac indicates that it's low on RAM or free storage drive space. You should increase your RAM (if possible) and clean up your Macintosh HD to regain free space and boost your Mac performance.
Use First Aid of Disk Utility
Your Mac hard drive requires repairing to eliminate Microsoft Word freezing issues. Steps to repair Mac hard drive using Disk Utility are as follows:
a) Open Disk Utility on your Mac in which the Microsoft Word application is freezing.
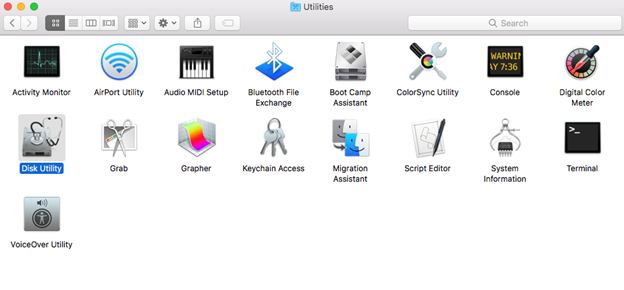
Image: Utilities Screen Containing Disk Utility
b) From Disk Utility's sidebar, select your Mac hard drive, then click First Aid tab from the top.
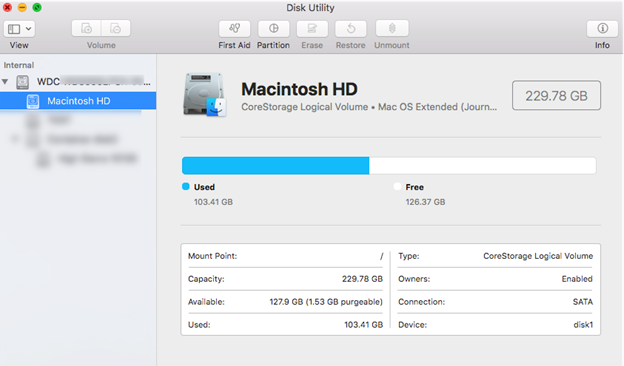
Image: Disk Utility Screen
c) Click Run to start the repair process and wait till the repair is complete.
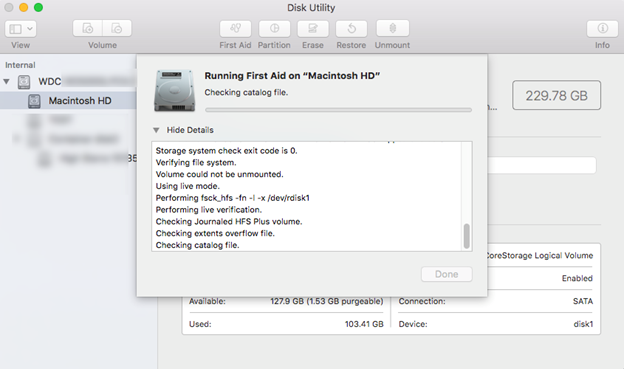
Image: Running First Aid on Macintosh HD
After your Mac hard drive is repaired, the freezing issue of Microsoft Word for Mac might get resolved. In case it doesn't, continue reading.
Update Microsoft Word
When Microsoft Word for Mac is not up-to-date, you can try updating the application to fix any issue that results in freezing of your Mac. Perform any one of the following methods:
- Launch the Mac App Store from Dock or Finder. From the App Store window, click the Update button next to Word for Mac app.
- Or, launch Word for Mac. From the top menu, go to Help > Check for Updates. If you can't see, run Microsoft AutoUpdate tool and check for updates. In the Microsoft AutoUpdate message box, select the "Automatically keep Microsoft Apps up to date" check box, then click Update.
The update of Microsoft Word for Mac will fix the freezing problem if it is due to software issue. If this doesn't help, continue reading.
Reinstall Microsoft Word
In case of any issue with the installed Microsoft Word application, you can reinstall the app after backing up your Mac by using Time Machine. The reinstallation steps are as follows:
a) Trash the current Microsoft Word for Mac to uninstall the app then empty your Trash.
b) Drag and drop the Microsoft Word for Mac setup file to the Application folder to reinstall it.
After the reinstallation of Microsoft Word for Mac, you won't find any freezing issue. In case you've lost your essential Word files due to reinstallation, accidental deletion, disk corruption, volume formatting, or partition loss, read the next method to get back those files.
Use a Free Mac Data Recovery Software
A free Mac data recovery software is quite helpful to salvage your lost, deleted, or inaccessible Word files on your macOS. The data recovery steps are as follows:
a) Download & install *Stellar Data Recovery Free Edition for Mac on your system.
b) Watch the following video for a quick overview of the data recovery process:
;
*Stellar Data Recovery Free Edition for Mac software can help you free scan your Mac drive and preview the recoverable files. By using the free software, you can recover up to 1 GB of files without any issue. To recover more, upgrade the software to the Professional or Premium edition. Also, you can avail a 30-day money-back guarantee with any Stellar software.
Conclusion
Now you know how to resolve the Microsoft Word for Mac freezing issue. Start by running First Aid of Disk Utility to resolve any bad sectors or other issues. Update the Word for Mac application or reinstall it if required. In case you lose your Microsoft Word for Mac files, try Stellar Data Recovery Free Edition for Mac software to recover them on your Mac.



 5 min read
